Split by Picking Area#
Overview#
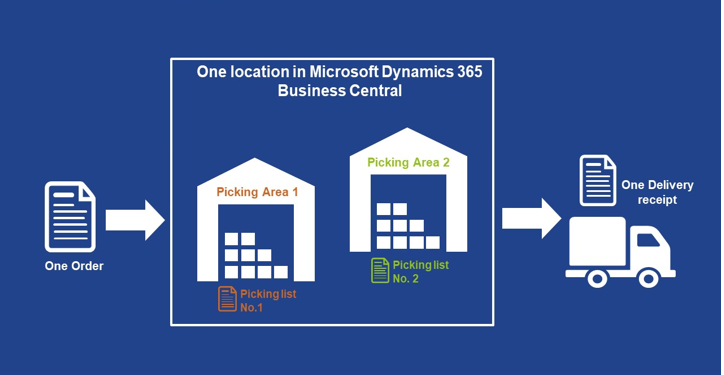
The KUMAVISION Split by Picking Area app allows you to define different picking areas within a location by specifying individual bins. When picking is initiated, the app will create picking lists based on these areas. For each picking area, a separate picking list will be generated. The app can only be used if the company uses a two-staged logistics solution consisting of warehouse shipping and picking. In addition, controlled warehousing may not be implemented.
Benefits of the Split by Picking Area app:
- Optimization of your picking processes
- Quick and simple definition of picking areas
- Clear structure by aggregation of multiple picking lists in a single delivery note
Practical examples:
Example of small and bulky items:
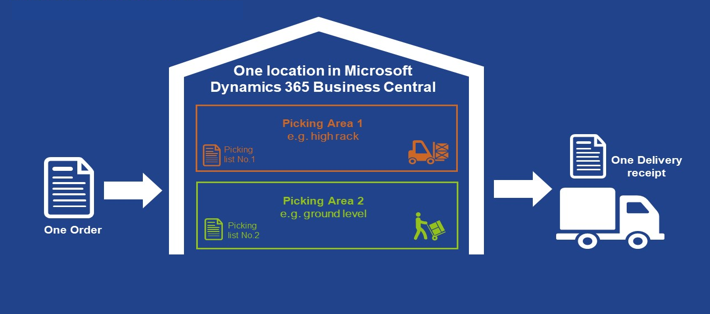
In a particular storage location, small items are picked manually, bulky items by using a forklift truck. The Split by Picking Area app allows you to generate separate picking lists for small items and for bulky items. The customer, however, will only receive a single delivery note.
Example of multiple warehouses:
Your main storage location consists of multiple warehouses. The Split by Picking Area app allows you to generate one picking list per warehouse – instead of a single overall picking list.
Introduction#
Split by Picking Area | KUMAVISION App from KUMAVISION on Vimeo.
Get KUMAVISION Split by Picking Area from Microsoft AppSource
Setup#
After successful installation of the app, some setup steps are required. These are explained below.
Location#
You need to enable the following switches for the location where you want to define picking areas:
- Split Picks By Picking Area
- Require Shipment
- Require Pick
Note
The Split Picks By Picking Area field has been added to the Location card automatically after successful installation of the app.
All other fields are default fields.
Create picking areas#
To define the picking areas for your location, use the Tell Me function to open the Picking Area List.
Click New in the ribbon to define a new picking area, using the following fields:
| Field | Description |
|---|---|
| Location Code | Select the location code of the location for which you want to define the picking area. |
| Code | Assign a meaningful abbreviation for the picking area, e.g. High. |
| Description | Enter a description for the picking area. Example: High-level rack. |
Assign areas to bins#
To assign picking areas to the bins existing in a location, open the location and then click Bins from the ribbon. The Bins card opens. Here, you can assign the desired picking area to each bin by selecting it in the Picking Area Code field.
Use the app in your processes#
Once all setup steps have been completed, the system will generate separate picking lists for each picking area in the warehouse shipping process.
Examples#
Example 1: Small and bulky items#
Your items are stored in a location where the warehouse employees pick smaller items from the floor rack manually, while picking bulky items from the high-level rack using a forklift truck. This means that you need to create two picking areas. If an order includes mixed items from the high-level rack and from the floor rack, two picking lists will be generated. Your warehouse employees can then start with picking the floor rack items manually and then pick all items from the high-level rack using the forklift truck.
Example 2: Different Warehouses#
Your main storage location consists of different warehouses. Instead of creating one picking list for all warehouses, the app will generate a separate picking list for each warehouse.