Create a Project#
Overview#
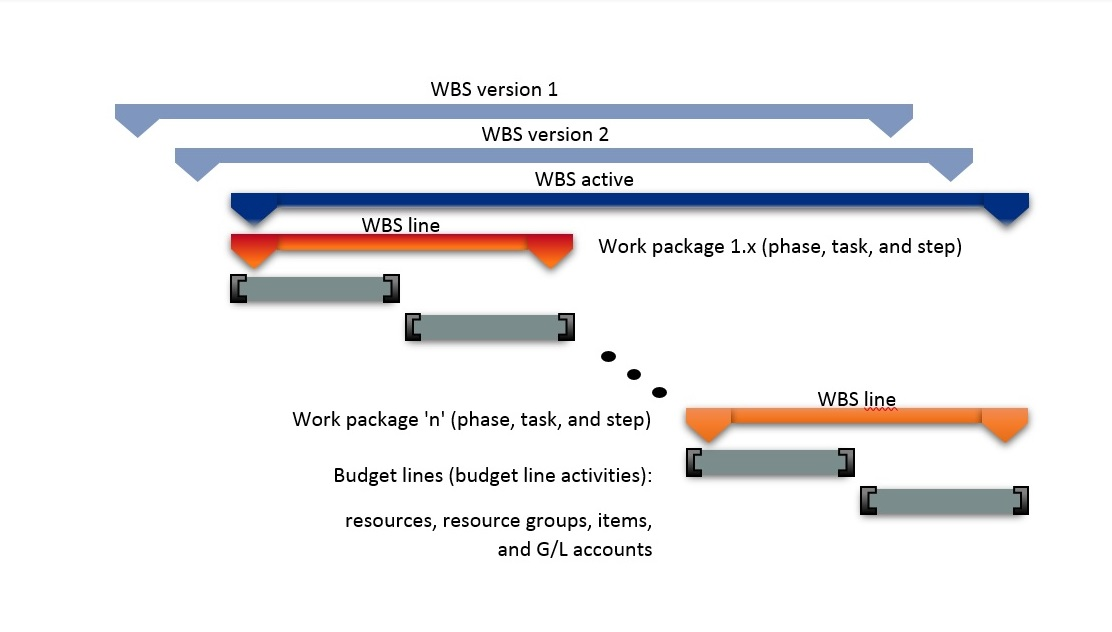
A detailed work breakdown structure (WBS) can be a great help in project management.
For this reason, you can enter both a work package code and a group of phase, task, and step codes on the WBS lines of a project. Combined, the four codes not only provide you with a more granular view of your project but uniquely identify each WBS line. As a result, you can enter the same package on more than one line if at least one of the other codes differ.
You can then create budget lines for WBS lines that store work packages and—if you need an even deeper breakdown of project activities—use these budget lines to keep track of tasks assigned to individual resources.
If, on the other hand, you don’t want to work with budget lines (that is, with a budget view), you can schedule activities directly on the work breakdown structure. You can also assign a project to a main project. The following chart shows you how projects are structured within project365:
Fill in basic project data#
To set up basic project information:
- Choose the Search icon, enter Projects, and then choose the related link.
- On the ribbon, choose New > New to create a project.
- Fill in the fields as necessary.
See the following tables for more information about the most important fields on project cards. Some are filled in automatically when you use a project template (as noted in the Description).
General#
| Field | Description |
|---|---|
| No. | Uniquely identifies the project. You can enter both numbers and letters or have the system assign a number from a series automatically. With the OnAssistButton, you can select from the available number series. The number of an existing project cannot be changed. |
| Customer No. | Shows the number of the customer for whom you want to create quotes and orders (unless the project has been specified as internal according to its project type, in which case this field remains blank). |
| Sell-to Contact No. (Cust.) | Shows the number of the person or company entered in the Customer No. field. If the project is set to Quote, you can select a contact who hasn’t been made a customer yet. As in the sales area, however, a contact must be turned into a customer before a quote can be converted into an order. |
| Sell-to Customer Template Code |
If a project in the Quote stage is set up for a contact who has yet to be made a customer, the code you select here will be used to fill in the fields that are needed to create quotes for the project. The code is also used when you turn a contact into a customer. |
| External Project No. | Specifies a document number that refers to the customer's numbering system. Note This number is only available on the project card and isn’t copied to sales documents created from the project. |
| External Document No. | Specifies a document number that refers to the customer's numbering system. When you create a sales document, this number is copied to the document field with the same name. |
| Your Reference | Specifies the customer’s reference. When you create a sales document, the value in this field is copied to the document field with the same name. It will also be printed on the document. |
| Status | Indicates the status of the project. A status must be assigned. You can choose one of the following options: • Planning • Quote • Open • Completed The status has an impact on many parts of the app; for example, a customer invoice cannot be created if the project is set to a status other than Open. Some status changes might also be blocked by the system, such as when open documents still exist for a project that you want to set to Completed. A status change might additionally be copied from the WBS lines (that is, work packages) of one document to the lines of another, such as from a quote to an order. Typically, when a project’s status changes to Completed, its work packages change to Finished automatically, as can be seen in the Work Status fields on the relevant WBS lines. If neither costs nor sales were posted to the packages, however, the lines will be set to Canceled instead. (This field might be filled in from a project template.) |
| Final Invoice Created | Part of the end stage of a project. Turned on, the toggle confirms you created a final customer invoice so that the project can now be posted to G/L. The project is then set to Completed. |
| Person Responsible | Indicates who manages the project. When you fill in this field, the project is added to the My Projects list of the person linked to the selected resource. The system then copies to the project the dimension values entered for this resource in the Dimension Integration field in Resources Setup, allowing you to evaluate cross-project performance. The resource in this field is also used as a filter when time entries are posted to the project journal. This way, a change in who manages the project will only affect new time postings. |
| Fill-In for Person Responsible | Enter the deputy project manager. This field has no functionality besides providing textual information. |
| Project Type | Enter a classification code for the project. The type plays an important role in setting up accounts for monitoring project progress and performance. For example, you can use the type to analyze the cost and profit margins of certain types of projects. (This field might be filled in from a project template.) |
| Use WBS Res. Prices | With the toggle turned on, the resource prices stored on WBS or budget lines are used for pricing. For more information, see About Resources. (This field might be filled in from a project template.) |
| Manual Update on Opening WBS Lines | With the toggle turned on, fields on total lines aren’t updated when you open a work breakdown structure. This might be necessary if the process is causing performance issues. |
| Responsibility Center | Like selecting a responsibility center for a sales or purchase document, selecting a center for projects limits a user’s view to projects that fall under the specified area of responsibility. |
| Blocked | Prevents users from posting to the project in the following ways. Posting Blocks postings of both revenues and expenses but permits changes to basic project information and planning data. All Blocks both postings and changes to project planning (WBS and budget). Times Blocks time recording, for example, in time journals and on CTC cards. Allows postings elsewhere, including in project journals, on purchase credit memos, and on sales credit memos. Also allows changes to basic data and work breakdown structures. |
| Main Project Assignment | Shows the number of main projects that the project is assigned to or, if it is assigned to only one, the description and code of the main project. You can click the field to see the card of a main project or to set up one if none has been assigned. |
| Contact No. for Time Tracking | Specifies if and how contact numbers should be entered for recording time spent on sales and marketing projects (which do not require that you fill in a customer number). Options are: (blank) No support of time tracking and no requirement for filling in a contact number. Optional Partial support of data entry by showing you a list of all company contacts stored in the system when you enter the number of the project. However, no requirement for picking a contact from the list. Required Same as Optional, except you must choose a contact number; without it, times cannot be posted to the project. You can use this feature, for example, in combination with BI tools to analyze the sales and marketing expenses allocated to a contact. When hours recorded by a contact are posted to the project, the number of the contact is copied along with other data to the time entries created for the project and from there to the project ledger entries. |
Posting#
| Field | Description |
|---|---|
| Time Posting Level | Specifies the level at which times can be posted by resources. This field is used on time sheets, CTC cards, and intercompany orders. WBS Hours are posted at the work package level (via WBS lines) to an active work breakdown structure. Budget Hours are posted at the budget line level. Additionally, the related line activity numbers are retrieved for use in budget-to-actual comparisons. Note When time is posted, the Budget option also posts the entries to WBS lines if no budget lines exist. This is because some WBS lines, such as those to record travel times, are not fine-planned so that no budget lines are available for them. (This field might be filled in from a project template.) |
| Purchase Posting Level | Specifies the level at which costs are allocated to purchase documents. See the Time Posting Level field for an explanation of the options that you can choose here. (This field might be filled in from a project template.) |
| Project Doc. Posting Level | Specifies the level at which costs are allocated to a project document, such as a project (vendor) shipment. See the Time Posting Level field for an explanation of the options that you can choose here. (This field might be filled in from a project template.) |
| Gen. Journal Posting Level | Specifies the level at which postings are assigned to general journals. See the Time Posting Level field for an explanation of the options that you can choose here. (This field might be filled in from a project template.) |
| Project Journal Posting Level | Specifies the level at which costs are allocated in project journals. See the Time Posting Level field for an explanation of the options that you can choose here. (This field might be filled in from a project template.) |
| Sales Posting Level | Do not worry if this field does not show. It is not strictly necessary, as every WBS line includes a checkbox (Copy to Sales Doc.) to specify how the line should be posted to sales. |
| Check Team at Time Posting | With the toggle turned on, only the team specified for the project can post to it. The project will also be hidden from anyone who is not a member of the team. This field becomes active after you turned on the Team Filter on Time Posting toggle in Projects Setup. If the toggle is turned off, the project is assumed to be shared so that all resources can post to it. (This field might be filled in from a project template.) |
| Strict Time Budget | With the toggle turned on, resources cannot exceed the time budgeted for them. Entering more than the budget allows will result in an error message. A crucial factor in this context is the level at which times are being recorded. The WBS budget is used as the baseline when hours are recorded on WBS lines, that is, for work packages. If they are not, the values on the budget lines (the line activities) are used to compare the amounts budgeted to the amounts posted and the times captured but not yet posted. Note A check is only performed for budget or WBS line quantities greater than 0. (This field might be filled in from a project template.) |
| Location Code | Specifies the code of the location that items for this project should be removed (posted) from. The code is copied to all WBS lines by default and from there to the related budget lines. When you create a purchase document or a project (vendor) shipment from a budget line, the location is retrieved from that line. You can specify a location as early as creating a project template. |
| Bin Code | Specifies, based on the location, the code of the bin that items for this project should be removed (posted) from. The code is copied to all WBS lines by default and from there to the associated budget lines. When you create a purchase document or a project (vendor) shipment from a budget line, the location is retrieved from that line. You can specify a bin as early as creating a project template. |
| Invoice Qty. % fixed in Budget Lines | With this toggle, you specify whether the Invoice Qty. % fixed checkbox is automatically activated or deactivated when creating new project budget lines from the project. Further information on this can be found in the section WBS and Scheduling – Set up budget lines. |
Invoice and Shipping#
| Field | Description |
|---|---|
| Bill-to | Shows the customer whom you want to invoice. If you select Default (Customer) here, the bill-to customer is identical to the Sell-to Customer in the project header. The other options allow you to specify a different bill-to customer. You can specify a different bill-to address or a completely different customer. |
| Bill-to Contact No. (Cust.) | Shows the customer contact to whom invoices are sent. This contact can be different from the person or company entered in the Customer No. field. If a project is set to Open, you can also choose a contact who isn’t a customer yet. |
| Bill-to Code | Use this field to select an alternative bill-to address for the customer. Bill-to addresses can be defined on the Customer Card. Bill-to addresses usually refer to the customer’s accounting department or another office at the customer’s that is responsible for the processing of invoices. On the Customer Card, one of these addresses can be set as the Default Bill-to Address. This address will be used automatically in projects and sales documents. |
| Payment Terms Code | Filled in automatically based on the Bill-to field but can be changed manually. The code in this field is also copied to sales documents created from the project. |
| Payment Method Code | Is preset via the Bill-to Customer and can be changed in the project. The code is inherited by the sales documents created for the project. |
| Gen. Bus. Posting Group | Filled in automatically based on the Bill-to field but can be changed manually. The group in this field is also copied to sales documents created from the project. |
| VAT Bus. Posting Group | Filled in automatically based on the Bill-to field but can be changed manually. The group in this field is also copied to sales documents created from the project. |
| Payment Plan Level | Creates a payment plan for an entire project or for individual WBS lines. |
| Ship-to Code | Contains the code of a shipment address that you want to store with the customer. |
| [Other Ship-to fields] | These fields show the exact address for project shipments. Nearly all of them can be changed manually. |
| Invoice Currency Code | Specifies the currency code that will be used to convert budgeted prices into the invoice. In addition to the company currency, sales amounts can also be planned in the billing currency within the project structure plan. All sales documents and subsequent invoices will be issued in this currency. Changes are no longer possible once project ledger entries have been posted because time and materials entries are both maintained along with the planned sales amounts in LCY and in the billing currency. Changing the billing currency is not possible through a change of the bill-to customer either if the project has already been posted. In this case, the customer can still be changed, but the customer’s deviating currency code will not be copied to the project. |
| Invoice Currency Date | Specifies the date that will be used to convert budgeted prices into the invoice currency. The exchange rate calculated on this date is then stored in the Invoice Currency Factor field. Note: This field is only shown if a currency code is entered in the Invoice Currency Code field. |
| Invoice Currency Factor | Specifies the exchange rate that will be used to budget sales amounts on the WBS. The rate is copied from the associated exchange rate table but can be changed manually. Depending on whether the unit price is in local currency or in the invoice currency (after having been entered manually or by the pricing function), the other price is calculated based on the factor given in this field. Note: This field is only shown if a currency code is entered in the Invoice Currency Code field |
| Use Project Currency Factor on Sales Docs. | Turn on this toggle if the exchange rate specified in the Invoice Currency Factor field should be used both for project planning and in sales documents. Otherwise, the current exchange rate will be used when a document is created. |
| Use Project Currency Factor in Usage | Turn on this toggle if the exchange rate specified in the Invoice Currency Factor field should be used for both project planning and consumption posting (purchase documents, project recordings). Otherwise, the current exchange rate will be used when a document is created. |
Duration#
| Field | Description |
|---|---|
| Starting Date | Indicates the date on which work on the project started. This field must be maintained manually. |
| Fixed Starting Date | With the toggle turned on, planning cannot occur before this date. |
| Ending Date | Indicates the date on which work on the project is expected to end. This field must be maintained manually. |
| Fixed Ending Date | With the toggle turned on, you can no longer schedule something on the WBS after this date. |
| Ending Date on Order | Shows when the project was set to Open. This makes it possible to check later if the originally planned ending date changed throughout the duration of the project. |
| Creation Date | Shows the date on which the project was created. |
| Closing Date | Shows when the project was set to Completed. |
Planning#
| Field | Description |
|---|---|
| Planning Direction | Specifies the planning direction for automatic planning. |
| Sales Project Acc. Entries From | When you monitor project progress and performance, project account entries represent the budget of a project, with time and materials entries time-linked to this budget. Sales budget values, on the other hand, can be linked to either the budget or a payment plan. Choosing Payment Plan copies the plan stored with the project to cost control in the form of a revenue plan. Choosing Project Budget in this field copies the sales budget instead. You can then use the following two fields to decouple sales from consumption over a certain period. |
| Base Sales Project Acc. Entries | If you choose Project Budget in the preceding field, you can select in this field whether you want the system to use the expected date of consumption to create analysis entries or a formula based on that date. |
| Formula Sales Project Acc. Entries | If you choose Project Budget in the Project Sales Project Acc. Entries From field, fill in this field with a formula to decouple budgeted sales from consumption. For example, if you’re expecting an item to be used in June, the revenue generated from it can be moved to July by using the formula +1M. The formula applies to an entire project; you cannot decouple consumption for individual entries. |
| Active Project Budget Name | Shows the name of the project budget used for the active WBS. |
| Active Version No. | Shows the version number of the active WBS. |
| Fixed Time Period | If this toggle activated, times posted by resources are checked against the period specified on the budget line, WBS line, or in the project. If CTC cards are used to post time spent on projects, the check is performed when a card is released. |
| Cost Status | This field, set by the project manager, shows the project's cost performance. It is part of multiple role centers, such as Project Accountant. The system uses the following colors to indicate performance: • On Budget = Green • Warning = Yellow • Alarm = Red |
| Time Status | This field, set by the project manager, shows the amount of time spent on the project. The system uses the following colors to indicate whether projects are on track: • On Time = Green • Warning = Yellow • Alarm = Red |
| Scope Status | This field, set by the project manager, shows how the project is progressing. The system uses the following colors to indicate if projects are on track: • In Scope = Green • Warning = Yellow • Alarm = Red |
Internal Information#
| Field | Description |
|---|---|
| Cause of Absence Code | Specifies for special projects to which codes users can post inactivity. |
| Last Date Modified | Shows when the project was last modified. |
| Project Template Code | When you create a project, you can select a project template to have several fields filled in automatically. For more information, see Create Project Templates. |
| Copy WBS From Template | Specify from which project template you want to create the WBS. This field is filled in automatically with the template used to create the project. You can choose a different template in this field after you set up a project but before you create a WBS. |
| IC Partner Ship-to Customer Address | Description to follow. |
Dimensions#
| Field | Description |
|---|---|
| Global Dimension Code 1 | Specify a global dimension that will be posted to the lines. |
| Global Dimension Code 2 | Specify a second global dimension that will be posted to the lines. |
| [Other fields] | All these fields contain other shortcut (default) dimensions from the Dimensions table. Fill them in if you want to use certain dimensions and values from the standard table as the default for making postings that include this project. For more information about dimensions, see the Microsoft Dynamics 365 Business Central1 documentation. |
Project Billings#
On this FastTab, you can specify if and how you want proofs of services to be printed when you bill work based on time and materials.
All fields on this tab also show up on sales documents such as orders and invoices. The values in these fields are copied there from the project card.
You can, however, edit them again in the sales area.
| Field | Description |
|---|---|
| Print Attachment | With the toggle turned on, an attachment—which provides proof of services rendered—is printed alongside an invoice. Leave the toggle turned off if you want users to decide whether to print the attachment. |
| Print Hours Worked | With the toggle turned on, documents show both the services rendered and the hours spent providing those services. |
| Print Not Billable | With the toggle turned on, documents show services that aren’t billed. |
| Print Grouping | Specifies according to which criteria you want to group services rendered: • Resource • Resource/Line Activity • Line Activity • Line Activity/Resource |
| Print Document No. | Turn on this toggle if you want printouts to show document numbers—for example, from purchase invoices—together with the services rendered. |
| Print Item Lines | Turn on this toggle if you want item lines printed on attached documents. Proof is often only requested for services. |
| Print Resource Name | With the toggle turned on, attachments show the names of employees who worked on the project. Leave the toggle turned off if you want proofs of services to show only the resource numbers and descriptions of activities. |
Intercompany#
| Field | Description |
|---|---|
| No. of IC Partners | Specifies the number of IC partners to which the project was sent. |
| Source IC Partner Code | Indicates if the project was created by another company and then copied from there. |
| Source IC Partner Project No. | Shows the number given to the project by the company that set up the project. This field is blank if the project wasn’t created by another company. |
| IC Review Status | Projects transferred from other companies must still be processed by using the IC Review action. This field shows if the review has already occurred. |
| IC Review Res. Prices Open | Indicates if new resource prices were transferred from a partner and require review. |
| IC Review WBS Lines Open | Indicates if new WBS lines were transferred from a partner and require review. |
| IC Review Budget Lines Open | Indicates whether new budget lines were transferred from a partner and need review. |
| ICP Ships to Customer Address | Specifies if you want the shipping address entered for the project copied as the delivery site to a service company during IC transfers. With the toggle turned off, the project is delivered to the business billing the service, that is, the customer address entered in the company the project is copied to. Note This field might already be filled in from a project template. |
Project status#
The status options are crucial to determining the next steps you need to take when managing a project.
Planning
Preliminary estimates can be created. You can also specify the project structure, that is, you can choose work packages and phase, task, and step codes. You can then add budget lines to WBS lines of the work package type. You, however, cannot post anything at this point. Strictly speaking, this status isn’t required, and most projects start on Quote.
Quote
Services can be offered to customers. Preliminary estimates are again possible as well. You can also change the structure and budget of the project.
However, unless the Project Posting in Quote Status toggle is turned on in Projects Setup, you still cannot post anything to the project.
Open (=Order)
When the project is set to Open, you can record and post times and purchase costs and use sales invoices and credit memos to post revenues.
WBS lines can also still be changed at this point.
And if you didn’t turn on the Project Posting in Quote Status toggle in Projects Setup, this is the only project stage in which you can post something.
Completed
You can no longer edit the project structure and budgets. This status is used to perform post-project calculations. Actual project costs can then be compared to budgeted amounts.
You cannot post to completed projects.
Create a project from a template#
There are two ways to create a project from a template:
- Choose the Search icon, enter Projects, and then choose the related link. On the ribbon, choose New > New. Alternatively, open a project card and—on the ribbon—choose New.
- Go to a project card or the project list. On the ribbon, choose New > Walkthrough.
Both methods are explained in the following.
Use the New action#
Choosing the New action on the project list or card creates a new record with a blank No. field.
You can now enter a number from a series, or you can exit the field.
Exit the field. You are asked if you want to use a project template. Choose Yes and then choose a template so that a number can be assigned automatically.
The template will also fill in multiple fields on the new project card. The rest needs to be filled in manually.
Additionally, if the Check Mandatory Project Fields toggle in Projects Setup is turned on, the project will be blocked until you entered something in all fields required for new projects. For more information, see Mandatory Field Check.
Then, you can use the Create WBS from Project Template function to prepare the work breakdown structure based on the template.
Use the Wizard#
Select Walkthrough: Create a New Project to use a wizard to create a new project.
Make sure to complete the individual steps of the wizard, where you can enter basic information such as Person Responsible, Starting Date, and Customer. When using the wizard, you are required to select a project template. In the last step of the wizard, you have the option to create a work breakdown structure (WBS) from the template; however, you can also choose to do this later.
As an alternative to creating the WBS from a template, you can also launch the Project Configurator directly from the wizard. Depending on whether you have selected the Create WBS from Template option in the wizard before, either the WBS is either directly via the Project Configurator or this configuration is saved for later. For more information, see the following section.
Note
If you select a template that is specified as internal via the Project Type field, filling in a customer (or a contact in the quote stage) isn’t required. It is, however, for creating any other kind of project.
Project Configurator#
The Project Configuration allows you to create the work breakdown structure by merging various project templates. You can select the required project templates in the desired order. The same project template can be used multiple times. In additional to Main, sub, partial tasks, customer, and project manager can be pre-defined for the project template block to be imported optionally. In addition, headings can be inserted as breakdown elements between the various project template blocks.
If the project configuration is launched from within the wizard, it displays the templates selected before in the Project Configurator. If you selected the Create WBS from Template option, the system creates the work breakdown structure based on the current configuration and then deletes all data from the Project Configurator. Otherwise, you can display the configuration again in the WBS, change and finally import it.
The configurator can be started at any time in a PSP to add further project template blocks to the bottom of the PSP.
Edit projects#
Not every field can be changed at any point throughout the life of a project.
For example, you can no longer switch to another customer after revenues are posted (unless you allow this kind of alteration by choosing the corresponding option in Projects Setup, in the Setup Customer Change Despite Revenue field).
A change in dimensions can also create issues. Because posted project ledger entries aren’t updated during this process, an analysis by dimensions might no longer produce accurate results.
If the Projects Setup toggle Check Mandatory Project Fields is turned on, you need to select the Edit Project action (found on project cards) before you can alter project information. Other users are then blocked from editing the data.
Delete projects#
A project can no longer be deleted if it includes entries (project entries and / or time entries) or measurements. The system also checks for existing references in the document lines.
Selected actions explained#
Create WBS from Project Template#
Creates a work breakdown structure for a project from the template stored in the Copy WBS from Template field. The field is filled in automatically together with the Project Template Code field when you create a project from a project template.
You can no longer choose this action after you’ve added a WBS to the project.
If a WBS Line Batch is specified for the template, the batch (which consists of WBS lines from another template) is automatically inserted at the beginning or end of the new structure, depending on your setup. See also Project Template.
Change Project#
Opens a page that shows some of the fields available on a project card. The page can be used by those who aren’t authorized to create projects but need to edit certain fields on a card (provided they ‘indirectly’ have permission to edit fields on project cards).
Note
The Edit Project action on the ribbon has an entirely different purpose, namely to make the current project card available for editing. This function is used mostly to set up mandatory field checks.
Create Interaction#
Creates an interaction. This function mostly relates to customers and their contacts but might also cover marketing campaigns.
An interaction can be tailored to a specific project and work package.
Update Addresses#
Updates the sell-to, bill-to, and ship-to addresses on a project card from base data. The relevant address is retrieved, for example, from a second customer card if a different bill-to customer is specified or from the ship-to address list set up for the customer of the project.
Note
This function cannot be used for custom (bill-to and ship-to) addresses.
Copy Project to IC Partner#
Copies a project to an intercompany partner. This function is used to review a project transferred by an intercompany partner.
Create User Task#
Creates a user task associated with a project.
This function uses the Related Table and Related Record fields to connect a task to a project.
Change Project Budget Status#
Opens a list of all budget lines of a project.
This action provides a way for you to edit the status of each line in the budget, for example, to set more than one task (line activity) to completed at the same time, without having to drill down on the relevant WBS lines.
Archive Completed Project#
Moves a completed project to the archive.
Archived projects are separated from active projects through filters and can only be opened by running the Archived Projects ribbon function. This helps declutter the standard list of projects to have it focus on (currently) relevant tasks only.
As for where project data is stored, both active and archived projects can be found in the same table so that analytical tools (such as Business Intelligence) don’t require access to multiple tables in the system.
Archived projects can be moved from the Projects Archive back to the overview of active projects using the Reactivate Project function. After reactivation, they remain in the completed status for the time being. If the project is to be reopened for postings, the status must be changed to open.
Project#
Project responsibility centers#
You can assign responsibility centers to projects just like you can to sales and purchase documents.
To assign a center to a project:
- Choose the Search icon, enter User Setup, and then choose the related link.
- Choose a code in the Projects Resp. Ctr. Filter field.
If you fill in one of the other fields but leave the Projects Resp. Ctr. field blank, you will see only sales, purchase, or service documents associated with a particular center but all projects with and without a center.
The Project Resp. Ctr. Filter affects all pages related to a project and cannot be changed by users on those pages. The filter can also be set on some cost control reports.
Note
The responsibility center filter is unavailable for time tracking, given that members of one center might work on projects of another. You can still restrict the selection by using the project team feature.
However, because of the special nature of project-related pages, users will not be able to open the project card or view other data of a project from time tracking.
Advertising groups#
Extended texts that you enter for an advertising group are copied to a project if the group is set up as a general-purpose group or if it has been assigned to the customer of the project. This works in much the same way as when you copy extended advertising group texts to sales documents.
You use extended texts to store general information such as notes on trade shows, special offers, and company holidays.
Dimensions#
The following options are available if you select Dimensions on the project list; else, the associated dimensions can be viewed on the project card.
Dimensions-Single
Shows the dimensions entered for the selected project. You can also enter new ones or change and delete existing dimensions here.
Dimensions-Multiple
Shows the dimensions that have been filled in for the selected projects. Also shows the dimension value codes, which are the same for identical fields.
Statistics#
Shows the budgeted and actual amounts stored for a project, including budgeted values on the WBS.
Comments#
Available for entering comments. These are used internally within a company and aren’t copied to subsequent documents created from a project.
Beginning and ending text#
Beginning and ending texts are copied to sales documents created from a project and can be printed there as well. As the name implies, beginning texts are shown before, ending texts after sales lines on printouts.
Online Map#
Opens the map service that you specified in Online Map Setup to show where a project is located.
Sales doc. project budget change log#
Shows a log of all sales document changes copied to projects.
Interaction log entries#
Shows a list of logged correspondence, such as printed cover sheets or sales orders, letters sent and received, phone calls made, and meetings held. Entries are filtered based on the page on which you selected the action. For example, if you select the action on a project card, the log contains all correspondence logged for this specific project.
User tasks#
Shows all user tasks associated with a project.
Documents#
Shows all documents available for a project. Purchase and sales documents are listed separately, as are open and posted documents.
To view a document, select one and then choose Show on the ribbon. Alternatively, use the lookup on the selected line.
Opportunities#
Gives you access to opportunities that were automatically or manually linked to a project through a sales quote.
Steps#
Used to manage project-specific partial activities. Steps are set up for every single project, whereas phase and task codes are the same for each of a company’s projects.
Contacts#
Used to enter information about the people and companies you’re expected to be in frequent contact with during the duration of a project. You can also assign one of them to a WBS line (for informational purposes).
When you set up a project, the customer selected for it will be entered on the Project Contacts page automatically. The same will be done with contacts specified on sales and purchase documents if the number of the project is entered on the document header.
Additionally, if all lines of a purchase document are assigned to the same line on a work breakdown structure, the WBS line will be linked to the relevant project contact when you release the document.
You can also assign roles (such as customer and vendor) to project contacts. Some of them might be filled in automatically on the project (see Projects Setup).
Project Team#
For more information, see Project Teams.
Budget line activities#
Shows work package-related activities at the WBS line or work package level. For more information, see Budget Line Activities.
Project IC Partners#
Shows a list of all IC partners related to a project. For more information, see Intercompany Work.
Project measurement#
Shows the options for measuring project progress and performance.
For a true representation of a company’s scope of services in accounting, revenues and expenses must be compared from period to period.
Project Bank Accounts#
For each project, you can specify bank details both in the vendor area (Purchase) and in the customer area (Sales). This also applies to WBS lines and budget lines.
In addition, it is possible to specify bank accounts for individual customers and vendors. This information will be used later for payments (only in connection with the Continia banking app).
Project bank accounts are specified on the page with the same name. You can open this page via the ribbon in the project or via the lines menu of the WBS/budget lines.
Note
The functions and pages are only shown if the Project Bank Account Active toggle is enabled in the KUMAVISION Module Setup.
Use the Type field to define the desired project bank account type. The following options are available:
Own Account (Purchase)
Accounts of this type can be used later for payment suggestions in the vendor area. For each purchasing document to be paid, the system will determine your own bank account that will be used for payment. The payment suggestion is then split automatically among your own bank accounts (only in connection with the Continia Banking App).
Own Account (Sales)
In the Project Bank Account Text and Purpose of Use Text fields of Sales & Receivables Setup, default text codes are available for selection. When you release a sales document with a project reference, the system will check whether a project bank account exists. If this is the case, an ending text for the document is inserted automatically; it is based on the default text code selected in the Project Bank Account Text field. The following placeholders in the text are replaced with the corresponding values from the bank account or document:
| Placeholder | Replaced with |
|---|---|
| #NAME# | Bank account name |
| #IBAN# | IBAN associated with the bank account |
| #BIC# | SWIFT code associated with the bank account |
| #AMOUNT# | Payment amount |
If you post an invoice from within a sales document, another text from the Purpose of Use Text quick text will be copied to the posted invoice.
The following placeholders in the text are replaced with the corresponding values from the bank account or document:
| Placeholder | Replaced with |
|---|---|
| #DOCUMENTNO# | Invoice number |
| #DUEDATE# | Due date |
| #AMOUNT# | Payment amount from the document including VAT |
Vendor
This option will be used in connection with the Continia banking app in the future..
Customer
This option will be used in connection with the Continia banking app in the future.
Note
If multiple project bank accounts have been specified for a project that conflict in a sales document, e.g. two WBS lines with different bank accounts assigned to them are referenced in a sales document, a message informs you during the release of the sales document that it needs to be split accordingly. Otherwise, the document cannot be released.
History#
Shows project ledger entries, time entries, and posted invoice entries.
Payment plan#
To specify under which conditions and at which times you want to invoice a project, go to the relevant project card and, on the ribbon, choose Related > Project > Payment Plans > Payment Plan.
Billing can include fixed partial amounts or a percentage of the total. You can also invoice by milestones. Plan entries are used when you create invoice suggestions.
Resource prices#
Whereas item and resource costs are maintained independently of a specific project, the unit prices for items, resources, and other expenses (overhead) can be stored for each project individually.
Unit prices can be set up for items, resources, and G/L accounts. For each, you can enter a distinct unit price or specify a surcharge on unit costs in percent (=unit cost factor). You can also enter a percentage-based line discount.
Additionally, resources can have different unit prices depending on the type of work being performed.
As for unit costs, they aren’t typically maintained for G/L accounts. But you can still store costs you would typically expect for them on the Project G/L Account Prices page. This can be useful in budgeting a project.
You can also specify resource prices per project and IC partner. When a project is later transferred to a partner, the prices are copied to the partner’s Project Resource Prices page. When you then review the transfer, they are assigned to the budget fields on copied WBS lines.
Likewise, they will be added to the times posted by IC partners so that the partners can later bill their services at agreed-on prices.
Planning#
Includes all options for project planning. For more information, see WBS and Scheduling.
WBS (Work breakdown structure)#
Work breakdown structures divide a project into individual stages. They are used to plan, budget, manage, and monitor projects. A WBS can be created from a stored project template and customized.
Budget line list#
Lists all budget lines created for a project.
Budget line activities overview#
Lists line activities (=budget lines set up for resources and resource groups) by work package.
Budgeted resources#
Lists all resources and resource groups set up for a project. Entries are aggregated per resource or resource group.
WBS scheduling#
Used in project planning. For more information, see WBS Scheduling.
Budget vs. actual#
Performs a budget-to-actual comparison based on current project data.
Reports#
Shows you a list of project reports. As a rule, these are filtered based on the current project.
Documents#
Shows all documents for projects related to the main project.
Budget Line Activities#
Shows the line activities that have been set up on the work breakdown structures of projects related to the main project.
Project teams#
You can create one project team for each of your projects by combining some of the resources available in the system. Every resource can be assigned to a project only once.
To set up a team:
- Open a project card.
- On the ribbon, choose Related > Project > Project Team.
- Fill in the fields as needed; in the Job Title field, choose Project Manager, Deputy Project Manager, Secretary, or Subproject Lead, or leave the field blank.
A team is changed or amended when you:
- Enter a (deputy) project manager on a project card.
- Enter a subproject lead on a WBS line (=work package).
- Set up a resource budget line (=line activity).
In each case, a resource will be added to the team and, if needed, the role of (deputy) project manager or subproject lead assigned or changed. The Time Posting checkbox is selected for all members that are added automatically to the team, the Invoice Suggestion checkbox for everyone, whether entered by the system or a user.
Besides manual and automatic entries (such as when the system transfers a project manager to a project card), you can run the Add Resource Team action to integrate entire groups of resources into a project team.
The Resource Team field on a Project Team Setup line then shows the group that a resource belongs to, the Source field how the resource was added (for example, manually, by inserting a whole team, or via a resource budget line).
In addition to providing details about its members, the project team feature governs access to:
- Time entries (to post to a project)
- Project ledger entries (to release posted times)
- Billing (to create invoice suggestions for a project)
For a quick and easy overview of all team members, you can unhide a FactBox on project cards or the project list.
Time entries#
To control the posting of times through project teams, you must:
- Turn on the Check Team at Time Posting toggle so that only certain resources can post to a project.
With the toggle turned off, all resources can post to a project, as it is considered a general-purpose project. - Maintain a project team after turning on the Check Team at Time Posting toggle.
- Set up resources who post times to a project as project team members and select the Time Posting field for them on the Project Team Setup page.
- Turn on the Team Filter on Time Posting toggle in Projects Setup.
This ensures that the filter on the project list in time tracking is tailored to the relevant resource (=user) and lists mainly projects for which the resource has been authorized.
It also shows the projects to which all resources can post. If the toggle isn’t turned on, an employee can see all projects. A check against the project team will only be carried out later, during posting. - Turn on the Strict Team Filter toggle in Projects Setup.
This ensures that when a project is set to Check Team at Time Posting, but a certain resource isn’t part of the project team, the related user can’t enter a project number (that is, without using the projects list) in time tracking.
Any attempt to post resource hours to projects for which the user hasn’t been set up will then prompt an error message and posting will be blocked.
Billing#
To control which resource is allowed to start a billing proposal for a project, the following must be set up:
-
The general setup in the Proj.team field at Abr.proposal in the project setup must be set.
-
There must be at least one entry in the Project Team table for the project, otherwise each resource may perform billing!
-
Each resource (user) that is to create billing proposals for a project must be created as a project team member and the switch in the Billing proposal field must be active.
Note
During the check, the resource is matched to users who are part of the project team to determine if a user has permission to invoice the project.
If the project is part of the team filter but the current user isn’t authorized to bill the project, a message appears when an attempt is made to create a suggestion, noting the lack of permission. The user can then display the projects blocked for posting.
Resource teams#
Not unlike a template, the Resource Teams page allows you to set up a group of resources for later addition to a project team. All members of the team can then be assigned to a project at the same time by running the Add Resource Team function from the Project Team Setup page.
When you add a resource team to a team set up for a project, a note about the origin of the resources will be shown in the Resource Team fields on the lines.
To copy resources to an existing resource team and from there to one or more projects:
- Choose the Search icon, enter Resource Teams, and then choose the related link.
- Select the team you want to add members to and click the No. of Members field on the line.
- On the ribbon, choose New, and fill in the fields as necessary.
- Again, on the ribbon, choose Add to Project Teams.
Note
You can only add resources to a project team if at least one of the existing resource team members is already linked to it.
This also applies to integration within Resource Management. If a resource team has been assigned to a user within Resource Management, an update can be carried out using the Add to Resource Administration function.
If additional members are later added to the resource team, existing assignments can be supplemented using the Add to Resource Administration function.
Project team roles#
The roles that you can assign to members of a project team are limited to the default project team roles available on resource cards. An individual extension will be required if you want to add more role options.
There is, however, an alternative solution that can be used to customize a role:
- Choose the Search icon, enter Project Team Roles, and then choose the related link.
- Fill in the fields described in the following table for each role you want to assign to a resource.
| Field | Description |
|---|---|
| Code | Specify a unique code for the role. |
| Description | Enter a description for the role. |
| Responsible for Billing | Select this field if you later want to filter invoice suggestions based on the people in charge of billing. |
| Unique to Project | Select this field if you want the role to be assigned no more than once to a project, Project Lead being an example. Only roles unique to a project can be selected on the Team Roles FastTab in Projects Setup. |
For example, you can specify a role named Architect on the page and link this role to the Subproject Lead, one of the standard options on the resource card:
| Field | Description |
|---|---|
| Default Project Team Role | Shows the role that will be assigned by the system when the resource becomes a member of a project team. What you can choose here depends on how you set up the Project Team Roles page, where each new role you create is linked to a standard team member role available in the system. |
Following on from our example, the role of architect is assigned to a resource. If added to a project team, the resource is then filled in as not only the architect but also the subproject lead for this project.
In Projects Setup, you can specify up to 10 team roles that you want to show on the project list or on project cards. This way, you can see immediately who works on which project in what area or capacity (for example, as the architect or as someone in billing or cost control).
Tipp
As invoicing is a crucial business process, you can use the Billing Responsibility Filter function on the Projects page to filter the page to projects where a resource has been marked as being responsible for billing.
Team overview#
To see what teams are assigned to certain projects, run the Project Teams action from the Project Lead role center. You can set a filter on any field of the page.
My Projects and profitability chart#
The My Projects tab in the Project Lead role center can be maintained manually. But the tab is also filled in automatically when you enter a resource as a Person Responsible (that is, as the project manager) on a project card.
Related to the My Projects tab is the Project Profitability chart. This chart shows all the projects listed under My Projects unless their Exclude from Business Chart field is filled in.
Main projects#
Main projects sum up multiple projects. They are essentially a higher-order category. If you filled in the fields for main project dimension integration in Projects Setup, the system creates and adds a dimension to a new main project automatically. It will also copy that dimension to any project that you later assign to the main project.
Note
A dimension assigned to a project through a main project will not change after replacing the dimension in the main project.
To see a list of all main projects:
- Choose the Search icon, enter Main Projects, and then choose the related link.
- On the ribbon, choose Related > Main Project and one of the following actions.
Statistics#
Shows a budget-to-actual comparison for all projects assigned to the main project.
Comments#
Used to enter notes about the main project.
-
Microsoft, Microsoft Dynamics, and Microsoft Dynamics 365 are trademarks of the Microsoft group of companies. ↩