Time & Materials#
Overview#
Project usage can be recorded in several ways. Whereas the hours worked on a project can be entered in time journals and on CTC cards, the consumption of items can be specified through adjustments to inventory and project purchases.
By using budget-to-actual comparisons, you can then compare the amount of time and materials spent toward a project to the number of hours and items budgeted for it.
Staff costs#
Following customer approval, you can start posting usage and sales for a project. Usage primarily refers to resource consumption. Resources might be employees, machines, or contractors. This article will focus on time tracking for employees.
A resource’s work hours are entered in time sheets and on other time tracking pages in the base unit chosen in Resources Setup. All resources representing actual people should have the same unit stored on their resource cards.
The most common base unit for these resources is Hour. For types of work typically billed in a different unit, such as Day, the system will hold off on converting a posted time entry into the billing unit until the entry is released through a project journal.
This way, employees can continue to think and post in hours, and the system will do the rest.
Time tracking level#
In the Time Posting Level field on project cards, you can specify how time spent on a project will be recorded. The options are:
- WBS
A rough listing of tasks at the level of work packages. - Budget
A detailed capture of tasks at the budget line (or line activity) level.
Note
This field might already be filled in from a project template.
- Whereas no restriction is placed on WBS line resources (each resource can post to all WBS lines), the selection for budget lines is limited to a user’s own resource or group. With the Strict Team Filter toggle turned in Projects Setup, you can even prevent the filter from being removed under any circumstances. Neutral budget lines (that all resources can post to) can be set up by using a general time recording resource.
- A project might contain work packages that aren’t planned at budget level, as there’s no need to divide them into subtasks that will be assigned to specific resources (travel cost being one example). However, for obvious reasons, you might still want to post to these WBS lines despite the posting level being set to Budget, so they’ll be shown on the selection page regardless.
Both levels are valid for all time tracking methods explained in the following.
Time journals#
A project time journal records the time that a resource spends on a project. All resources require a journal of their own (see Resource Capacity).
For the correct time entries to be retrieved when a user opens the Project Time Journals page, the user must first be assigned to a resource and to a journal in User Setup. The selected resource is then entered on all journal lines automatically.
Users whom the Other Res. in Time Tracking checkbox is selected for in User Setup can also edit other resources’ journals. A message appears if a user cannot be assigned to a journal.
The following table describes the most important fields found in time journals.
| Field | Description |
|---|---|
| Resource No. | Shows the resource who records time. This field is filled in by default, as each a journal is specific to a resource. |
| Posting Date | Specifies the day that time is being recorded for. |
| Project No. | Specifies the number of the project for which time is being recorded. |
| Project Search | Finds projects based on common filter criteria provided with Microsoft Dynamics 365 Business Central. This feature is meant as an alternative to drilling down on the value in the Project No. field. Projects that match the text you entered are shown when you exit the field so that you can select the project that you want to see filled in on the line. A second dialog page shows the WBS or budget lines that you can post to. Besides numbers and letters, you can use symbols such as * and @ to limit search results. For more information about filter criteria, see Sorting, Searching, and Filtering Lists - Business Central. Specifying a filter such as @ *introduc* would yield the following (case-insensitive) results, for example: Introducing Business Central; Reintroduction of CRM fields Searches cover the Project No., Description, Description 2, and Search Description fields of projects. |
| Line Activity No. | Shows the activity number of a budget line. When filling in the Project No. field, a user can choose a budget line (=activity) if the time posting level on the related project card is set to Budget. This includes any line to which the user’s resource is assigned through the Person Responsible field or the relevant resource group, unless the activity has been completed. To record time for a completed activity, the status of the activity must be set back to In Progress. When a budget line is selected, the work package and the phase, task, and step code fields on the journal line are filled in automatically. This means that the work hours recorded by resources are posted not only to the budget lines but to the associated WBS lines as well. This field can also be used to switch to another activity or—if the time posting level is set to WBS—another work package specified for the project. |
| Work Package Code | Specifies the work package that is assigned to the WBS line to which time needs to be posted. This field is filled in automatically when a line activity is selected. |
| Description | Describes the activity that was performed by the resource. The description can have a maximum of 50 characters. |
| Project Time Comment | Stores additional remarks about the time posting. |
| Start Time End Time |
Specifies when work on a certain activity started and ended. Filling in these fields is not required but helps employees estimate the duration of a task. |
| Break (Minutes) | Specifies a work break in between two time periods, in minutes. This field might be used by the system to fill in the Break and Quantity fields. |
| Break | Specifies a work break, in hours. This field might be used by the system to fill in the Break (Minutes) and Quantity fields. Whichever break field is filled in last will be used to determine the length of the break taken by the resource. |
| Quantity | Shows the quantity of work performed by the resource, in hours. This field is filled in based on start, end, and break times but can be changed manually. |
| Line Activity Progress % | This field is only relevant if budget lines store time spent on activities. To report the status of a line activity, a user can choose this field or the Line Activity Progress % field. Either will be sufficient for the system to fill in the Estimated Total Quantity and Estimated Total Amount fields on the selected budget line. |
| Billing Type | Copied from the related WBS line. This field cannot be changed manually. |
| Invoice Qty. | Typically, the Invoice Qty. field is filled in from the Quantity field. A different invoice quantity can only be entered if services are billed based on time and materials and the New Invoice Qty. in Time Tracking toggle is turned on in Projects Setup. Additionally, when time is posted to budget lines, the line you want to change the quantity on must be billable in full. In other words, the Billable checkbox needs to be selected on the line and the Invoice Qty. % field cannot be filled in with a value other than 100. If the time cannot be invoiced in full, the amount that you can bill will depend on the specified line activity. |
| Reverse Entry No. | Used to cancel a posted time entry. |
| Contact No. | Specifies a company contact. This field is used to analyze on a per contact basis the costs linked to sales and marketing projects, which do not require customer numbers. This field is used to analyze on a per contact basis the costs linked to sales and marketing projects that do not require customer numbers. |
| Internal Code | Specifies an internal billing reason code to classify changes in the billing quantities. The corresponding code is transferred to the time entries and then copied to the project journal to inform project management about the reason for this change. |
Additional information about the project and the activity stored on a specific journal line is available in the lower-left section of each journal. The progress and extent of time tracking on the line can be found to the right of that section.
Actions#
Functions#
Includes the Get Work Package function, which can be used on a journal line to fill in an activity and a reference to a WBS line.
If a project number has been entered on the journal line and the time spent on the project is tracked on budget lines, only activities assigned to the resource or to no resource at all (=general tasks) can be chosen here.
However, if the Project No. field has been left blank, the window for selecting an activity includes all activities from all projects so that staff members can find their tasks without needing to know the number of a specific project.
Selecting an activity then fills in a large part of the fields found on the journal line.
Post#
Used to post the journal.
Related#
Project#
Choosing the Project Card action opens the card of the project that has been entered on the journal line. Choosing Ledger Entries shows the associated ledger entries.
Resources#
Choosing Resource Card opens the card of the resource assigned to the journal.
Choosing Time Entries provides a user with a list of all time entries posted for a certain project.
The Budget Line Activities (Open) action, on the other hand, shows all current line activities.
Line#
Used to open line-related dimensions and comments.
CTC time tracking#
The time that resources spent on projects can also be recorded on CTC cards. The use of CTC (complete time capture) differs from entering hours on a time journal in the following ways:
- Internal checks prevent time postings from exceeding workday limits.
- The system calculates a resource’s number of work hours from clock-in and clock-out times before allocating these hours to projects.
- Time recording includes default breaks and absence.
- Only one CTC card is available per day and employee. Hours can be allocated on this card more than once, whereas you need to create multiple lines in a project time journal to get the same result.
- Inputs can be tracked at any time based on posted cards.
- Time entries must be released before they can be posted.
CTC Time Tracking—the main page for entering and viewing resource hours—combines unposted and posted cards in a single view. The Status field on the header indicates whether a card has or hasn’t been posted yet. The page also includes calendars with status colors to help pick the days you want to record time on.
Indicate absence#
As one visual aid, you can change the color of CTC calendar days to indicate when a certain resource isn’t available.
To initialize background colors indicating absence:
- Choose the Search icon, enter Calendar Colors, and then choose the related link.
- On the ribbon, choose New > Initialize to have the system specify RGB color values.
Assign colors to causes of absence#
After setting up the colors, you can use them to visualize causes of absence.
- Choose the Search icon, enter Causes of Absence, and then choose the related link.
- Select a line. In the Calendar Background Color field, choose a color.
Indicate status of time tracking#
You can also visualize the status of time recording on a CTC calendar:
- Choose the Search icon, enter Projects Setup, and then choose the related link.
- Go to the CTC Calendar Colors FastTab and fill in the fields as described in the following table.
| Field | Description |
|---|---|
| Neutral | Specify a color for days, such as Saturdays, Sundays, and holidays, on which resources aren’t available. |
| Posted CTC | Specify a color for days on which hours have been recorded and posted. |
| Released CTC | Specify a color for days on which hours have been recorded and released but have yet to be posted. |
| Open CTC | Specify a color for days on which hours have been entered but haven’t been released. |
| Missing CTC | Specify a color for days on which hours have yet to be recorded. |
| Outside Month | Specify a color for days that are outside the specified month. |
Specify breaks#
You can use one of two methods to specify CTC breaks:
-
Enter a default break on the Work-Hour Templates page.
You can then fill in the Work-Hour Template field on a resource card. This default break defined on the Resource Card, in turn, is copied as a default to time tracking and can be changed there manually, if required. -
Break time settings
While the default break is meant to help you with entering your time data, the break time settings define a minimum break time depending on the daily working time.
Example
| Max. Work Time | Break |
|---|---|
| 4 | 0 |
| 8 | 1 |
| 10 | 1.25 |
The work hours and breaks shown in the table have the following meaning:
- At up to 4 hours, a break isn’t required so no time is suggested automatically. You can specify a break manually, however.
- Working for over 4 hours but for less than 8 hours requires a break of at least 1 hour. This value is also entered automatically on every CTC card. Changing the Break field, trying to make a break smaller, results in an error message, but you can increase the length if necessary.
- Over 8 and under 10 hours, resources need to take a break of least 1.25 hours.
- A work time of more than 10 hours cannot be specified.
To define a default break time setting, go to Resources Setup. You can specify a different break time setting for resources to whom a specific break time regulation applies (e.g. TRAINEE).
Note
You can turn on the No Break Minimum toggle in Projects Setup if you want to specify breaks that are smaller than those suggested by the system.
Elements of CTC time tracking#
To record time on a CTC card:
- Choose CTC Time Tracking on the Time Recording (or Project Lead) role center. See also (CTC Card) Actions.
- Fill in the fields as necessary.
CTC header#
| Field | Description |
|---|---|
| Resource | Specifies the number of the resource whom time is recorded for. |
| Description | Shows the name of the resource. |
| Date | Shows the workday for which time is being recorded. |
| Start Time | Shows when the resource started work on the specified day. |
| End Time | Shows when the resource left the office on the specified day. |
| Break (Hours) | For more information, see Specify Breaks. |
| Quantity | Shows the time the resource spent on project work. The value in this field is calculated based on the formula End Time minus Start Time minus Break. |
| Qty. Allocated | Shows the total time allocated to projects on the CTC lines. |
| To Allocate | Shows time not yet allocated to a project. |
| Status | Specifies the status of the CTC card. Open Card values can be changed at any time. Released All hours have been recorded on the card, making it available for posting. |
| Last Card Posted On | Shows when a card was last posted for the resource. |
| Cause of Absence Code | Specifies a cause of absence (field must be unhidden). |
CTC lines#
(Nearly all fields found on project time journal lines are also available on CTC cards.)
| Field | Description |
|---|---|
| Project No. | Specifies the project to which time will be posted. |
| Project Search | Used to find projects based on common Business Central filter criteria. This feature is meant as an alternative to drilling down on the value in the Project No. field. Projects that match the text you entered are shown as soon as you exit the field, and a project number is filled in on the journal line after you choose a project from the search results. A second dialog page shows the WBS or budget lines that you can post to. Besides numbers and letters, you can use symbols such as * and @ to limit search results. For more information about filter criteria, see Sorting, Searching, and Filtering Lists - Business Central. Example The filter @ *introduc* yields the following (case-insensitive) results: Introducing Business Central; Reintroduction of CRM fields Searches cover the Project No., Description, Description 2, and Search Description fields of projects. |
| Work Package Code | Specifies the work package to which time will be posted. |
| Description | Describes the activity that was performed by the resource. The description is copied to time and project ledger entries and, for projects billed by time and materials, to proof of performance documents as well. |
| Customer Comment Internal Comment |
These fields can be used to describe the activity further. Both types of remarks are stored on comment sheets. However, whereas comments addressed to customers can be printed on proof of performance documents for projects billed based on time and materials, internal comments cannot, because their Print on Customer Doc. field is not selected. |
| Start Time End Time |
The values in these fields indicate when work on an activity started and ended. Both are logged on time entries. The CTC line quantity is then calculated automatically from them if the CTC Time Tracking Incl. Start/End Times toggle was turned on in Projects Setup. If it was, you can also no longer edit the Quantity field manually. |
| Start Time (Break) End Time (Break) |
These fields specify when a work break starts and ends. The values of both are also logged on time entries. The system then calculates the length of the break automatically if the values entered here are within the start and end times specified on the line and updates the Quantity field to show the actual number of work hours. |
| Quantity | Specifies the number of hours spent on the activity. You cannot enter a negative quantity in this field. |
| Line Activity Progress % | Specifies how far the line activity has progressed. |
| Invoice Qty. | Indicates how much of the project work can be billed to the customer. This is only a deciding factor if work can be billed based on time and materials. |
| Billable | With the toggle turned on, project effort can be billed to the customer. This effort is stored with the activity. |
| Billing Type | Copied from the WBS line. This field cannot be changed by the user. |
| Line Activity No. | Shows the activity number of a budget line. When filling in the Project No. field, a user can choose a budget line (=activity) if the time posting level on the related project card is set to Budget. This includes any line to which the user’s resource is assigned through the Person Responsible field or the relevant resource group, unless the activity has been completed. To record time for a completed activity, the status of the activity must be set back to In Progress. After a budget line has been selected, the work package and the phase, task, and step code fields on the CTC line are filled in automatically. This means that work hours recorded by resources will be posted to not only budget lines but the associated WBS lines as well. This field can also be used to switch to another activity or—if the time posting level was set to WBS—another work package stored with the project. |
| Qty. to Complete | This field is only relevant to time tracking at the budget line level. To report the status of a line activity, a user can choose this field or the Line Activity Progress % field. Either will be sufficient for the system to fill in the Estimated Total Quantity and Estimated Total Amount fields on the selected budget line. |
| Contact No. | Specifies a company contact. This field is used to analyze on a per contact basis the costs linked to sales and marketing projects, which do not require customer numbers. By selecting the relevant option in the Contact No. for Time Tracking field in Projects Setup, you can also make it mandatory to enter a contact number for this kind of project. |
| Internal Code | Specifies an internal billing reason code to classify changes in the billing quantities. The corresponding code is transferred to the time entries and then copied to the project journal to inform project management about the reason for the change. |
FactBoxes#
FactBoxes on the right side of the screen provide you with additional information about time tracking.
Time Statistics indicate which services are scheduled for the day (the week, or month) according to the resource’s capacity, how much flextime has been entered for this day (unpaid absences), how many paid absences have been registered (vacation, illness, etc.), how much working time has been posted and which services are still outstanding.
Below this section are the current, previous, and following months in calendar form. These calendars are intended to help you navigate time recording and show where resources have recorded hours and entered absence. You can select a calendar day to view or enter time-related data.
The CTC Line Info FactBox lists project and activity data regarding the line you chose on the Lines FastTab.
The Color Legend shows you what colors are being used to indicate absence and the status of time recording.
Actions#
Create CTC Cards#
Creates multiple CTC cards with the same information, an especially useful function for specifying absence.
Release CTC Cards#
Releases all completed CTC cards that match the specified filters. During this process, a check is run on all data entered on the cards. If the check fails, you see an error and any card containing incorrect information will not be released (which means that it cannot be posted).
Release#
Releases the current CTC card.
Reopen#
Changes the current card’s status from Released to Open.
Copy to Today's Card#
Copies the current CTC card to the card of today. This copies both the header and the lines and can only be used if the CTC lines of the target card are still blank.
Copy from Existing CTC Card#
Works in the opposite way to the Copy to Today’s Card action, as it copies data from the card you choose to the card you’re on.
Post / Post Batch#
Posts recorded and released CTC cards.
The single time entries that you can post with the first function are released (and therefore checked) automatically. The Post Batch function, on the other hand, can only be used on CTC cards that have already been released.
When posting a batch of cards, you can set filters on resources and periods. The resource filter is filled in with the resource assigned to you, although an administrator can adjust the setting, if needed.
You can also turn on the Release toggle to have the system release all CTC cards within the entered date filter when choosing OK on the request page. You see a message if an error is encountered during this process.
Afterward, the system will post all previously released CTC cards and those released by running the action.
Resource#
Opens the card of the resource for which time is being recorded.
Unposted Cards#
Opens the CTC Cards page, on which you can manage cards that haven't been posted yet.
Posted Cards#
Opens the Posted CTC Cards page.
Note
As mentioned, CTC time tracking shows both unposted and posted cards. Typically, only administrators might need to view them on separate pages.
Cancel Posted CTC Card#
Cancels a posted card and deletes project time entries assigned to it.
If the entries have already been copied to a project, the project ledger entries created from them are deleted as well. This requires that the user running the function be authorized to post project ledger entries.
Employees without this kind of permission must ask the project manager to cancel cards. Project ledger entries that have been invoiced cannot be deleted in either case.
Cancel CTC line#
Cancels a single CTC line instead of all hours posted on a given day.
Before you can run the action, you need to set up a project time journal batch that will be used exclusively for these kinds of corrections. This batch cannot be assigned to a resource, which means the Resource No. field on the related Project Time Journal Batches line must remain blank.
For more information, see Project Setup | Time Tracking.
Note
As CTC cards are documents, where the values entered on the lines must match the total displayed on the header, reversing a line requires a replacement for the original posting (like a corrective entry does).
Running the function on the selected CTC line opens a new time journal filtered to the prepared reversal posting. The correction must also be entered here.
The project and work package numbers on the CTC line and the reversal entry don’t need to match; the date and the quantity, however, do.
As an example, if the time specified on the line is minus 1.5 hours, the quantity for correction must be plus 1.5 hours. If needed, you can divide up the amount and assign it to multiple entries. The one-and-a-half hours given as an example can therefore be distributed across two entries, with one hour assigned to one entry and 0.5 hours assigned to the other.
The correction must be posted before you exit the journal page. Otherwise, the system will not save the changes you’ve made so far.
The journal used to reverse time entries contains the start time, end time, and break fields from the relevant CTC line. You can also view the comments that were made about the line or enter new ones in the journal, if necessary. If you want to keep the existing notes, use the Copy Comments action on the ribbon.
After you’ve posted the reversal, a new CTC line containing a negative amount is inserted to offset the journal posting you’ve just made. Offset values to keep the line and header quantities in sync are also added.
You can only cancel CTC lines that project ledger entries haven’t been created for. The action also cannot be run if the CTC Posting As field in Projects Setup is set to something other than Time Entry, as line cancellations cannot be used to correct project ledger entries.
Project Time Entries / Project Ledger Entries#
Shows the project time or project ledger entries related to the card (provided that these entries have been created for the project).
Absence Registration#
Used to specify absence. You can only choose this option when you open a posted card.
Dimensions#
Shows the dimensions stored on the header of a card.
Record time#
To store work hours, pick a day on the calendar. This creates a new time record, that is, an unposted CTC card, automatically.
You can also use the Create CTC Cards function to create a record.
Record activities#
A resource’s work hours are allocated to individual project activities on CTC lines.
To enter the activity last worked on for a project, choose Functions > Get Last Activity on the Lines FastTab. This retrieves the line activity or work package last opened by the relevant employee.
Release a record#
Days on which you recorded work hours must be released before posting. Some plausibility checks are performed during that process, for example, to see if the entire CTC card quantity has been allocated on the lines.
By using this action, you can release either a single day or multiple days at once.
Post a record#
Released days must be posted. You can post a single day or multiple days.
Only when you post time does the system create time entries. These are then copied to the project as project ledger entries following a review by the project manager.
Note
Single time entries are released automatically. The Post Batch function, on the other hand, can only be run on released CTC cards.
Time sheets#
Time sheets are yet another method to specify how much time a resource has spent on a project. You can record usage in time sheets in seven-day increments. Before you can work with time sheets, you need to set up the feature by registering the relevant resources and turning on the Use Time Sheets toggle on their resource cards. You also need to create new, mostly blank sheets.
To create a batch of time sheets:
- Choose the Search icon, enter Create Time Sheets, and then choose the related link.
- Alternatively, open a resource card. On the ribbon, choose Process > Create Time Sheets.
- Fill in the fields as described in the following table.
| Field | Description |
|---|---|
| Starting Date | Specify the first date of the batch. |
| No. of Weeks | Enter the number of weeks the sheets should cover. |
You can then use the fields on the Filter FastTab, for example, to set up sheets for specific resources or external employees.
Note
Time sheets can only be created by a user for whom the Time Sheet Administrator checkbox has been selected in User Setup.
To see the newly created sheets, choose the Search function, enter project365 Time Sheet List, and then choose the related link.
Like a CTC card, a time sheet can only be viewed by the resource linked to the sheet unless the Other Res. in Time Tracking toggle is turned on for a user in User Setup. After the sheets have been created, you can report work hours on a weekly basis:
- Open the project365 Time Sheet List, select your sheet, and enter the work hours on the lines related to the current calendar week.
- When all hours have been entered, choose Submit to release them for posting.
The time you recorded is then converted into time entries, which can be done on a regular basis by using a job queue. If the status of an entry is set to Submitted but the line hasn’t been posted—that is, it isn’t yet part of the Project Time Entries Created—you can still reset the status to make changes to a work package, a line activity, or a quantity.
You can choose Budget Line Activities (Open) on the ribbon to see a list of unposted line activities assigned to the current resource. This doesn’t include line activities for resource groups, however.
To copy all the lines from the previous week, use the Copy Lines from Previous Time Sheet action. You can do this week by week.
To add comments to a record, fill in the text fields next to the Quantity field on a line. This ensures that the data record is assigned to the correct time entry when you post the line. The comments can also later be used on a proof of performance document sent to the customer.
Related#
If you want to see a list of all project ledger entries related to a time sheet line, select the line and, on the ribbon, choose Related > Ledger Entries.
To open the related resource card or see more information about time entries stored on the line (like on a CTC card), choose Related > Resources > Time Entries.
Lines#
To retrieve a work package, choose Line > Get Work Package on the Lines FastTab. You can now select a package from all work packages set up for the resource or the related resource group.
Project time entries#
Time entries are created automatically when you record hours spent on a project (in whichever way possible).
Note
You can use the CTC Posting As and Time Sheet Posting As fields in Projects Setup if you want to post project ledger entries instead of time entries or post both at the same time.
Initially, the entries don’t affect project usage but represent the hours committed to a project. Times recorded but not posted can later be analyzed, for example, in cost control.
Usage is generated only when you copy time entries to a project journal and post them there (see also Project Journals).
Important fields#
See the following table for a more detailed explanation of the key fields found on the Project Time Entries page.
One option for viewing the page is to open a project and choose Related > History > Project Time Entries on the ribbon.
| Field | Description |
|---|---|
| Posting Date | The date in this field corresponds to the date of performance. |
| System Date | Shows the exact date and time the entry was posted. Helps to see with what delay (if any) hours are recorded in the system. |
| Resource No. | Specifies the resource whom time entries were posted for. |
| Start Time End Time |
Only filled in if hours were entered with start and end times. |
| Project No. | Specifies the project that time was recorded for. |
| Work Package Code | You always post time entries to lines on an active WBS. To which line the entry is assigned is shown in the Project No., the Work Package Code, and the Phase, Task, and Step Code fields. |
| Line Activity No. | Specifies a budget line activity if an entry was posted to a project at budget line level. |
| Reversed | Selected if the time entry has been cancelled. |
| Reverse Entry No. | Shows the associated reversal entry if the time entry has been cancelled. The reversal entry, on the other hand, will reference this entry. |
| Qty. (Base) | Time is always recorded in the base unit of measure assigned to the relevant resource. With the most common unit in this context being hours, this field typically shows the hours worked. |
| Invoice Qty. (Base) | Frequently corresponds to the value in the Quantity (Base) field. Only if you post a line activity that you want to bill based on time and materials and the Invoice Qty. % is not 100 does the value in this field differ from the value in the Quantity (Base) field. |
| Copied to Project | Indicates if the time entry has been copied to a project journal and posted there. After the entry has been posted, it can no longer be copied to another journal, even if the project that it was posted to contains only part of the quantity assigned to the entry. |
| Copied to Project (Date) | Shows the exact date and time the entry was posted to a project. |
| Copied to Project (Ledger Entry No.) | Specifies the project ledger entry that was created when you copied the time entry to a project. This field ensures that the project ledger entry assigned to the time entry is deleted if you cancel the latter. |
| Qty. Copied to Project | Typically, when a time entry is copied to a journal, the complete quantity entered for it is retrieved automatically. If necessary, however, you can track changes to the journal quantity by comparing the value in this and the value in the Quantity (Base) field. |
| Total Cost (LCY) | This amount is relevant to measuring the time committed to projects. Note When you copy time entries to a project journal, the total cost will be recalculated. |
| Comments | Indicates if comments exist for the entry. You can store these when recording work hours. You can also have them printed on proof of performance documents. |
| Contact No. | Shows the contact number entered during time recording. This field is used to analyze on a per contact basis the costs linked to sales and marketing projects, which do not require customer numbers. |
| Internal Code | Specifies an internal billing reason code that was entered in time tracking to classify changes in billing quantities. The corresponding code is transferred to the time entries and then copied to the project journal to inform project management about the reason for this change. |
Actions#
The following functions can be run from the Project Time Entries page.
Comments#
Opens the comment sheet used for project time entries.
You can enter comments when you record hours in the system. You can also change them if necessary.
These comments will later be copied to the project ledger entry comments and to proof of performance documents.
Cancel Entries#
Prepares time entries for cancellation.
When the action is run, a cancellation line (with a negative quantity) is inserted into the relevant resource’s time journal while the journal is opened so that the reversal can be posted immediately.
To prepare a single entry for reversal, you can also fill in the Cancellation Entry No. field and use the Cancel Entries function to add a line with a negative quantity.
Time entries can likewise be cancelled by using the relevant function on a CTC card or in time sheets.
Note
When you cancel a time entry that has already been copied to a project, the ledger entry linked to the time entry is deleted as well. You can, however, only delete entries that haven’t been invoiced yet. You also require the delete permission.
If (for either reason) you cannot post a cancellation, you need to clear the reference to the project ledger entry in the time journal. This turns the reversal entry into a simple correction posting that doesn’t cancel the time entry.
The quantity and value of both entries are the same whichever method is used. The difference is that cancellation links the entry you want to reverse to the cancellation fields in the system.
Cancelled time entries also aren’t copied to project journals and, if they’ve already been turned into project ledger entries, the ledger entries are cancelled as well.
Monitor time entries#
The following ease-of-use reports are available to either resources or time managers for checking time entries in the system.
Project Time Check#
If run from the Time Recording role center, this report is already filtered to the user who opened it and you’re asked about the month you want to check time entries for.
Afterward, the system opens the report request page, where you can see how entries are filtered in general (=per user and per month).
Choosing Print or Preview & Close then creates a table that lists all posted and unposted hours recorded for project tasks and for absence on each day of the week.
The Total Quantity field on the document shows the sum of all hours recorded on a certain day. The comparison of this value to the expected (daily) capacity results in the difference shown in the Variance field.
At the bottom of the report, you can see a total line and flextime information, if available—for more details, see Set Up Time Summaries (Flextime).
Proof of Performance#
When run from the Time Recording role center, this report is also filtered to the user who opened it and you’re again asked about the month you want to create a document for.
Prior to this request, you can choose the project for which you want to issue a proof of performance document.
You can then run the report from the request page to see the hours you spent on a project on different days, together with information on the work package and the activity they were posted to. The total hours are shown at the bottom of the document.
The report can also be filtered to multiple resources. In this case, one list and subtotal are created per resource and the sum of all resource hours recorded for the project in the specified period is displayed at the bottom.
Resource Capacity/CTC List#
This special analysis is used to compare resource capacity to CTC values.
The report supports you in checking whether CTC cards have been posted for a certain workday or, at the very least, if they’ve been released already.
It does not provide you with information about how many hours were actually posted and if these were above or below the hours expected on a certain day.
The report only checks if a certain CTC card exists, if quantities are missing on CTC lines, that is, whether some hours haven’t been worked yet, and if the time entries recorded on the card have been released or posted.
When a CTC card is released or when absence is registered for a day on which time was supposed to be recorded for on the card, that day is deleted from the list.
The purpose of this report is to give an overview of which workdays (days with available capacity) time has not been fully entered on or absence has yet to be registered for.
Project journals#
Project time journals, CTC cards, and time sheets are all used to record how many hours have been spent on project work.
To ensure that the correct number of hours is allocated to each project—or, more specifically, that time entries are stored in the project ledger—the time recorded must be posted through a project journal.
Although this journal is used to post all kinds of entries, including those that cover the use of material taken from a warehouse, the following paragraphs will focus on posting project time only.
To retrieve the hours spent but not yet added as project ledger entries:
- Choose the Search icon, enter Project Journals, and then choose the related link.
- Select a journal. On the ribbon, choose Home > Get Project Time Entries.
- Set the filters on the request page as needed.
Typically, as a project lead, you only retrieve time recorded by resources under your management. You can do this by looking at the time entries for a specific project only or by using the Person Responsible filter on the request page.
Another option—which ensures a smooth workflow for those in charge of both invoicing and approval—is to fill in the Responsible for Billing field on the page.
You can also turn on the Check by Time Manager toggle in Projects Setup and specify for each resource a time manager and a fill-in. Either can then use the Time Manager filter in a project journal to see and change the times that have been entered by resources they’re responsible for.
Following approval, the journal is filled in with the required time data, and one journal line is set up for every time entry within the specified filters.
Among the data filled in are the Quantity (=the amount of work performed) and the Invoice Qty. Although these values are often identical, the invoice quantity can be changed when a service is billed by time and materials.
If it is, the Manual Invoice Qty. field is automatically selected on the line. This field is also selected if the invoice quantity was changed earlier—either by the person recording time or by their manager in the Invoice Qty. % field found on the budget line that the resource’s hours are posted to—and the new quantity is copied to the project journal.
Journal lines where the quantity and invoice quantity don’t match are marked in another color, and the difference between them is shown in the Invoice Qty. Variance field.
If the Confirm Invoice Qty. Variance toggle is turned on in Projects Setup, you need to release project journal lines with this kind of value difference prior to posting by selecting them and running the Confirm Qty. Variance-Multiple action from the ribbon.
Line values that aren’t supposed to differ from each other must be changed manually on each affected line. On lines that are set to No Billing, the values always differ (the Invoice Qty. being 0), which means these lines are released automatically.
When everything is filled in as needed, you can choose Post on the ribbon to have the system create project ledger entries for all lines and clear the journal.
Extra pay#
Holidays and weekends#
For holiday and weekend shifts, you can specify premiums that are calculated when resources record their hours worked in time sheets, on CTC cards, or in time journals but which have an impact only after the time entered is copied to a project journal.
More specifically, a second batch of project ledger entries is created to cover extra pay when time entries are released and posted through a project journal so that the premiums are available for billing.
Note
Premiums and on-call or standby pay can only be used for entries that are posted in time tracking and through a project journal as project ledger entries.
Setup#
Premium types#
- Choose the Search icon, enter Premium Types and Standby/On-Call Pay, and then choose the related link.
- On the page, create a line for every type of premium that you want to set up, and then fill in the fields as described in the following table.
| Field | Description |
|---|---|
| Code | Specify a code for the premium. The code must be unique. |
| Description | Enter a description for the code, if necessary. |
| Invoice Qty. Factor | Specify the factor that the quantity to bill should be multiplied with. A factor of 1.5 translates into 50% extra pay. Example On the weekend, a resource posts 4 hours of worktime (Invoice Qty. = 4), the premium being an extra quantity of 2. Therefore, 6 hours will be billed to the customer. Note The unit prices for premium entries are the same as for their source entries. |
| Unit Cost Factor | Specify the factor that the unit cost should be multiplied with. A factor of 1.5 translates into 50% extra pay. Example On the weekend, a total of 4 hours is posted at a standard unit cost of USD50 an hour = USD200. The premium entry has a cost of USD25 per hour so that the cost of the work performed amounts to USD200 + (4 * USD25) = USD300. |
| Premium Type Description | Enter a description that will be copied to all project ledger entries set up for the premium and to proof of performance documents. |
| Type | Specify if the premium is paid for work on weekends or holidays or for on-call or standby duty. |
| Style | Choose a style if you want to set apart lines containing the premium from the rest of the project journal lines. |
project365 base calender#
Following the creation of different kinds of premiums, you also need to specify on a certain resource’s calendar (or the shared calendar stored in Resource Setup, at least) the days on which staff members typically do not work and the premiums that are paid when they do.
- Choose the Search icon, enter project365 Base Calendar, and then choose the related link.
- Select a calendar, and then choose Maintain Base Calendar Changes on the ribbon.
- In the Premium Type Code, select the kind of premium that you want to use when times are posted to the day specified on the line.
Time tracking#
Project journal#
When time entries are copied to a project journal, the entries that premiums must be used for are marked in color (see Setup).
The only difference between these and other time tracking lines is the added premium type. Project leads can remove premiums they don’t agree with and post the entries without them.
Additionally, entries of type Premium can be replaced, or they can be entered on lines where none exist yet. You cannot change or add an entry of type On-Call or Standby, however, as this kind of extra pay comes with different requirements
Premium entries#
When hours that premiums have been added to are posted in a project journal, the system creates two project ledger entries, one for the actual hours worked and another for the premium. Both are linked and show the same posting date and project number, as well as the same work package or budget line.
The entry created for the premium is treated as a value correction. This means that the Value Correction checkbox is selected on the entry, whereas the Quantity field isn’t filled in. Only the Invoice Qty. is entered, as the value in this field is later used when billing the project.
The value correction (unit cost) and the invoice quantity are determined based on the factor specified on the Premium Types and Standby/On-Call Pay page. The unit price for the premium and the source entry are identical. Additionally, the text you entered in the Premium Type Description field is also retrieved.
On-call and standby times#
Standby means that employees must be available to work and cannot use the time they’re in that status for other purposes. When they’re on-call, they can—unless they’re needed.
Standby counts as worktime, on-call (typically) does not. This means that the time an employee is on-call isn’t included in the quantity worked. Only if the employee is needed during on-call hours will the time be counted and posted in the same way as regular worktime.
Setup#
On call and standby#
- Choose the Search icon, enter Premium Types and Standby/On-Call Pay, and then choose the related link.
- On the page, create a line for every type of premium that you want to set up, and then fill in the fields as described in the following table.
| Field | Description |
|---|---|
| Code | Specify a code for the premium. The code must be unique. |
| Description | Enter a description for the code, if necessary. |
| Invoice Qty. Factor | Specify the factor that the quantity to bill should be multiplied with. A factor of 1.5 translates into 50% extra pay. Example A resource posts 4 hours of worktime (Quantity = 4). The quantity to bill might then be 6 because of 50% extra pay (factor 1.5). However, a premium of 0 is also possible, depending on whether the time recorded is specified as on-call or standby. In the latter case, the factor remains at 1.0 and the line quantity and invoice quantity will be identical. |
| Unit Cost Factor | Specify the factor that the unit cost should be multiplied with. A factor of 1.5 translates into 50% extra pay. Example A total of 4 hours is posted at a standard unit cost of USD50 an hour = USD200. The premium entry has a cost of USD25 per hour so that the cost of the work performed amounts to USD200 + (4 * USD25) = USD300. However, a premium of 0 is also possible, depending on whether the time recorded is specified as on-call or standby. In the latter case, the factor remains at 1.0 and the line quantity and invoice quantity will be identical. See also Unit Cost. |
| Premium Type Description | This field remains blank, as no additional ledger entries are created. |
| Type | You can choose between Standby or On-Call (for the differences between those two options, see above). |
| Style | Choose a style if you want to set apart lines containing the premium from the rest of the project journal lines. |
Work packages#
On-call and standby times are posted to special work packages. For each type of extra pay, another work package is needed. Every project that time is posted to must also have this package entered on its WBS.
Work types and sales prices#
The work package that you choose determines the work type of the entry. This type, in turn, is then used to calculate the unit cost per hour. You need different work types for differing unit prices, and each work type also requires special prices for both on-call and standby duty.
Unit cost#
You can specify unit costs per work type. For on-call duty, which doesn’t count as worktime, you can enter a unit cost of $0.00 so that the time recorded for it doesn’t add costs to your project.
Time tracking#
The process of recording hours for on-call or standby duty is the same as for entering regular worktime in the system, the only difference being that a work package must be selected for the former.
Time entries#
In contrast to standby time, on-call duty doesn’t count as worktime so that the Qty. field on entries specified as on-call remains blank. Only the Invoice Qty. is filled in. To be able to see the time a resource spent on-call, a field called On-Call Qty. was added to time sheets, cards, and journals. A work package code is also entered in the Premium Type Code field of each on-call entry.
Project journal#
When time entries are copied to a project journal, the entries that premiums must be used for are marked in color (see Setup ).
You can see the factor specified for an entry in the Invoice Qty. or the Unit Cost field on the relevant project journal line. This is because—in contrast to holiday and weekend premiums—extra pay for being on-call or on standby doesn’t lead to additional project ledger entries in the system.
The sales price for an entry is copied automatically from the price table that is assigned to the specified work type.
For on-call duty, the hours worked are copied from the On-Call Qty. field on the entry.
Project ledger entries#
On-call or standby entries don’t differ much from other time entries, except for their filled-in Premium Type Code fields.
External resources#
Set up an external resource#
In the Project Setup, you can use the Only External Resources in Purchase toggle to specify whether only resources marked as external may be entered in purchase lines, or whether other resources are also permitted.
However, regardless of this, it is necessary for the processes described to distinguish external resources from other resources using the External toggle on the respective resource card.
All external resources require a vendor for billing services. This vendor might be a staffing agency, for example. For a freelancer, you need to register both a resource and a vendor and link them to each other.
When you later enter the resource on the budget line of a project, the associated vendor is also copied to the line. This way, you can have the system calculate unit costs for the resource-vendor combination and use the vendor to create purchase orders from the budget.
External resources can have unit costs, unit prices, project-specific resource prices, and purchase prices. In contrast to standard unit costs, prices and costs set up this way are always tied to a certain vendor, that is, the relevant vendor is retrieved when you procure the external resource or include the resource in a budget.
If no unit cost is stored with the vendor, a unit cost is copied from the standard Unit Cost table. If no suitable cost is found there either, the required value is copied from the associated resource card.
If you have a specific group of external workers in mind when you start working on a project, we recommend that you set up a resource for each of them and assign a vendor, costs, and prices right away.
For external resources who record time like employees, you need to turn on the Use Purch. Invoice Entries toggle on their resource cards. This will create invoice entries for them during billing so that projects aren’t posted to twice.
Procure a resource#
You purchase a resource in the same way as you do items:
- Open the WBS of a project.
- On the ribbon, choose New > Create Purchase Document.
- Fill in the fields as necessary.
This copies the resource to a requisition worksheet or a purchase order.
You can also create a purchase document manually. In this case, you need to enter the relevant project number on individual document lines (if you’ve entered the number on the header, it is copied to new lines automatically) and use the Get Work Package function to copy the number to a WBS line or a budget line, depending on the Purchase Posting Level specified for the project.
Choose Yes on the dialog page that appears if you also want the description of the resource copied from the WBS or budget line. If you choose No, the system will retain the description that you entered on the purchase line.
Typically, you would then post consumption from a purchase order when items have been received by adding their quantities and prices to the project. In the case of external resources, however, the services rendered are often posted with receipt of a bill.
If, on the other hand, you want to post the acceptance of services immediately—that is, post project usage before you get a bill—and the bill shows a different unit cost for the external resource, the project ledger entries created from the resource’s time postings are adjusted automatically based on how much you need to pay.
Distribute purchased work#
Typically, the system creates one project ledger entry for each posted purchase line or purchase invoice line related to a project. Sometimes, however, you might want to post project expenses at a more granular level.
With the project distribution feature, you can, for example, distribute WBS line quantities onto multiple budget lines without having to list every little aspect on the associated purchase document. This way, you can keep detailed project posting information handy while streamlining your document.
When you use the distribution feature, you must always distribute the entire quantity; otherwise, you cannot post the document. You’ll see a message if not everything has been allocated yet.
You can distribute a quantity on different WBS lines of the same project at the level of the work breakdown structure or its budget lines.
Prerequisites:
-
You can distribute resource lines only.
-
Purchase lines that contain purchase invoice entries cannot be split in project distribution because they have already been distributed in the postings done for the external resource. Neither can you split any additional time or material via project distribution.
-
A work package has been selected in the purchase line. This selection determines the units and prices (including the project sales prices for the individual project ledger entries).
-
Only WBS lines / budget lines with the same work type as in the purchase line can be used for project distribution. This is the only way to ensure matching units and prices in the project ledger entries to be posted.
Track resource costs#
Like other resources, an external resource can post hours in a time journal. This isn’t a requirement; a purchase invoice that lists the hours worked would be enough.
However, because a considerable amount of time might pass before the hours are billed, you might run into problems when trying to invoice your own customers. For this reason, we recommend that external resources post their times immediately.
To avoid a situation in which expenses are posted to a project twice, the invoice you get from an external resource will later be applied to the project ledger entries created from the resource’s time journal.
Purchase invoices and invoice entries#
When you post invoices for hours recorded by an external resource, you must apply the project ledger entries posted so far to prevent billing a customer twice for the same work (once because of the time entries and once due to the invoice). If the resource doesn’t post time, application isn’t needed.
To prevent the posting of invoices without invoice entries (which have already been recorded as time entries), you must turn on the Use Purch. Invoice Entries toggle on the relevant resource card. After turning on the toggle, you can post neither receipts nor invoices without these entries, and an error message appears if you try to do so.
Receipts and invoices are then posted in one go. Should you want to separate them, you need to assign invoice entries with the delivery of services. Otherwise, project ledger entries will be posted as always.
Example:
An external resource uses a time journal to record a total of 6 hours. These hours are then posted to a project through its project journal.
To settle the amount that you now owe the external service provider, you proceed by creating a purchase invoice from the project and entering 6 in a Qty. to Receive field on a line. You also check if the Line Amount excl. VAT field there shows the correct value.
Afterward, you choose Line > Purch. Invoice Entries (on the Lines FastTab) to assign invoice entries to the line. This opens a new page on which you select the resource’s unapplied project ledger entries and choose Add Entries on the ribbon.
You then choose OK to copy the ledger entries to the purchase line. The invoice entry totals and the Qty. to Receive field values from the line can now be seen in a FactBox on the right-hand side of the Purchase Invoice page.
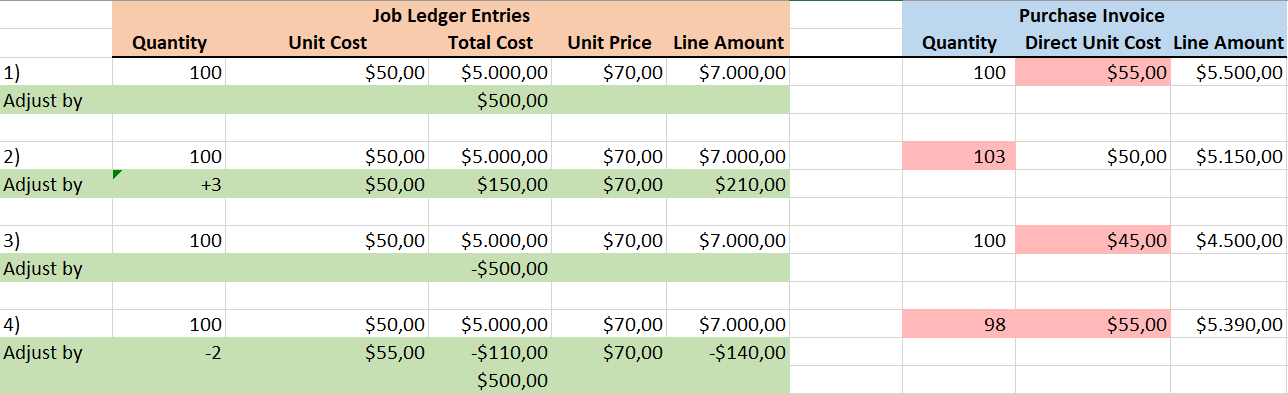
A difference in these amounts means that there’s something wrong with either the direct unit cost on the purchase line or the unit cost on the resource card. If you don’t see an error message, you can start posting corrections to quantities or project ledger entries, or both.
Note
For technical reasons, deleting one or more invoice entries will not update the totals on a purchase line. Instead, you need to run the Update Totals function. All totals are also updated when you reopen the invoice page or add project ledger entries.
Value or quantity corrections, or both, are only made when you post an invoice. The corrections are documented on a purchase line in the Correction Project Amount (LCY) and Project Qty. Correction fields. After you posted updates to values or quantities and acceptance of the services, project ledger entries can no longer be added to the invoice.
You can post multiple receipts to a single purchase order to gather invoice entries in one place. When you later post a bill for the order, the Qty. to Invoice must match the combined value of the Qty. to Receive and the Qty. Received fields.
You cannot post partial invoices for the services you accepted, as you cannot assign invoice entries from a purchase line to more than one invoice. The same is true for a correction you make to an entry.
Post corrections#
Because of the use of invoice entries for bills received from external resources, you typically only need to post a project ledger entry if you want to make a value or quantity adjustment. The following list shows what this kind of adjustment might look like.
Adjust quantities#
You post quantity corrections as if you were posting project ledger entries to a purchase invoice without invoice entries. This means that a change in quantity and a change in value always go hand in hand.
Adjust values#
Value adjustments are also posted as project ledger entries but without a quantity. This adjusts unit costs in a project without changing the quantity or even the invoice quantity. You can easily spot project ledger entries adjusted in this way by checking if their Value Correction checkbox has been selected.
Cost of materials#
Besides resources, a project might also require materials. Their costs are added to a project when you order items for it. Whereas you use WBS or budget lines to specify and meet item demand, you usually replenish inventory via the supply chain functionality.
However, you can also fill in a project number on a purchase line to purchase items for a project but not add them to inventory. The items are then consumed immediately as you post their purchase.
Project Purchase Incl. Inventory#
To decouple inventory management from item consumption, you need to turn on the Project Purchase Incl. Inventory Management toggle in Projects Setup.
With the toggle turned on, items are added to inventory as you post their receipt but aren’t consumed right away. You must use a project shipment to do so manually.
To link inventory items to budget lines, you can use the Create Purchase Document function on a WBS. Alternatively, you can create a purchase order during a planning run and select the Reorder Qty. replenishment method for each item you require.
Both methods will assign items to the project budget through order tracking entries and the Project No., Work Package, Phase Code, Task Code, and Step Code fields.
Manual and automated reordering#
The requisition worksheet feature integrated into Microsoft Dynamics 365 Business Central1 provides you with a multitude of options for estimating item demand. Based on how you set up supply chain and inventory management, a requisition worksheet can then be used to calculate demand for an item and suggest a reorder quantity to you.
Requisition worksheets, however, typically ignore demand that goes directly to projects. To change the behavior of the app and include project materials, you can use either the Requisition checkbox on budget lines or the Create Purchase Document function on a work breakdown structure. The drawback of the function is that it doesn’t check stock or order levels but only informs about them.
As using both options for project management might lead to purchases being made twice, we recommend you stick to one of them for projects. If a decision on this can’t be made right away, you should at least clear the Requisition fields on budget lines from which you want to order manually.
Automated reorder process#
Automated ordering uses the Requisition checkbox on WBS lines to budget demand for items ordered through worksheets. To automate ordering:
- Choose the Search icon, enter Requisition Worksheets, and then choose the related link.
- On the ribbon, choose Calculate Plan.
- On the Options tab, fill in the Starting and Ending Date fields. The worksheet will ignore demand outside the planning window.
- Fill in the Use Forecast field if you want a plan that already includes data about demand.
- Fill in the Exclude Forecast Before field if you don’t want to include demand created before a specified date.
A worksheet you create in this way will then include all items that you entered on the budget lines set up for a project, but only if the lines are part of on active WBS and if the Requisition checkbox was selected on all of them. All related WBS lines must be set to Open as well.
Be aware that a worksheet also retrieves the settings you made on item cards. If the item you want to reorder wasn’t specified well enough there, demand for it might not be estimated correctly or even not at all.
To create a purchase order from a line on the requisition worksheet, choose Process > Carry Out Action Message. To print the order, turn on the Print Orders toggle.
Manual orders (Action: Create Purchase Document)#
As an alternative, you can create certain purchase documents directly from a work breakdown structure. To bypass automated ordering, open a WBS and choose New > Create Purchase Document on the ribbon.
You can then fill in the filter fields on the request page. For the type filter, you can select Resource, Item, or G/L account (unless you’ve already specified a default filter in Projects Setup), and in the Document Type field, you can choose Quote, Order, Requisition, or Purchase Request. Afterward, you need to ensure that the Buy-from Vendor No. field is filled in on the lines. For item lines, the default vendor is entered automatically but can be changed if necessary.
In the Default Shipping Address in Purchase field, you can specify the address to which the delivery should be made. The following options are available:
Default (Company Address)
In the purchase document, no separate ship-to address needs to be entered, i.e. the delivery will be made to the company address as specified in the company information. In the purchase document, the Ship-To field defaults to Default (Company Address).
Location
In the purchase document, the ship-to address of the corresponding location needs to be entered. If you select this option, the function separates the purchase documents by location. In the purchase document, the Ship-To field defaults to Location.
Ship-To Project Address
In the purchase document, the ship-to address as specified in the project needs to be entered. In the purchase document, the Ship-To field defaults to Custom Address.
The default value for this field can be preset in Projects Setup
The system then suggests the budgeted quantity minus the quantity ordered or consumed as the quantity that you need to reorder. For a better overview, you can also see all quote, order, and requisition line quantities associated with the line here, as well as the quantities received or used.
If you want to copy only a certain number of lines, you must select the Copy to Purchase field at the beginning of each line you want to include in the transfer. You can also select the Copy Budget Text to Purch. field on them to copy text entered on budget lines to the new document.
You can then choose OK to create the purchase document.
Purchase requests#
A purchase request can be considered a pre-procurement document. You can use this feature—as a project lead—to send a request for items, G/L accounts, or external resources to your organization’s procurement department.
Note
You need a valid license to work with purchase requests. You must also turn on the Purchase Request toggle in KUMAVISION Module Setup.
Note
This article describes the purchase request extension developed for KUMAVISION project365. For general information on how to set up requests and how they work, see the Purchase Request section.
Pseudo items as used on requests in KUMAVISION base (Booster) are currently not supported by project budget functionality.
Projects Setup#
Besides general purchase request setup, you can specify a workflow code that will be used exclusively for requests in KUMAVISION project365.
- Choose the Search icon, enter Projects Setup, and then choose the related link.
- On the Manufacturing and Warehouse FastTab, fill in the following field:
| Field | Description |
|---|---|
| Purchase Request Workflow Code | You must fill in this field if want to work with purchase request. When you create a request from a project, the value in this field is then filled in automatically. For more information, see Create a Request. |
Create a request#
To create a purchase request for a project:
- Open a project.
- On the ribbon, choose Project > WBS.
- Select the line for which you want to create a request.
- On the ribbon, choose Create Purchase Document.
- Choose Purchase Request in the Document Type field on the header.
- Select the Copy to Purchase field on the budget lines that you want to transfer to a new request.
You can see in the Qty. on Purch. Request field on each line the quantity that has already been copied to purchase requests. The value in this field doesn’t automatically reduce the quantity suggested for purchase, as requests aren’t tied to standard procurement processes.
After selecting the relevant budget lines, choose OK to link the request to the current project and the request lines to the budget lines.
You can find a list of all requests associated with the project by choosing Related > Documents on the ribbon.
When the request is approved, the purchase lines created from it will be linked to the same budget lines as those included earlier.
Transfer orders#
You can move items from one location to another by creating a transfer order. These orders are mostly used if the replenishment method for inventory is set to Transfer.
In KUMAVISION project365, you can move an item on a project budget line from the default location set up in the system to a location that is assigned to the project (or, more specifically, to the line itself).
An item that is moved to a project location will be reserved for the line that it has been assigned to, as specified for the moved item entry in the Project No., Work Package Code, and Line Activity No. fields.
As a result, you can post consumption of the item only on this one budget line. See the following articles for more information on transfer orders:
Create a transfer#
To create a transfer order:
- Open a project.
- On the ribbon, choose Project > WBS.
- Select the line for which you want to create a transfer order.
- On the ribbon, choose Create Transfer Document.
- Select the Copy to Transfer field on the budget lines that you want to transfer to a new order.
The following fields on each line are of great import here.
| Field | Description |
|---|---|
| Location Code | Shows the location specified on the project budget line. This location represents the target site for the transfer (=project location). |
| Transfer-from Code | Shows the place from where items should be moved. This code is copied automatically from a stockkeeping unit if the item replenishment method has been set to Transfer. Otherwise, you need to choose a code manually. |
What will be transferred is the Order Quantity on a line, which is calculated in the same way as for the Create Purchase Document action. The value in the Order Quantity field is only a suggestion and can be changed if necessary.
The other fields on the page used for the Create Transfer Document function can provide you with information about, for example, the quantities budgeted and consumed, and the following transfer-related values.
| Field | Description |
|---|---|
| Outstd. Qty. on Transfer Order (Base) | Indicates the quantity that will remain after you posted the transfer. |
| Project Inventory (Base) | When a transfer order has been fully posted (shipped and received), shows the quantity moved as project inventory (that is, the quantity reserved for the selected project budget line). |
| General Project Inventory (Base) | Contrary to the previous field, shows all reserved inventory at the location. If necessary, you can delete a project reference from inventory (see Delete Item Entry Reference). |
| Inventory | Shows the total stock at the selected location, regardless of whether it has been reserved for projects (=project inventory). |
To get a quick overview of what items must be moved, the page only shows transfer-related budget lines. These lines must have:
- A stockkeeping unit for this item and location with the Transfer replenishment method.
- An item quantity that isn’t part of a transfer order.
A budget line isn’t suggested if the quantity specified on it is already part of a transfer order, has been moved to project inventory—as might be indicated in the Project Inventory (Base) field—or has been consumed (from inventory).
For an unfiltered view on all budget lines, you can turn on the following toggles on the Create Transfer Doc. From WBS page.
| Toggle | Description |
|---|---|
| Show Items If No Order Qty. | Also shows items that have been fully consumed, have been moved, or are about to be moved so that you can request additional transfers, for example. |
| Show Items If No SKU | Also shows budget lines with items that have not been set up for transfer or have no stockkeeping units. |
Take from inventory#
You can use the (Inventory) Take action to transfer available (unreserved) item inventory to budget lines. Inventory that has already been assigned to a project can be identified by the project number stored for the relevant item entry.
On budget lines, the function is called Inventory Take and takes out items for a selected line. On planning worksheets, you can only start the function for a line assigned to a project budget.
When you run the action, you’ll see the project inventory available at line level and a list of all unreserved, positive, and unassigned item entries that are linked to the location specified on the line. On this list, you can then enter per item entry the quantity that you want to take out of inventory—provided it doesn’t exceed the number of items left on the line. You can also clear the Project No. filter if you want to transfer items from other projects.
When you close the page, you’re asked to confirm that you want to transfer the selected items. Choose Yes to move the quantities to project inventory and assign them directly to the project (or, more specifically, the budget line) through a project reference on the item entries created by the function.
Afterward, you need to use a project shipment to post consumption. Only then will the item be taken from the location and consumed.
Note
The result of the Transfer Order and Project Take functions is the same. Both create item entries that are directly linked to a budget line so that consumption can be posted only on that line.
The difference is that the Inventory Take function uses entries that are already at the location they’re supposed to be (the location specified on the relevant budget line), whereas transfer orders retrieve items from another location.
Stock commitment#
As explained earlier, items can be linked to a project in multiple ways, for example, via project purchase, inventory removal, or transfer from one location to another.
Their value entries make up what is known as stock commitment in the app. It indicates inventory that, for all intents and purposes, has been put aside for a specific project and is shown as a flow field quantity at WBS and budget line level, as well as on the project card.
You can track reductions and increases in these kinds of reservations by using the lookup next to a commitment field. This way, you can see how the quantity committed to a project has changed with each inventory-related posting (such as when you post a purchase receipt and later adjust the purchase price of the items on the associated invoice).
When you delete a project reference, you might also have to delete the reservation associated with the project. Otherwise, you see an error message that not enough inventory is available. Afterward, you can delete the reference and transfer the quantity remaining on the project. Because of the transfer, the stock commitment field is also cleared, as the value entry linked to the item is no longer related to a project.
Delete a reference to a project#
When an item is moved via transfer order or taken out of inventory, the system creates at the target location (=line-specific project inventory) an item entry based on this transfer or removal and includes a reference to the relevant budget line (by filling in the Project No., Work Package Code, Phase Code, Task Code, Step Code, and Line Activity No. fields). The entry can then be viewed on the budget line in the Project Inventory (Base) field.
Note
The same is true for project purchases without immediate consumption (Project Purchase Incl. Inventory).
Should you determine that reserved project inventory is no longer needed, you can transfer the remaining quantity to item ledger entries without a project reference.
Note
If a project reference is created by a purchase receipt that isn’t consumed immediately, an error message appears, and you cannot delete the reference before you invoice the receipt. You then need to post the invoice or move the item to general inventory.
Warning
Besides a relation to a project, an item ledger entry might also be linked to reservation entries on a budget line. In this case, you can delete the reference only after you’ve manually deleted those entries.
This will clear any project reference and make the inventory accessible again.
Instant Consumption Posting (purchases)#
As explained under Project Purchase Incl. Inventory, purchased materials are consumed immediately if you turned on the toggle with the same name in Projects Setup.
If the toggle is turned off, you must use the Post action on a purchase order for this.
When a receipt is posted, consumption is then posted as well. In inventory, a positive adjustment is made at the same time, and the item that you received is posted to the project instantaneously.
For correct posting, the Vendor Receipt No. and Vendor Invoice No. must be filled in, and the order must have been released.
Item Purchase Return#
When returning a project-related item to the vendor, the following points must be considered depending on the type of location, whether project location or direct material consumption:
With Project Location#
If the purchase is posted to a project location without immediate consumption for the project and the item has not yet been withdrawn using a project delivery, the following must be observed:
- Create Purchase Return Order.
- Via Get posted Document Lines to Reverse function select the posted receipts.
- Post the Purchase Return Order (Item Entries are posted by the Location).
Without Project Location – immediate Project Consumption#
If no project location is used, the Warehouse Receipt (posting the Purchase Receipt) results in the item being immediately consumed by the project. As a result, the item is no longer in location, meaning the initial situation is completely different compared to using a project location. The following procedure is recommended:
- First, the item must be transferred back from the project to the Location.
In the Project journals, first create a reversal line. In the field Reversal Entry No. select the project consumption entry that you want to reverse. - When the project reversal is posted, the item is transferred back to the location.
- If the Return Shipments to Project Inventory toggle is deactivated in the Projects Setup, then the item entry is without a project reference and can be used immediately. However, if the toggle is activated, the item entry remains linked to the project. For further processing, the item entry must be prepared using the Remove Project Reference function.
- Create Purchase Return Order.
- Via Copy Purchase Document Function select the Posted Receipt. Please note no Copy Project Reference.
- In the Lines you can select the posted Item Entries via Appl.-to Item Entry field.
Business registration certificates#
A Freistellungsbescheinigung (often translated as a certificate of exemption) was introduced by the German government to combat tax evasion, especially in the construction sector.
This business registration certificate is issued pursuant to Section 48b of the German Income Tax Act and provides proof that a subcontractor pays its fair share of taxes.
If the certificate hasn’t been made available, companies doing business with the subcontractor will be required by law to withhold 15% of all invoice totals to cover potential tax liabilities.
You can open a vendor card to check the status of registration based on the following (purely informational) fields:
| Field | Description |
|---|---|
| Business Registration Certificate | Shows if a certificate is available. |
| Registration Certificate Valid Until | Shows how long the certificate remains valid. |
You'll be notified if this kind of certificate is needed but hasn’t been provided yet when you enter a vendor on a purchase document.
Project documents#
The following documents can help make posting consumption to projects faster and easier to track.
Project shipments#
Project shipments, or, more specifically, shipping notes, offer your customers more information about the goods and services you deliver to them. They’re often made for projects that aren’t linked to specific sales orders.
You can create shipping notes in one of two ways. To create a note manually:
- Go to your role center.
- Choose Project Documents > Project Shipments at the top of the page.
- On the ribbon, choose New, and then fill in the lines.
The manual creation of shipping notes is very time consuming and prone to errors. We recommend that you only use this method for editing and instead create new notes by running the Create Project Shipment action from a work breakdown structure.
This action shows you all budget lines of the active WBS. Select the Copy to Project Shipment checkbox on each line that you want to transfer to the new shipment, and then choose OK.
Afterward, you see a message that the shipment has been created and you can open the document immediately.
Like on purchase and sales documents, you can add standard and extended texts at the beginning and the end of a note.
Posting a shipment creates time entries and, if the project includes items, item picks and project usage (for which the item ledger entry type is set to Negative Adjmt.). Additionally, you can change the default shipping values by editing the Shipment FastTab fields on the Project Shipments page.
On the same page, you can also turn on the No Usage Posting toggle so that usage for projects isn’t posted in the background. This is crucial if you want to use notes only as customer receipts—for example, if the items you bought for a project are consumed right away and aren’t moved to inventory.
The toggle is turned on automatically when you create a note from a project so that the system doesn’t pick items and posts consumption yet again.
You can post a note together with a warehouse shipment. For this purpose, the note must be released. To create a warehouse shipment, you need to run the function with the same name on the Project Shipments page or on the shipping document itself.
Warning
Warehouse shipments are only created for project shipment lines that contain a storage location code. The No Usage Posting toggle also needs to be turned off in this case.
If different customers are used in the WBS or in the budget lines, the function creates a separate project delivery for each customer and inserts the budget lines according to their respective customers. If an existing project delivery has a customer different from the project customer, only budget lines belonging to this customer are shown for manual selection there.
The system will copy any existing reservation from the budget lines to the project shipment line.
Project vendor shipments#
The vendor shipment feature provides a supplier with items needed to finish a purchase order. It is used both to pick items from inventory and to send notes to suppliers.
The items picked are then posted as consumption to a project. Each shipment can be assigned to a vendor through a purchase order.
The functions provided with project vendor shipments and project shipments are the same and either can be posted with a warehouse shipment. Their only difference is the page where you fill in the data for each document.
To create a project vendor shipment from a WBS, open a structure and choose Home > Create Project Vendor Shipment on the ribbon.
To create a shipment manually, open the Project Vendor Shipments page and choose New on the ribbon. This creates a blank shipment card, where you can enter a vendor number and address. Alternatively, you can have the vendor assigned automatically by filling in the Purchase Order No. field on the card.
Undo shipment#
You can use the Undo Shipment ribbon action to reverse one or more shipped lines on a posted project document. You can only reverse a line quantity in its entirety, however.
When you run the action, a corrective line with a negative quantity is added for each line you want to undo. For partially shipped lines that a source document is still available for, the quantity is reset in full.
Example
You enter an item quantity of 10 on a vendor shipment line. You then post six of the line items as received, with four remaining. When the line is reversed, the outstanding quantity on it is reset to 10. If the unposted line is no longer available, however, the line cannot be reset and the system doesn’t create a replacement document (which must be done manually, if needed).
With the undo function canceling the entire shipping process (that is, unless you’ve turned on the No Usage Posting toggle), the following happens:
1. When you reverse a quantity associated with a resource…
a) …the related time entry is corrected as well.
b) If the time entry has been copied to a project journal and posted as a project ledger entry, this ledger entry is also reversed.
Note
Project ledger entries that are included on invoices or have been billed already can no longer be corrected.
2. When you reverse an item quantity…
a) …the related item ledger entry is corrected as well.
b) With item tracking, this might affect several item ledger entries (that is, all entries created for a certain serial number).
c) …the associated bin entries are also reversed.
d) If the item was entered on a partially shipped warehouse document, the system additionally cancels the relevant line on this document (in the same way as the project document line).
Note
Corrected quantities remain ‘reserved,’ as every consumption entry that you want to reverse includes a project reference (such as a project number or a work package code) and the reversal entry will also contain this reference. If you want to make the item available again to all projects, you need to use the Delete Project Reference ribbon function.
If you reverse item consumption on a warehouse shipment document, the item will remain stored in the warehouse shipment bin at the associated location.
Project ledger entries#
Regardless of the method you choose to post project expenses, each posting that you make creates project ledger entries of type Usage. This includes posting times in a project journal, resource costs in purchasing, or lines on project shipments.
Project ledger entries are used to:
- Assign costs to a project.
- Bill by time and materials.
- Provide proof of performance.
- Analyze a project in cost control.
- Measure the progress of work completed.
See the following table for a more detailed explanation of the key fields found on the Project Ledger Entries page.
Important fields#
| Field | Description |
|---|---|
| Posting Date | Specifies the posting date of consumption, for example, as shown on a purchase document. |
| Performance Date | Specifies when work was performed. Typically, this date is identical to the posting date. However, the dates might differ, for example, when you post hours for a previous month. |
| Performance Resource No. | Only filled in for posting the consumption of resource hours. Typically, the value in this and in the No. field are identical. But the numbers might differ, for example, if you’re using Continia Expense Management for posting travel expenses. The expenses are then posted to dummy resources, whereas this field is used to assign a resource number to the person who took the business trip. |
| Start Time End Time |
Only filled in if usage is the result of hours being entered for a project with start and end times. |
| Entry Type | Shows either Usage or Sale. Usage entries can come from a variety of sources (such as purchases, project journals, and project shipments) and are used to allocate costs to a project (unless they are part of credit memos or reversals). Entries of type Sale are created by posting invoices or credit memos. They reduce the costs of a project (unless they are part of credit memos or reversals). |
| Document No. | Specifies the number of the document that is assigned to the entry. Typically, this number originates from a posted document, such as a sales or purchase invoice, but it might also have been retrieved from a posted project journal line. You can configure the display of document numbers on journal lines by using two fields in Projects Setup. For more information, see Project Setup. |
| Project No. | Specifies the number of the project that the ledger entry was posted to. |
| Type | Specifies the type of usage or revenue, resource, item, or G/L account stored with the ledger entry. |
| No. | Shows the number linked to the usage or revenue, resource, item, or G/L account stored with the ledger entry. |
| Work Package Code | You always post (usage or revenue) to a project on the lines of an active WBS. The ledger entry is linked to a WBS line through the project number and work package, as well as phase, task, and step code fields. |
| Line Activity No. | Specifies the number of a budget line activity if you posted to the project at budget line level. |
| Unit of Measure Code | Indicates the unit of measure in which usage or revenue is shown. |
| Quantity | For time and materials entries, specifies the usage quantity. For revenues, the value in this field is copied from the associated sales invoice line. |
| Unit Cost | For time and materials entries, specifies the unit cost of the usage entry. For revenues, the unit cost is not relevant so that the field shows a value based on the Type and No. fields on the sales invoice line. Note Project values are always measured in local currency, with the unit cost equaling the amount in the Total Cost (LCY) field. It does not matter in this context in which currency project usage was posted or if an invoice currency has been specified. KUMAVISION project365 does not support the use of another currency in planning. |
| Total Cost | For time and materials entries, specifies the cost of project usage as an amount. For revenues, the cost amount is not relevant so that the field shows a value based on the Type and No. fields on the sales invoice line. |
| Billing Type | Shows the billing type of the associated WBS line. If you change the billing type on that line, the new type will also be copied here. |
| Billable | Indicates if the project ledger entry can be billed. Only used for time and materials entries. If the field has not been selected for a time and materials entry, the entry will not be included when you bill the project. This is in contrast to a ledger entry where the field has been selected but the invoice quantity is 0 see (here). |
| Invoice Unit of Measure Code | For time and materials entries, specifies the unit that should be used to bill the entry. In the case of resources, the unit to be used depends on the work type. For revenues, indicates the unit in which the invoice line was posted. |
| Invoice Qty. | Only used for time and materials entries. Specifies the quantity that should be billed. The value in this field might differ from the value in the standard Qty. field. An entry with no invoice quantity but the Billable field selected will be copied as far as the proof of performance document, for example, to show customers free-of-charge services. |
| Unit Price | For time and materials entries, specifies the typical sales price for the entry. If no sales order is linked, this price will also be suggested for billing. For revenues, shows the unit price from the sales invoice line. Note In contrast to unit costs, unit prices can be displayed in a project-specific invoice currency. The price in local currency is then shown in the Unit Price (LCY) field. You should always bill entries in the invoice currency specified for the project. |
| Line Amount | For time and materials entries, shows the result of multiplying the invoice quantity with the unit price. For revenues, shows the quantity times the unit price. |
| Line Discount Amount | For time and materials entries, shows the line discount that will be used in billing. For revenues, shows the line discount specified on the associated invoice line. |
| Line Discount % | For time and materials entries, shows (in percent) the line discount that will be used in billing. For revenues, the field shows (in percent) the line discount specified on the associated invoice line. |
| Line Amount (LCY) | Shows the result of multiplying the unit price with the line discount. |
| Invoice Currency Code | Indicates the currency in which the project should be billed. Sales amounts stored with project ledger entries are shown in both local and invoice currencies. |
| Invoice Currency Factor | Copied from the project card. Indicates the factor used to convert the unit price in local currency to the price in the invoice currency. |
| Invoice Entry | Only used for time and materials entries. When a project ledger entry is being prepared for billing (which means the invoice has not been posted yet), the system assigns an invoice entry to the ledger entry and the sales (order or invoice) line. This prevents project ledger entries from being billed twice. Invoice entries have entry numbers identical to project ledger entries and can be printed on preliminary proof of performance documents. For a more detailed explanation, see Billings. |
| Posted Invoice Entry | Only used for time and materials entries. When you post a sales invoice, the system copies the invoice entries created for it along with other data to the newly posted document. This then closes the assigned time and materials entries so that they can no longer be copied to another invoice. A posted invoice entry is the link between a time and materials entry and a revenue entry. It has the same entry number as the project ledger entry and can be printed on proof of performance documents. For a more detailed explanation, see Billings. |
| Applies-to Sales | Only used for time and materials entries. Shows for an entry of type Sale how many time and materials entries will be billed with it. The time and materials entries are connected to the sales area through posted invoice entries. |
| Sales Adjmt. Qty. | Only used for time and materials entries. Shows for an entry of type Sale the total time and materials quantity that will be billed with it. The time and materials entries are connected to the sales area through posted invoice entries. |
| Purch. Invoice Entry | Indicates for entries of type Usage linked to external resources (with time postings) if the entries were prepared for billing on an unposted purchase invoice. For more information, see Purchase Invoices and Invoice Entries. |
| Posted Purch. Invoice Entry | Indicates for entries of type Usage linked to external resources (with time postings) if the entries were billed with a purchase invoice. For more information, see Purchase Invoices and Invoice Entries. |
| Add. Purch. Entry Link | Contains time and materials entries from a purchase invoice created for external resources (with time postings) if the quantities on the invoice differ from those entered in time recording. The new values are then posted to the project. For more information, see Purchase Invoices and Invoice Entries. |
| Add. Purch. Value Entry Link | Contains time and materials entries from a purchase invoice created for external resources (with time postings) if the values on the invoice differ from those entered in time recording. The new values are then posted to the project. For more information, see Purchase Invoices and Invoice Entries. |
| Ledger Entry No. | Shows the usage entries, that is, the resource, item, or G/L account entries linked to the project ledger entry. |
| Entry No. | Shows the (unique) number of the ledger entry. |
| Time Entry No. | Shows an entry number if the ledger entry was created by retrieving and posting a time entry in the project journal. |
| WP Modified [multiple fields] | Indicates for an entry whether, when, and by whom the work package entered for the project was changed. Only used for unbilled time and materials entries. |
| Value Correction | Belated corrective entry from a purchase invoice. This entry is created for an external resource if a purchase receipt was posted with a differing unit cost. The correction concerns only the unit cost, not the quantity or unit price. |
| Contact No. | Shows the contact number entered during time recording. This field is used to analyze on a per contact basis the costs linked to sales and marketing projects, which do not require customer numbers. |
Actions#
The following functions can be run from the Project Ledger Entries page.
Edit Entries#
What all ledger entries in Microsoft Dynamics 365 Business Central1 have in common is that once created, they can be changed only to a limited extent. This is also true for project ledger entries.
For this function to work, the project ledger entry that it is used for must be of type Usage and cannot have been billed already (that is, the Invoiced field cannot be selected). Entries that will or have been reversed cannot be changed.
Only the following fields stored with an entry can be edited at all:
- Description and Description 2
- Invoice Qty.
- Billable
- Unit Price
- Line Discount %
- Line Activity No. (for the same work package or WBS line by deleting the line activity filter on the Budget Line Activities page)
Most the of these will affect billing. But to correct costs specifically, you must reverse the project ledger entry and repost it with the correct values.
Apply Entries#
Assigns time and materials entries to an existing entry of type Sale. This will close the entries so that they cannot be billed again. You can run this action after selecting either entry, which affects whether the system will suggest time and materials or revenue entries for application.
Note
When you bill by time and materials, posted invoice entries are used for application automatically. The business logic of KUMAVISION project365 employs this method for time and materials entries only, although you can do the same manually for other billing types.
Applied Entries#
Shows the applied entries linked to the project ledger entry.
You can run this action from time and materials or from revenue entries. Your choice determines if you’re shown a revenue entry closing time and materials entries or time and materials entries applied to a revenue entry.
Change Work Package#
Changes the work package assigned to a time and materials entry. This function provides you with an easy way to correct postings in the system. If applicable, a new pricing run (in case of a work package change and, along with it, a work type change) and a dimensioning run are initiated.
If you change a work package, any existing reference to a budget line will be deleted.
Change Budget Line#
Use this function to make changes on the budget line level. When doing so, you can select a target budget line from another WBS line of the project. If applicable, a new pricing run (in case of a work package change and, along with it, a work type change) and a dimensioning run are initiated.
This function is only available for resource costs that are to be billed by time and materials. Please note the following: Cost entries that are to be billed by time and materials can only be moved to a different budget line while they have not been invoiced yet.
Suggest Account Transfer#
The Suggest Account Transfer function goes a step further than the previous action.
When a time and materials entry is selected and the function is run, the entry is copied to a negative posting line on the project journal for cancellation. At the same time, the action retrieves a new target project and a WBS line therein. This results in two lines that must be posted in the project journal.
Correct Dimensions#
Starts a correction for one or more selected dimensions.
This action serves essentially the same purpose as the function used to correct general ledger entries. For more information, see Troubleshooting and correcting dimensions - Business Central | Microsoft Learn.
Entry type for G/L account posting#
he type of a posted document also determines the type of project entry created for it. Typically, sales documents create entries of type Sale and purchase documents entries of type Consumption. You can, however, change the type, if necessary.
- Choose the Search icon, enter General Journals, and then choose the related link.
- Select an account, and then choose Related > Account > Card on the ribbon.
- On the Projects FastTab, in the Project Entry Type field, choose one of the options described in the following table.
| Option | Description |
|---|---|
| (blank) | G/L posting works as in the standard app (see above). |
| Usage | The ledger entry associated with the G/L account is posted as consumption (even on sales documents). |
| Sale | The ledger entry associated with the G/L account is posted as revenue (even on purchase documents). |
The original type is then replaced on the relevant document and in the general journal. You can make use of this feature in situations such as the following:
- During purchase: Negative revenue is billed by a supplier.
- During sale: Foreign taxes need to be included on an invoice.
Internal Billing Reasons (internal code)#
This page allows you to define internal billing reasons that can be used in time tracking for classifying changes of the billing quantity. The corresponding code is transferred automatically to the time entries and then copied to the project journal so that project management can track the reason for the change.