EDX - Electronic Data eXchange#
General#
EDX - Electronic Data eXchange stands for the document exchange module of KUMAVISION 365. EDI documents are sent in different formats, e.g. EDIFACT, VDA, OpenTrans etc.. A converter handles the conversion from the external format to the EDX internal XML format.
EDX then processes the converted messages and imports them into Microsoft Dynamics 365 Business Central. Required message acknowledgements are automatically sent within the internal document exchange. In the case of external EDI (electronic data interchange), message acknowledgement must be coordinated with the EDI service provider.
Incoming messages are validated by the EDX module. This means that the message content is loaded into the EDX document and checked for correctness, discrepancies and completeness. The user can manually correct the data in the EDX document and subsequently create the associated Business Central document.
For incoming messages, mapping is often required between the external item units and those stored in Business Central. For this purpose, the EDX module provides appropriate mapping tables.
The following diagram should clarify which task EDX takes over in the electronic document exchange:

| Area | Description |
|---|---|
| 1st communication | In this area the communication of the data exchange parties takes place. For the transmission different protocols are used. The transmission protocols are usually specified by the data sender. Automotive, for example, uses the OFTP2 protocol. The trade sector tends to use X.400 or AS2. It is not always necessary to use a service provider for document exchange. For X.400 transmission, for example, FileWork from Telekom can be used. However, if the OFTP½ protocol is required, then it makes sense to delegate the task of document exchange to a service provider |
| Message converter | The incoming messages are converted from the source format to the EDX target format using a converter. For example, EDIFACT messages are converted to EDX in-house format. For outgoing messages, the message is converted from the EDX in-house format to the respective target format. |
| EDX Inhouse Format | The Inhouse Format maps the documents of the Business Central business processes in a defined format. EDX uses the XML format for this purpose. The documents are described in the "KUMAVISION EDI Guideline". |
| 4. EDX Business Logic | In this area the previously converted documents are transferred into intermediate documents. With the "Business Logic" all relevant process steps are served, which are necessary for the examination of the document, creation as well as processing of the Business Central document. If it is possible by the document, an automation of the business process takes place. |
Business processes#
The EDX module enables internal as well as external document exchange. Microsoft Dynamics 365 Business Central1 documents can be exchanged within a group of companies as well as with external EDI partners.
Internal document exchange#
If there is a hierarchical company structure with several companies, then the document exchange can be implemented with the EDX module. Here, the documents of the individual companies can be exchanged among each other.
Prerequisites for the internal document exchange:
-
Main company and companies are in one database
In this case, the internal document exchange can be set up directly with the wizard. -
Main company and companies are in separate databases
In this case, document exchange must be set up manually. -
There is a common network structure and all participants can access a shared network path.
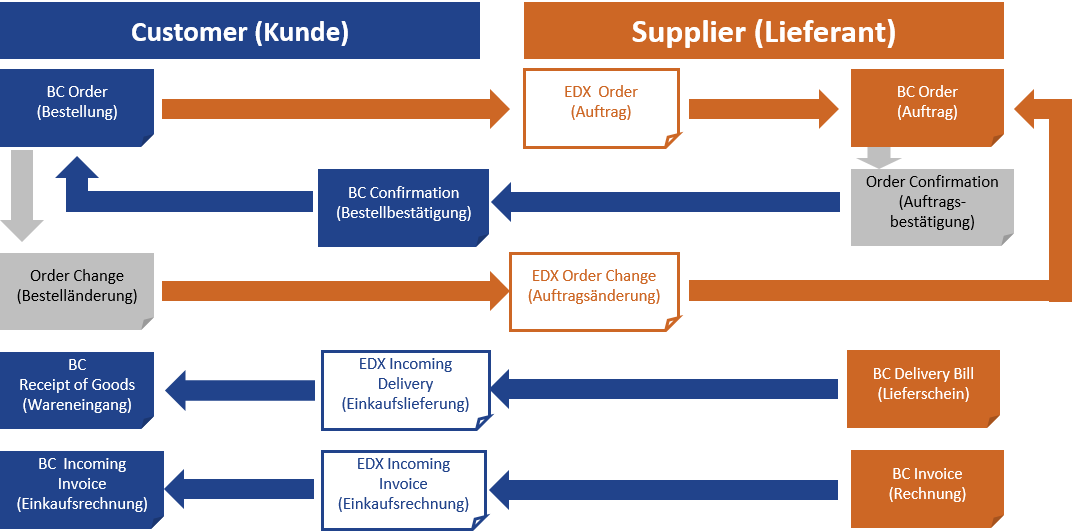
The following figure shows the document flow between customer and supplier in conjunction with the EDX module:
Main Company = Customer
Company = Supplier
External document exchange#
If documents are sent to an external partner (EDI) this is described below as external document exchange.
The external document exchange contains message types that have been developed for use with EDI service providers. The EDI service provider receives the EDX messages, transforms them into the target format and transmits the messages to the recipient.
It is not mandatory to use an EDI service provider. Depending on the requirements, the transformation and transmission can also be implemented as an in-house solution with appropriate middleware.
Available vouchers#
The following documents are already available in XML format after installation:
Purchase
- Order outgoing
- Order change outgoing
- Order confirmation incoming
- Incoming purchase delivery
- Incoming purchase invoice
- Purchasing complaint outgoing
Note
In order for a purchase invoice to be created, the combination of delivery bill number and customer/vendor must be unique.
Sale
- Sales order received
- Sales order change received
- Order confirmation outgoing
- Sales quotation outgoing
- Delivery bill outgoing
- Sales invoice outgoing
- Sales credit note outgoing
- Sales complaint outgoing
Subsequent changes to purchase order / sales order#
If a purchase order has already been sent via EDI and an order line is no longer required, this line must not be deleted. In this case, the quantity of the line is set to 0 and an order change is sent. This procedure can also be used if an ordered item is to be exchanged for another item. As described above, the quantity of the original item is set to 0. A new order line is created for the new item.
If a sales order line has been received via EDI and the item cannot be delivered, the quantity of the line must be set to 0. The line should not be deleted here either.
Establishment#
The module has numerous configuration and customization options, which will be explained in more detail in the following sections. The first part of the documentation covers all topics concerning administration and configuration. The second part describes the operation of the data exchange.
Entitlement rates#
Via the installation of the EDX Apps, different authorization sets are automatically integrated in your Business Central application. Assigning these permission sets to your users or user groups ensures that the respective users have access to the connection and can execute the functions depending on the assigned set.
| Authorization set | Description |
|---|---|
| EDX ALL | Permissions to read the EDX setup. This role must be assigned to the users. |
| EDX SETUP | Permissions to read, write, modify as well as delete records for all EDX tables. This permission set allows EDX setup as well as access to all EDX objects. This role must be assigned to the Microsoft Dynamics 365 Business Central1 Administrator as well as the task queue user. |
| Expiry of the retention period | Specifies the retention period for messages in the EDX inbox/outbox; the value entered here is transferred to the message setup. See section "Retention period expiry". |
| EDX SALES | Permissions to read, write as well as modify records related to the sales business process. This role must be assigned to the sales users. |
| EDX PURCHASE | Permissions to read, write as well as modify records which are related to the business process purchasing. This role must be assigned to users from the purchasing area. |
Roll Center#
The EDX Role Center represents the central work platform for the entire EDX module. All necessary information regarding documents (incoming/outgoing), items (incoming/outgoing) and configurations are displayed with corresponding stacks in the role center.
Incoming and outgoing documents are displayed as links in the Purchasing, Sales and Logistics overviews, indicating the number of each. Clicking on the link opens the relevant document or an overview of the documents. It is therefore possible to navigate from the role center to all EDX relevant documents.
Furthermore, all settings as well as error entries and system messages are displayed in additional overviews.
EDX Setup#
In the EDX Setup, settings can be made that are valid for the entire module. The EDX Setup can be called up via the Facilities and extensions > Service connections > KVSEDX Setup start page.
In the register Interface directory the directories for documents, test as well as the productive have to be defined.
Further entries are not necessary for the time being, since these are made with the EDX Setup Wizard. Further information can be found in the section of the same name.
For completeness, all fields of the EDX setup are explained in more detail below.
Inforegister General#
| Field | Description |
|---|---|
| Active | Indicates whether the EDX interface is enabled. If the EDX interface is disabled, the following actions will no longer take place: • No EDX events will be triggered. • Tasks from the EDX task queue will not be executed. The following functions will continue to operate: • Assigning an EDX partner to a Microsoft Dynamics 365 Business Central1 document remains possible. • Depending on the individual implementation of an EDX extension in the respective customer project, it may be that some interface actions are still partially executed. |
| Test environment | This flag controls whether the messages are processed in the subdirectory for the production or test database. see "Inforegister interface-directory" |
| database name | name of the current SQL database |
Inforegister interface directory#
| Field | Description |
|---|---|
| Document directory (UNC) | Base directory for electronic document exchange. The path must refer to a network share and be written according to UNC notation. Example: \server name\EDX |
| Subdirectory Test Environment | Subdirectory for Test Environment. |
| Subdirectory productive environment | Subdirectory for productive environment. |
Inforegister Azure Storage#
| field | Description |
|---|---|
| Storage Account Name | Name of the created Azure storage account. See Azure Environment: All Resources-> Storage Account |
| Shared Access Key | Access key for the storage account After selecting the storage account in the Azure environment, the access key (key1) can be retrieved and copied to the Shared Access Key field. |
| Container | Name of the blob container in the storage account. |
| Azure subdirectory Prod | Subdirectory for productive data. |
| Azure subdirectory Test | Subdirectory for test data. |
| Activated | When activated, the Azure Storage interface is registered as a service connection and can be used. |
| File Share | Name of the Azure file share. |
The Azure service connection is registered when the setup dialog is closed. Before the Azure Connection Test action can be executed, the setup dialog must be closed and reopened.
After that, the Azure Connection Test action can be executed.
Depending on the setup, either the connection to the Azure Storage Container or to the Azure File Share can be tested.
The following actions are performed during the test:
- Create Readme.txt file in the container.
- List files in the container
- Read in file "Readme.txt
- Delete file "Readme.txt".
Information register partner#
| field | Description |
|---|---|
| Extension Vendor EDX Partner Code Extension Customer EDX Partner Code |
Within the EDX module the EDI partners are created based on a customer or vendor. The partner codes are composed of the respective Microsoft Dynamics 365 Business Central1 vendor or customer number and the extension specified here Example: Creating an EDX partner based on vendor 1000. The EDX partner is managed as V1000. The extension codes are freely selectable. Both extension codes must be filled in . |
Inforegister numbering#
All incoming EDX documents are first stored in EDX intermediate tables. For these EDX documents number series are necessary. If the EDX module is used exclusively for outgoing documents, then the specification of number series is not necessary.
| Field | Description |
|---|---|
| EDX Order Number | Incoming order from customer. |
| EDX Order Change Number | Incoming order change from customer. |
| EDX Purchase delivery number | Incoming sales delivery from supplier. |
| EDX Purchase Invoice Number | Incoming sales invoice from vendor. |
| EDX Order Confirmation Number | Incoming order confirmation from supplier. |
Information register web service#
| field | Description |
|---|---|
| Log incoming web service data | Specifies logging of incoming web service calls. Logging takes place in the EDX inbox. |
| Log outbound web service data | Specifies logging of outbound web service calls. Logging takes place in the EDX outbound. |
Inforegister error handling#
| field | Description |
|---|---|
| The parameter "Time period until e-mail is sent" can be used to control the time period for which the errors are collected. Only after this time span has expired, the mail dispatch of all occurred errors takes place. | |
| Error mail address | Mail address to which error messages are sent. Only error messages are sent, which occur within the server processing. The following list shows a few examples of when error mails are sent automatically: An error occurs when reading an XML file. Possible error causes: - General errors within the XML file (Wellformed) - The XML file does not match the expected schema An error occurred during automatic further processing "Receiving a sales order". Possible causes of error: - Within the sales order, a reference is made to a Business Central master data record (e.g. article number, article unit) which does not exist. - When the sales order is created, queries are made which must be confirmed by the user (e.g. credit limit). These queries are not allowed in a background process. An error occurs when sending an XML file. Possible error causes: - No permission to write the outbound directory. In the error mail, a link to call the related Business Central Page is provided. For further information, please refer to the section "Setting up e-mail dispatch". |
Inforegister XML#
| field | Description |
|---|---|
| Disable XML Byte Order Mark | This switch can be used to control whether the XML message to be output should contain the byte order mark. |
Inforegister GS1#
| field | Description |
|---|---|
| Weight Unit code | A unit code is required for the weight within the GS1 messages. As the weight is specified in Microsoft Dynamics 365 Business Central1 without a unit, the unit code can be defined in this field. |
| Volume Unit code | A unit code is required for the volume within the GS1 messages. As the volume is specified in Microsoft Dynamics 365 Business Central1 without a unit, the unit code can be defined in this field. |
Inforegister Reorganization#
| field | Description |
|---|---|
| The date formula in the "Archive outputs/inputs that are older" fields can be used to specify the date from which EDX inputs/outputs will be moved to the archive. Only outgoing items for which no transmission error has occurred will be moved to the archive. Outgoing items with transmission errors can be manually moved to the archive using the Archive outgoing items with transmission errors action. For inbound items, only completed acknowledgement messages are moved to the archive. The archiving of other input messages, such as EDX sales orders is controlled via the respective EDX document. |
Inforegister BC Configuration#
| field | Description |
|---|---|
| Job Queue V3 | Indicates that the new version of the EDX task queue is being used. With version 3.0, tasks can be executed at one-second intervals. In addition, transactions such as message receipt, document creation and dispatch take place directly one after the other, which minimizes delays. |
| Task queue items in seconds interval | As soon as the switch is active, all EDX task queue items except for the parameters "Reorganization" and "Send Mail" will be executed in seconds interval. |
| Use interval for incoming/outgoing messages | Specifies that the interval in the message setup is also used for sending or receiving messages. If the switch is activated, incoming and outgoing message setups are executed when the "Earliest start date" according to the message setup has been reached. Further information can be found in the section "Message facility - Information register processing". |
| Suppress purchase commit | In the standard version of Microsoft Dynamics 365 Business Central1, commits are executed during a booking. This can lead to inconsistent data. This option suppresses the Microsoft Dynamics 365 Business Central1 standard function. |
| Suppress sale commit | In the standard version of Microsoft Dynamics 365 Business Central1, commits are executed during a booking. This can lead to inconsistent data. This option suppresses the Microsoft Dynamics 365 Business Central1 standard function. |
| Deactivate during upgrade | Indicates that the EDX interface is not active during a data upgrade. See Active. |
Inforegister Facility Overview#
The fields on the Setup Overview info tab give an overview of which items are already set up in EDX.
EDX Setup Wizard#
To make setting up the connection as convenient as possible for users, a setup wizard has been developed to guide you through the individual steps. This setup wizard can be called up via the EDX Setup ribbon (More options > Action > Setup > EDX setup wizard).
The EDX setup wizard can also be started via the "Supported setup".
The EDX setup wizard is started.
The first EDX configuration should start with the "Communication" function.
By selecting "Communication", the parameters for the file transfer (OnPrem) and the parameters for the Azure Storage can be entered.
The message types, number series for incoming messages, task queue items and retention period expiry are set up via the "General" selection.
See section "Expiry of the retention period".
If you want to send orders, delivery notes or invoices to another client, select the "Internal document exchange" function. Further information on this can be found in the "Internal document exchange" setup section.
KUMAVISION Feature Management#
In the KUMAVISION Function Management, you determine whether Microsoft Dynamics 365 Business Central1 communicates with Azure via the old API (2020) or the current REST API (AFS/ABS Client). If the function key Use Standard Business Central AFS/ABS Client (EDX) is deactivated, the old API remains active. When the key is activated, the system uses the new REST API; no changes to the EDX Azure setup or Azure Storage are required.
EDX Document types#
When installed, the EDX module already has some message types which can be used for internal and external document exchange.
Setup#
The EDX message types are created with the action "EDX Setup Wizard" within the EDX setup.
You can view the "EDX message types" using the call of the same name via the user search. The individual fields are explained in more detail below:
| Field | Description |
|---|---|
| Document | Name of the EDX message. |
| Description | Description of the EDX message. |
| Document Direction | Inbound/Outbound Message. |
| GS1 Business Message Standard | Indicates if this is a GS1 Business Message Standard message. |
| Intercompany Role | Role of the document within the intercompany message exchange (customer/vendor). |
| Processing order | Default value for the processing order. This ensures that a purchase order confirmation is processed before the purchase delivery. |
| Field setting active | Default value for the field setting. If the message supports the field setting, then the field setting can be called after the message has been assigned to an EDX partner. |
| Collective mail allowed | Default value for collective mail.See "Processing". |
| Include PDF allowed | Indicates to include the associated Business Central PDF document as a base64 string in the message. |
| Message Encoding | Sets the message encoding. |
Distribution of EDX document types#
All EDX message types have a prefix with which an area assignment can be made.
The areas are subdivided as follows:
| Area | Description |
|---|---|
| IC | Internal message exchange. |
| GS1 | GS1 Message. |
| CC | External message exchange. Documents reconciled with Clearing Center. These messages are used from EDX version >= 10 for external message exchange. See also KUMA EDI Guideline. |
| PEPPOL BIS 3.0 | PEPPOL Business Interoperability Specification (BIS) 3.0. |
| Message | Description | Message direction |
|---|---|---|
| BASE CUSTOMER | Basis Debitor Export | Starting from |
| BASE ITEM | Basic Item Export | Starting from |
| BASE VENDOR | Basis Vendor Export | Starting from |
| CC PURCHASE ORDER | Send purchase order | Starting from |
| CC PURCHASE ORDER CHANGE | Send purchase order change | Starting from |
| CC PURCHASE RETURN ORDER | Send purchase complaint (CC) | Starting from |
| CC PURCHASE RETURN ORDER CHG | Send purchase complaint change (CC) | Starting from |
| CC PURCHASE INVOICE | Receive purchase invoice (CC) | Incoming |
| CC PURCHASE RECEIPT | Receive purchase delivery (CC) | Incoming |
| CC PURCHASE ORDER CONF | Receive purchase order confirmation (CC) | Incoming |
| CC SALES INVOICE | Send sales invoice (CC) | Starting from |
| CC SALES ORDER | Receive sales order (CC) | Incoming |
| CC SALES ORDER CHG | Receive sales order change (CC) | Incoming |
| CC SALES ORDER CONF | Send order confirmation (CC) | Starting from |
| CC SALES SHIPMENT | Send sales delivery (CC) | Starting from |
| CC DESPATCH ADVISE | Send sales delivery (CC) This message can only be used in conjunction with the "KUMAVISION Dispatch processing". The message contains the assigned load carriers and their hierarchy. |
Starting from |
| CC SALES CR.MEMO | Send sales credit memo (CC) | Starting from |
| CC SALES RETURN ORDER | Send sales complaint (CC) | Starting from |
| CC SALES RETURN ORDER CHG | Send sales complaint change (CC) | Starting from |
| CC SERVICE INVOICE | Send service invoice (CC) | Starting from |
| CC SERVICE CR.MEMO | Send service credit note (CC) | Starting from |
| CONFIRMATION RECEIVE | Receive confirmation of receipt | Incoming |
| CONFIRMATION SEND | Send confirmation of receipt | Starting from |
| GS1 APP REC ACK IMP | Receive confirmation of receipt EDI application recommendation GS1 XML 3.4.1. Application Receipt Acknowledgement |
Incoming |
| GS1 APP REC ACK IMP | Receive confirmation of receipt EDI application recommendation GS1 XML 3.4.1. Application Receipt Acknowledgement |
Starting from |
| GS1 SALES CRMEMO EXP | Send sales credit note EDI application recommendation GS1 XML 3.4.1. Invoice |
Starting from |
| GS1 PURCHASE CRMEMO EXP | Send purchase credit EDI application recommendation GS1 XML 3.4.1. Invoice |
Incoming |
| GS1 SALES DESADV EXP | Send sales delivery EDI application recommendation GS1 XML 3.4.1. Despatch Advice |
Starting from |
| GS1 PURCHASE DESADV IMP | Receive purchase delivery EDI application recommendation GS1 XML 3.4.1. Despatch Advice |
Incoming |
| GS1 SALES INVOIC EXP | Send sales invoice EDI application recommendation GS1 XML 3.4.1. Invoice |
Starting from |
| GS1 PURCHASE INVOIC IMP | Receive purchase invoice EDI application recommendation GS1 XML 3.4.1. Invoice |
Incoming |
| GS1 PURCHASE ORDCHG EXP | Send purchase order change EDI application recommendation GS1 XML 3.4.1. Order |
Starting from |
| GS1 SALES ORDCHG IMP | Receive sales order change EDI application recommendation GS1 XML 3.4.1. Order |
Incoming |
| GS1 PURCHASE ORDER EXP | Send purchase order EDI application recommendation GS1 XML 3.4.1. Order |
Starting from |
| GS1 SALES ORDER IMP | Receive sales order EDI application recommendation GS1 XML 3.4.1. Order |
Incoming |
| GS1 SALES ORDRSP EXP | Send sales order confirmation EDI application recommendation GS1 XML 3.4.1. Order Response |
Starting from |
| GS1 PURCHASE ORDRSP IMP | Receive purchase order confirmation EDI application recommendation GS1 XML 3.4.1. Order Response |
Incoming |
| GS1 SERVICE CRMEMO EXP | Send service invoice EDI application recommendation GS1 XML 3.4.1. Invoice |
Starting from |
| GS1 SERVICE INVOIC EXP | Send service credit note EDI application recommendation GS1 XML 3.4.1. Invoice |
Starting from |
| PEPPOL 3.0 SALES INVOICE EXP | PEPPOL To 3.0 Verkaufsrechnung | Starting from |
| PEPPOL 3.0 SALES CR.MEMO EXP | PEPPOL To 3.0 Verkaufsgutschrift | Starting from |
| PEPPOL 3.0 SERVICE INVOICE | EXP | PEPPOL To 3.0 Servicerechnung |
| PEPPOL 3.0 SERVICE CR.MEMO | EXP | PEPPOL To 3.0 Servicegutschrift |
| IC PURCHASE INVOICE | Receive purchase invoice (IC) | Incoming |
| IC PURCHASE ORDER | Send purchase order to vendor (IC) | Starting from |
| IC PURCHASE ORDER CHG | Send order change (IC) | Starting from |
| IC PURCHASE ORDER CONF | Receive order confirmation (IC) | Incoming |
| IC PURCHASE SHIPMENT | Receive purchase delivery (IC) | Incoming |
| IC SALES INVOICE | Send sales invoice (IC) | Starting from |
| IC SALES ORDER | Receive sales order (IC) | Incoming |
| IC SALES ORDER CHG | Receive sales change (IC) | Incoming |
| IC SALES ORDER CONF | Send order confirmation (IC) | Starting from |
| IC SALES SHIPMENT | Send sales delivery (IC) | Starting from |
| IC SALES DELFOR | Receive delivery call-off (FACTORY only) | Incoming |
EDX Partner#
In order to be able to exchange documents, one or more partners must first be defined in the EDX module. These partners can be created based on existing accounts payable or accounts receivable.
EDX partners are managed under a code that consists of the respective Business Central vendor or customer number and a defined prefix.
Before creating the EDX partner, the field "Our account number" must be defined in the vendor/customer.
Example of "Our Account Number":
Vendor Role: For customer 1000, 61000 is entered in the "Our Account Number" field.
Role of Customer: For vendor 61000, 1000 is entered in the "Our account number" field.
Partner type debtor#
A new EDX partner is created directly from the partner overview. To do this, first call up the "EDX partner" via the user search.
With the action "Create customer" a new EDX partner is created on the basis of a customer.
For the EDIFACT UNB segment to be created, the fields: GLN, Data sender as well as Recipient Id. can be used for the EDIFACT UNB segment to be created.
The fields data sender and recipient ID are not subject to a format check. Accordingly an ODETTE-Id, DUNS-No etc. can be entered.
For the transmission of XInvoices to an EDI service provider the "Routing Id." is required. see "Coordination Office for IT Standards".
Basically all above mentioned fields have to be coordinated with the EDI service provider. The fields are transmitted within the CC messages invoice, credit bill as well as delivery bill in the element "Routing".
Units mapping#
A unit mapping is necessary to change the customer's unit code to your own unit code.
Example:
A customer orders 5 PCS, the unit code in Microsoft Dynamics 365 Business Central1 is Piece.
In this case, a mapping must be created for the translation from PCS to Piece.
The unit mapping is accessed from the "EDX Partner Overview" via the ribbon.
It is not necessary to store a unit mapping for each EDX partner and article. As a rule, the unit "PCS" must be converted to the Business Central unit "Piece" for all EDX partners and articles.
The following sequence is used to determine the unit mapping:
- mapping with EDX partner, article and reference code search.
- mapping with article and reference code search
- search mapping with EDX partner and reference code
- mapping with reference code search
Unit mapping is used with the following documents:
- Sales orders
- Sales order changes
- Purchase order confirmations
- Purchasing deliveries
- Purchasing invoices
For outgoing documents, unit mapping is only performed in the "Clearing Center Messages".
- born sales delivery
- born sales invoice
- purchase order
- order confirmation
Additions/Detractions Mapping#
In EDX additions/deductions mapping, additions and deductions can be assigned to articles, resources, G/L accounts and fields in the document header.
Examples:
- G/L account for surcharge advertising costs
- Item as freight costs
- Amount incl. VAT field from the sales header as an insurance surcharge.
Only fields from the sales header can be used. Amounts and percentages can be specified. These two fields are disabled for lines surcharges/discounts. The field "Position" is filled automatically and is only an information for the user.
The addition and deduction codes are selected from a separate table.
The surcharge/deduction mapping is only used for external outgoing document dispatch with Clearing Center. This includes the following documents:
- Order Confirmation
- Posted sales invoice
- Posted sales credit memo
Service GTIN Mapping#
With the "EDX Service GTIN Mapping" resources, G/L accounts etc. can be provided with a GTIN. The stored GTIN is sent within the service invoice as well as credit note.
GTIN/Reference Mapping#
The GTIN/reference mapping can be used to assign a GTIN to resources, G/L accounts, etc.
The selection of the business relationship determines whether the mapping is used for purchase or sales messages. A reference can also be entered in the mapping. This is necessary if the resource does not have a GTIN but the message recipient has defined a different code for the resource.
Example:
| Business relationship | Relationship no. | Typ | No. | GTIN | Referenz-No. |
|---|---|---|---|---|---|
| customers | 30000 | Resource | LIFT | H58 | |
| customers | 30000 | Surcharge/discount (item) | V-DISCOUNT | E-DISCOUNT | |
| vendor | 30000 | Resource | H58 | LIFT | |
| vendor | 30000 | Surcharge/discount (item) | E-DISCOUNT | V-DISCOUNT |
For outgoing messages for customer 30000, the resource LIFT with the reference no. H58 to the message recipient. The surcharge/discount V-RABATT is reported with the reference E-RABATT.
GTIN/reference mapping is supported for EDX GS1 messages and for Clearing Center messages for service invoices and credit notes.
The mapping can also be used in EDX Intercompany.
GTIN14#
With the introduction of EDX GS1 messages, a 14-digit GTIN is supported.
Further information can be found at: GTIN (Global Trade Item Number).
EDX Occupancy device#
Different message types can be defined for each EDX partner. With the "EDX message setup" the documents are assigned to the EDX partner as well as configured.
Via "New" an EDX message is assigned to a previously created EDX partner. In the following, the fields of the EDX message card will be explained in more detail.
Inforegister General#
| field | Description |
|---|---|
| Partner No. | Selection of EDX partner. Only active EDX partners can be selected. |
| EDX Message | Selection of the EDX Message. By default, the following messages are included: - Order outgoing - Order confirmation incoming - Order change outgoing - Sales order incoming - Sales order change incoming - Order confirmation outgoing - Delivery bill outgoing - Sales invoice outgoing |
| EDX Message Description | A freely selectable description can be entered here. This is for information only |
| EDX Message Direction | Indicates the direction of the message (incoming or outgoing). |
| EDX transmission from | Microsoft Dynamics 365 Business Central1 documents are received or sent from the date specified here. |
| Retention period expiry | Specifies the expiry of the retention period for messages in the EDX inbox/outbox. See "Retention period expiry". |
| Receipt Confirmation Check | Receipt confirmation check can be used to control whether a message confirmation should be requested. Example: Sending a purchase order with receipt confirmation check. Upon receipt of the purchase order on the receiving end, a receipt confirmation is sent to the message sender. The EDX status within the purchase order will automatically change to "Recipient Received". After the Business Centrals sales order is created at the recipient's end, another acknowledgement is sent. The EDX status within the order automatically changes to "Recipient accepted". If the recipient rejects the EDX sales order, then an acknowledgement is also sent. The EDX status in the sent order will change to "EDX Rejected". Acknowledgement check should be enabled on outgoing as well as incoming message. Outgoing acknowledgement messages e.g. for receiving an EDX sales order will now be sent via EDX outgoing. The "Source record" field now always refers to the associated document. The acknowledgement check is now supported by all EDX messages, sales deliveries, sales invoices as well as sales credit notes. In case of external EDI, the acknowledgement messages may have to be coordinated with the EDI service provider. |
| Test Indicator | Identifies the incoming or outgoing messages as a test message See section Productive/Test Database. |
Inforegister transfer#
| Field | Description |
|---|---|
| EDX transmission type | Intercompany If both clients are in one database, the transmission type "Intercompany" can be used. The EDX Intercompany setup must be carried out via the EDX setup wizard. API V2.0 Intercompany Prerequisite: see section "OAuth setup". If both clients are in different SaaS databases, the "API V2.0 Intercompany" transfer type can be selected. The EDX Intercompany setup must be done via the EDX setup wizard. Azure Storage Prerequisite: Set up an Azure storage and container. See section "Inforegister Azure forwarding" All messages are stored or retrieved on the specified Azure Storage container. This transfer type can be used in the following scenario: Messages are to be stored on an FTP or SFTP server for the interface operator. An Azure Logic App must be created in the customer project. The Azure Connector "FTP" is used for message transfer within the Azure Logic App. Note: The Azure Logic App is not part of the EDX module. Azure Fileshare Prerequisite: Set up an Azure storage and fileshare. All messages are stored or retrieved on the specified Azure fileshare. This transfer type can be used in the following scenario: Messages are to be stored in the file system of the interface operator. A Powershell script is made available to the interface operator for the Azure fileshare set up. The interface operator can use this script to integrate the Azure fileshare as a network drive in their infrastructure. Null Prerequisite: none Outgoing messages: The "Null" communication interface marks outgoing messages as sent. A transmission does not take place. The outgoing message can be downloaded with the "Download message" action. Incoming messages: No processing. Incoming messages can be imported in the EDX inbox with the "Upload message" action. This transmission type can be used in the following scenarios: The interface operator sends the messages directly to the EDX inbox via the "EDX API Inbound" web service. In this case, the associated EDX message must be assigned to the EDX partner with the "Null" transmission type. The incoming/outgoing EDX messages should already be tested, although the communication parameters have not yet been determined. Prerequisite: Set up an e-mail account in Microsoft Dynamics 365 Business Central1. The messages are sent as an attachment to an e-mail. This transmission type can be used in the following scenarios: A supplier would like to receive the Microsoft Dynamics 365 Business Central1 article, purchase order, etc. as an xml message attached to an email. Note: Additional transmission types can be implemented in the customer project. It makes sense to extend the transmission type if the interface operator provides web services for receiving messages, for example. Messages from the interface operator to Microsoft Dynamics 365 Business Central1 can be sent to the "EDX API Inbound". |
Inforegister Azure / File Transfer#
| field | Description |
|---|---|
| EDX file path | Input/output path for files. In this field either an absolute or dynamic path can be entered. The dynamic path is stored with the placeholder %ROOT_DIR%. This placeholder is exchanged at runtime for the base directory from the EDX setup. Thus, when moving a directory share, it is sufficient to change the new directory in the "Directory Documents (UNC)" field within the EDX setup. In the above example, %ROOT_DIR% is exchanged for \kvsdodc01\temp\EDX\Test10\Prod\. Once the "Test Environment" switch is enabled, the following directory applies to %ROOT_DIR% \\kvsdodc01\temp\EDX\Test10\Test\The same rules apply to the placeholder %AZURE_CONTAINER% In this case, the Azure container set up is used. |
Inforegister Azure Forwarding#
The forwarding parameters are sent to an Azure Logic App or Power Automate.
The Azure Logic App is not part of EDX. A corresponding "Azure Logic App" or "Power Automate" must be created in the customer project to process the parameters listed below. For the creation of the "Azure Logic App" the template "EDX_Outbound_Message" can be used.
When using the forwarding parameters, the GS1 messages "GS1 APP REC ACK IMP" as well as "GS1 APP REC ACK EXP" must be assigned to the EDX partner.
The forwarding parameters can be stored for both the test and production environments.
| Field | Description |
|---|---|
| Forwarding type | This parameter can be used within the Logic App to decide which Azure Connector is used. |
| Forwarding ID | Determines the EDI party. |
| Forwarding Destination | Determines the destination of the message. |
Example:
CC Invoice message is to be forwarded to EDI service provider EDI1 via SFTP. The message is to be placed on the destination FTP server in the /inbound directory.
Specify the following forwarding parameters:
| field | description |
|---|---|
| Forwarding type | SFTP |
| Forwarding ID | EDI1 |
| Forwarding destination | /inbound/ |
FTP information register#
No longer supported.
For FTP as well as SFTP transfer, an Azure Storage in connection with an Azure Logic App is required.
Inforegister e-mail#
| field | Description |
|---|---|
| Recipient Email Address | Email address of the message recipient. |
| CC recipient e-mail address | CC e-mail address of the message recipient. |
| BCC recipient e-mail address | BCC e-mail address of the message recipient. |
| Email Subject | Indicates the subject of the e-mail. |
| Email Text (HTML) | Indicates the text of the e-mail. |
FastTab Processing#
In this FastTab the processing parameters for the incoming as well as outgoing messages are defined.
| Field | Description |
|---|---|
| Automatic processing | EDX incoming document: The received EDX document is automatically checked. If there are no errors during the check, the Business Central document is created. If an error occurs during the review or creation of the Business Central document, an error email is automatically sent. This feature is currently available for EDX sales orders. See section: "Automatic processing" EDX Outbound Document: So far, the following outbound documents can be sent automatically: - Sales delivery - Sales invoice - Sales credit memo - Purchase order - Purchase order changes See section: "Automatic processing". |
| Automatic processing steps | This option can be used to specify which processing steps are to be carried out during automatic processing. The following options are available: • Check and process • Check only Note: This option can only be selected for incoming EDX standard messages. |
| Processing order | Specifies the processing order of incoming messages. |
| Do not add transmission ID | If this option is enabled, the "EDX Transmission ID" element is not transferred to the XML file. The EDX module basically assumes that the "TransmissionID" element is present in the incoming XML document. This element, for example, is used for document navigation within EDX. If the incoming XML document does not contain the TransmissionID, then this is automatically added as the first element. Note: The setting of this switch should only be changed if described in the respective application documentation (customer project). |
| Invoice ignore zero | Invoices with a value of 0 € will not be transferred if this option is enabled. The setting of this switch should only be changed if it is described in the respective application documentation (customer project). |
| Ignore zero credit notes | Credit notes with a value of 0 € will not be transferred if this option is enabled. |
| Automatic archiving | Determines that the associated EDX receipt is archived after EDX receipt processing. |
| Direct purchase invoice / credit note | Disabled: When processing an incoming purchase invoice, the purchase delivery information is expected. Based on the purchase delivery number, the associated purchase order is determined. The purchase delivery as well as the purchase order are then used for plausibility checks. Switched On: The EDX purchase invoice data is transferred directly to an unposted purchase invoice. Plausibility checks are performed with regard to the "purchase from vendor" as well as the articles. Note This option is not available with EDX Intercompany. Einkaufsgutschrift See Internal document exchange |
| Include the associated PDF document | In the case of outgoing messages for the Clearing Center, the associated PDF document can be included directly in the message. The PDF document is transmitted as a base64 encoded string. If the created Business Central documents (sales delivery bill, sales invoice as well as sales credit bill) should not be sent immediately when posting, then a document collection can be activated with this option. This option is currently used by the EDX documents: Sales Delivery (CC), Sales Invoice (CC), Sales Credit Memo (CC) supported. The time for sending the document can be set by the processing time window. |
| Next list number | When sending collective shipments, a list number is usually required. In the "Next list number" field, the list number can be specified which will be used for the next transmission. Note: Sales deliveries can be transmitted as collective consignments. There is no provision for assigning a list number. In general, a forwarding order number must be transmitted within the delivery note message. This is currently not supported by the EDX CC delivery note message. |
| Transmission Nos. | Specifies the number series for outgoing messages. The transmission number is only supported for outgoing GS1 messages. |
| BC Release document | This setting controls that a scanned document is automatically released after creation. |
| BC Post Document | Determines whether an incoming EDX document should be posted or not. |
| Use Posting Date | Specifies which date should be used for incoming EDX vouchers. The following options are available: - Posting date - Current date - Work date - Incoming document date. |
| Show BC document | Specifies whether the associated Microsoft Dynamics 365 Business Central1 document should be displayed after processing an incoming message. User query As before, a query is displayed asking whether the associated Microsoft Dynamics 365 Business Central1 document, e.g. sales order, should be displayed. Display automatically The associated Microsoft Dynamics 365 Business Central1 document, e.g. sales order, is displayed without a query. Do not query/display There is no query and the Microsoft Dynamics 365 Business Central1 document is not displayed. |
| Use article references | Since in the rarest cases there is a consolidated article master between the partners, it is necessary to ensure a reliable assignment of the article numbers. The setting "Use article references" controls a check of the transmitted article number, as well as the transmitted reference number. The article/reference number check is based on the Microsoft Dynamics 365 Business Central1 article master > References. When using this function, the following requirements are necessary: - The partner must necessarily transmit the GTIN or reference number. - The article references of the partner must be maintained in the article master. When transmitting a GTIN, the Microsoft Dynamics 365 Business Central1 article is determined based on the GTIN field in the article master. If no matching article is found, then a search is performed using the article references with type "Barcode". With the article reference search the reported article unit is used. If also this search should lead to no result, then the search takes place on the basis the article references with type "debtor" and/or "creditor". The reported article reference number from the message is used. |
| Use article unit mapping | This setting controls an automatic mapping of the article units. Example: The EDX partner transmits for any article the article unit "PCS" which is managed in Microsoft Dynamics 365 Business Central1 as "Piece". If the corresponding mapping table is maintained and the "Article Unit Mapping" setting is maintained, the unit will be changed accordingly upon receipt. . |
| EDX Automatic Archiving | If an EDX document is processed, this setting can be used to control that the corresponding incoming item is archived. |
| Processing Time Window | For outgoing documents, the processing time window controls when the document is sent. For incoming documents, the processing time window controls the review and creation time. Example for outgoing sales invoices: Sales invoices are to be collected by Saturday and sent at 10:00 p.m. In this case, the "Execute Saturday" option is enabled in the processing time window. All other days will be disabled. The start time is set to 22:00 and the end time is set to 23:00. The earliest start date will be calculated automatically. Once the specified time window is reached, all invoices that have not yet been sent will be sent. Incoming sales order example: Sales orders should be processed automatically at 22:00 every day. In this case, every day will be activated in the processing time window. The start time is set to 22:00 and the end time is set to 23:00. Note: Once the specified time window is reached, all unprocessed EDX sales orders will be checked and created as Microsoft Dynamics 365 Microsoft Dynamics 365 Business Central1 order. |
| Intervall | Specifies that incoming EDX intermediate documents are automatically processed at the interval specified here. Outgoing BC documents are also transferred to the EDX outbox at the interval specified here. If the "Use interval for incoming/outgoing messages" parameter is activated in the EDX setup, messages are also sent and received at the interval specified here. Example: No start/end time has been set. The weekdays from Monday to Friday are activated. Interval is set to 30 minutes. "Earliest start date/time" is empty or less than the current date/time. EDX processing is executed. After execution, "Earliest start date/time" is recalculated with the current date/time + interval. Example: Start/end time from 12:00 to 15:00. The weekdays from Monday to Friday are activated. Interval is set to 30 minutes. "Earliest start date/time" is empty or less than the current date/time. EDX processing is executed. After execution, "Earliest start date/time" is recalculated with the current date/time + interval. After the end time is exceeded, "Earliest start date/time" is recalculated with the current date/time + 1 day. |
Info tab Advanced#
| field | description |
|---|---|
| Partner Type | Indicates whether the displayed EDX partner is a customer or vendor. |
| Partner BC No. | Displays the Microsoft Dynamics 365 Business Central1 customer or vendor no. depending on the "Partner type" field. |
| Message Type | Displays the Microsoft Dynamics 365 Business Central1 message type associated with the EDX document setup. |
| Document Table No. | Displays the Microsoft Dynamics 365 Business Central1 Table No. associated with the EDX Document Setup. |
| Object Type Object ID |
Indicates the XML port or code unit responsible for message processing. |
| Message Encoding | Specifies the message encoding. This parameter has no effect on EDX standard messages. Within project specific messages this parameter can be used for the message encoding. |
| Webservice Function | Specifies the message for use within internal webservice functions. |
| Webservice Function Name | Sets the name of the internal webservice function. |
FastTab Parameter#
This FastTab shows the parameters for the current message. These parameters may override the settings from the EDX configuration if necessary. Currently, the following parameters are supported:
| Transmission type | Parameter | Description |
|---|---|---|
| Azure File Share | These parameters can be used to override the Azure file share parameters from the EDX setup. Example 1. In the EDX setup, the Azure storage account "PartnerA" and the file share "Transfer" is set up. No different parameters are entered on the selected message. In this case, the message transfer is to the Azure storage account "PartnerA" / "Transfer". 2. As described in point 1, the Azure storage account as well as the fileshare is set up in the EDX setup. For the selected message, the Azure storage account "PartnerB" and the fileshare "Interface" are specified via the parameters. In this case, the message transfer will be to the Azure storage account "PartnerB" / "Interface". |
|
| AZURE_FILESHARE_ACCOUNT_NAME | storage account name | |
| AZURE_FILESHARE_ACCESS_KEY | Storage account access key | |
| AZURE_FILESHARE | fileshare name | |
| AZURE_FILESHARE_DIR_PROD | Directory for Prod. environment | |
| AZURE_FILESHARE_DIR_TEST | directory for test environment |
Function "Field settings document check "#
The function "Field settings for document check" in the ribbon defines which fields of the EDX document are checked or transferred to the Microsoft Dynamics 365 Business Central1 document.
| Field | Description |
|---|---|
| Validation sequence | The data from the EDX intermediate document is transferred to the Microsoft Dynamics 365 Business Central1 document in accordance with the defined validation sequence. |
| Use default values | The "Use default value" option can be used to pre-assign fields within the EDX document that are not contained in the message, for example. |
| Default value | For example, you can set the due date in the sales header so that this field is always initialized with the working date. Constant values or placeholders can be used within the default value. When using a constant, care must be taken to ensure that the value is entered in XML format. A fixed date must therefore be entered in the format YYYY-MM-DD. For decimal values, the dot must be used as a separator. The XML format was chosen to avoid translation errors in different languages. If employees set the date: 15.01.2023 as the default value and then English-speaking employees check the message, the default date cannot be converted. The default values are initialized when the EDX document is checked. List of placeholders: %WORKDATE = Work date %TIME = Current time %TODAY = Current date %COMPANYNAME = Client name @Fieldname = Reference to another field in the current table %CLEAR = Clear target field |
| This indicator controls whether the field content from the EDX document is to be checked and transferred to the Microsoft Dynamics 365 Business Central1 document. |
"Message relationship" function#
The "Message relationship" function in the ribbon is used to define which customers or vendors are linked to the current message facility.
Previously, an EDX partner had to be created for each "Sale to" and "Invoice to customer" and then assigned to messages. This procedure is still supported.
In order to minimise the set-up effort, the "Message relationship" function has been extended in EDX.
This function can be used in the following cases:
- The messages are sent to or received from an EDI service provider.
- The "Our account number" (OurAccountNo) element is supplied with incoming messages.
- The selected messages are to be received/sent for several debtors or creditors.
Example:
An EDX partner of the type "Contact" is created. The "Our account number" field is not entered. If necessary, the GLN of the invoice message recipient is entered in the "GLN" field.
Incoming messages are sent to the EDX partner: Sales order, sales order change and the outgoing messages sales order confirmation, sales delivery note and sales invoice.
The EDX partner includes the accounts receivable 10000, 20000 and 30000.
The "Message relationship" function can be carried out either via the message set-up list or via the debtor list.
Call from message setup list
In this case, the "Message relationship" list is displayed directly. The customer list can be called up within the lines using the [...] button. The customers 10000, 20000 and 30000 can now be selected from this list.
Click on "OK" to transfer them to the "Message relationship" list.
Call from customer list
In the customer list, the customers 10000, 20000 and 30000 are selected first. The "Message relationship" function is then called up. The list of message facilities is now displayed. All messages of the EDX partner are selected in this list and confirmed with "OK".
Set up task queue item#
Automated message sending/receiving is done by setting up the task queue items. These are created using the EDX setup wizard. See "EDX Setup".
Process distribution within the task queue items#
The following task queue items are created using the EDX Wizard: CodeUnit: 5487951 EDX Job Queue
| Parameter | Description |
|---|---|
| INBOUND_TRANSMISSION | Read data according to the specified transfer type (e.g. file transfer) and make it available in "EDX Inbox". |
| INBOUND_TO_EDX_DOCUMENT | Process all EDX input items with status "Unprocessed". |
| INBOUND_POST_EDX_DOCUMENT | Check all created EDX documents (sales order, purchase order confirmation, etc.) that have been configured with the "Automatic processing" flag and create the corresponding Microsoft Dynamics 365 Business Central1 document if necessary. |
| OUTBOUND_SEND_NAV_DOCUMENT | All created Microsoft Dynamics 365 Business Central1 documents (sales delivery, sales invoice, etc.), which are configured with the "Automatic processing" flag, are transferred to the "EDX outbox". |
| OUTBOUND_TRANSMISSION | Send all EDX outgoing items with status "Unprocessed" according to the defined transmission type. |
| SEND_MAIL | Send processing errors by mail. |
| REORGANIZATION | Archive the EDX outputs. Time of archiving is defined in EDX Setup. |
Expiry of the retention period#
A retention period can be set for incoming and outgoing messages.
Messages that exceed the retention period are automatically deleted.
This is set up using the setup wizard. To do this, select the "Retention period expiry" function in the wizard.
The following retention periods are suggested:
| Message type | Expiry of the retention period | Description |
|---|---|---|
| Invoices | 3650 Days (10 Years) | Sales, purchase and service invoices/credit notes |
| Deliveries | 2192 Days (6 Years) | Sales, purchasing and service deliveries |
| Orders | 1461 Days (4 Years) | Sales orders/purchase orders Sales/purchase changes Delivery call-offs Offers and changes to offers |
| Confirmations | 731 Days (2 Years) | Sales order confirmations Purchase order confirmations |
| Master data | 14 Days | Customer, vendor and items |
| Message confirmations | 31 Days | GS1 Acknowledgement of receipt |
| Outgoing/incoming goods | 60 Days | WMS Outgoing/incoming goods |
| Stock notifications | 31 Days | WMS stock reports |
| Goods issue status | 14 Days | WMS Goods issue status |
The set retention periods are transferred to the message types and the message setup.
GLN facility#
For the creation of an EDIFACT message, further GLNs are required in addition to the GLN (Global Location Number) in the customer. With EDIFACT the message recipient is transmitted in the UNB segment. The GLN of the message recipient can differ from the GLN of the customer.
According to EDIFACT GLN's are mapped in the following segments:
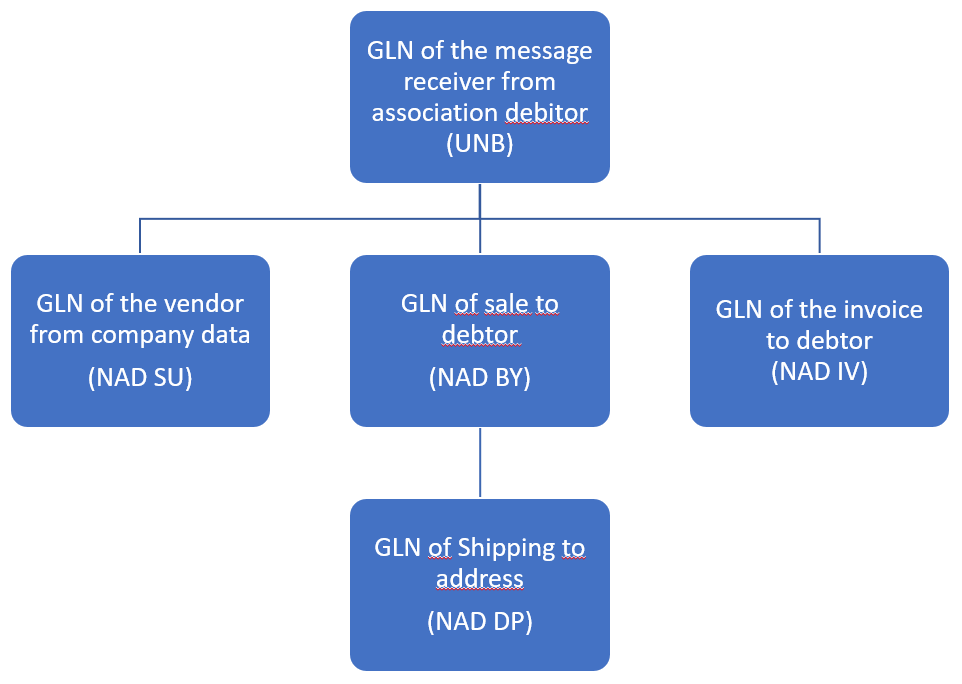
| Message Segment | Description | Identifier |
|---|---|---|
| UNB | Interchange Header (Message Sender/Receiver). If the "Invoice to Customer" belongs to a federation, then GLN of the federation customer, otherwise GLN of the "Invoice to Customer". Special case: The message receiver requires a GLN, which does not belong to the above master data. In this case the GLN of the EDX partner is used. |
|
| NAD | Name and address data | SU = Supplier BY = Buyer DP = Delivery address IV = Invoice address |
The GLN's are entered in the following Microsoft Dynamics 365 Business Central1 master data:
Message receiver (UNB)#
The GLN for the message recipient/sender (UNB) is entered directly at the EDX partner in the "GLN" field.
Debtor (NAD segment)#
The GLN for the customer (NAD segment) is entered directly on the customer card in the "GLN" field in the "Invoicing" info tab.
GLN of location#
Location for the delivery can be defined within a Microsoft Dynamics 365 Business Central1 purchase order. If this location has a different GLN to the company data, this GLN can be entered in location.
This setting only applies to EDX GS1 messages.
Delivery to address (NAD segment)#
The GLN for the delivery to address (NAD segment) is entered directly on the customer card > delivery to addresses in the field "GLN" in the info tab "General".
The transmission of the above mentioned GLN's is supported by the XMLPorts for EDI service providers (prefix CC).
Set up e-mail dispatch#
As described in the previous sections, EDX sends mails automatically if, for example, an error has occurred during processing.
The following items must be set up for sending mails:
SMTP mail setup#
An SMTP account must be set up via "E-mail accounts". With the action "New" the setup wizard is displayed. Then "SMTP" is selected. After completing the SMTP setup, the scenario "EDX" must be assigned to the created account.
BC Administration (Management Console OnPrem)#
Mail is usually sent using the Microsoft Dynamics 365 Business Central1 instance JOBQUEUE01. Since this is a process without client service, it is necessary that the base URL is entered.
In the field "Windows Client Base URL" the URL of a Microsoft Dynamics 365 Business Central1 instance must be entered, where the option "Enable Client Services" is activated.
Example:
DynamicsNAV://srvnav:7246/NAVProd01/
This base URL is then used, for example, for the PageLinks within the error mail.
Internal document exchange#
Set up with the EDX Setup Wizard#
The internal document exchange can be set up completely via the EDX Setup Wizard if both clients are present in one database.
Note
Before starting the assistant, the EDX setup must be configured in both clients. For further information, please refer to "EDX Setup".
If internal document exchange is to take place across multiple SaaS databases, an EDX OAuth setup must first be performed in both databases. See the section "OAuth Setup".
Afterwards, the action "EDX Setup Wizard" can be started in the EDX Setup.
The setup for the internal document exchange can now be started with the action "EDX Setup Wizard".
After starting the wizard, the following parameters must be set:
- Set the function of the wizard to "internal document exchange".
- Set the role of the current client.
- Selection of the communication interface.
- Use purchase price as sales price.
The price will be transferred from the sent purchase order to the sales order. (See Field Control) - Selection of the client with which messages are to be exchanged.
- Assignment of customer as well as vendor according to the clients.
After executing the "Finish" action, the matching of the "Our account number" field between the customer and vendor takes place. In both clients, the required EDX partners and the related intercompany documents are assigned.
API V2.0 Intercompany#
As described above, the oAuth setup must be carried out in both databases.
Example:
| Environment | oAuth Code |
|---|---|
| DE | DE2CH |
| CH | CH2DE |
Current environment DE: When setting up with the wizard, the value "DE2CH" is entered in the "Current database.OAuth code" field.
The value "CH2DE" is entered in the "Target database.OAuth code" field.
Manual setup#
If the clients exist in different databases, then the setup must be done manually.
The following messages have to be set up on the client side:
| partner no. | EDX document | EDX document direction | EDX document description | partner type | partner BC no. | EDX transmission type |
|---|---|---|---|---|---|---|
| V10000 | IC PURCHASE ORDER CHG | Outgoing | Send order change | Vendor | 10000 | File transfer |
| V10000 | IC PURCHASE ORDER CONF | Outgoing | Receive order confirmation | Vendor | 10000 | File transfer |
| V10000 | IC PURCHASE ORDER | Outgoing | Send order | Vendor | 10000 | File transfer |
| V10000 | IC PURCHASE SHIPMENT | Outgoing | Receive purchase delivery | Vendor | 10000 | File transfer |
| V10000 | IC PURCHASE INVOICE | Incoming | Receiving purchase invoice | vendor | 10000 | file transmission |
| V10000 | CONFIRMATION RECEIVE | Incoming | Acknowledgement Received | Vendor | 10000 | File Transmission |
The following messages are to be set up on the vendor side:
| Partner No. | EDX Document | EDX Document Direction | EDX Document Description | Partner Type | Partner BC No. | EDX Transfer Type |
|---|---|---|---|---|---|---|
| C10000 | IC SALES ORDER CONF | Outgoing | Sending order confirmation | Customer | 10000 | File transmission |
| C10000 | CONFIRMATION SEND | Outgoing | Message acknowledgement | Customer | 10000 | File transfer |
| C10000 | IC SALES ORDER Incoming | Receipt of sales orders | Customer | 10000 | File transfer | |
| C10000 | IC SALES ORDER CHG | Incoming | Receive order change | customer | 10000 | File transfer |
| C10000 | IC SALES SHIPMENT | Outgoing | Send Sales Delivery | Customer | 10000 | File Transfer |
| C10000 | IC SALES INVOICE | Outgoing | Send Sales Invoice | Customer | 10000 | File Transfer |
When setting up the intercompany documents manually, the EDX file paths must be configured manually.
In doing so, the outgoing message is configured first. The corresponding path must be stored temporarily. Afterwards the incoming message can be configured. Here, the path from the previously configured outgoing message must be used.
The message recipient and sender can thus communicate via the same directory.
Using the example "IC PURCHASE ORDER", the following steps must be carried out. The EDX basic setup must already have been carried out and partners must have been created. This procedure must be carried out for all incoming messages:
- Open client "Customer".
- Create EDX message setup for document "IC PURCHASE ORDER" and save path temporarily.
- Switch to the "Supplier" client.
- Create EDX message setup for document "IC SALES ORDER" and use the path of the outgoing document.
Oauth Setup#
If the intercompany setup is to be done via different SaaS databases, then the OAuth setup must be performed in both databases. For this purpose, the action "OAuth connections" is called in the EDX setup. Within the OAuth setup, the new connection is started with the action "New->Microsoft Dynamics 365 Business Central1 Connection". The setup wizard requires the following parameters from the Azure App registry:
- Tenant Id
- Client Id
- Secret
- Environment name
Shipping order / load carrier#
For the use of the outgoing message "CC DESPATCH ADVISE" (DESADV) the setup of the shipping orders including the load carriers is required.
The general information for setting up the shipping orders and load carriers can be found in the corresponding section "Shipping processing". In the following, you will only find notes on the relevant settings for the outbound message mentioned above.
Setup storage location#
In order for an assignment of the load carriers/packages in the shipping order to take place, the option "Shipping order" must be selected in the "Shipping processing" field in the storage location or must remain free.
Shipping order setup#
Via the menu item "Shipping and Load Carrier Setup" you set up your shipping orders. If you want to send load carriers with information on the NVE/SSCC, the fields "Company ID" must be filled with the base number (GLN) of the company, as well as "Load carrier ID numbers" with a number series. Instead of storing the number series here in general, these can also be stored specifically for individual load carriers. In addition, the option "Create check digit for carrier ID" must be activated so that the check digit specified by GS1 can be calculated and added for the NVE/SSCC.
Note
In the field "Company ID" a reserve digit (see GS1 specification) must be prefixed before the base number, so that a correct NVE/SSCC can be generated.
In order for a NVE/SSCC to be generated automatically, the option "Assign load carrier ID on order release" must also be activated.
The NVE/SSCC has a total length of 18 digits (see GS1 specification). Therefore, the combination of company ID with reserve digit, number series of the load carrier and check digit must be exactly 18 digits long. If this is not the case when a shipping order is released and the "Assign load carrier ID on order release" option is activated, a corresponding note appears.
Load carrier setup#
The required load carriers can be set up via the menu item "Load carrier". If load carriers including NVE/SSCC are to be transferred, the option "ID mandatory" should be set here. If no number series is stored in the "Load carrier ID number" field in the shipping order or if a different number is to be used for the respective load carrier, a previously created number series can be selected here.
Please note the information on the NVE/SSCC from the "Shipping order setup" section.
Create DESADV#
The outgoing message "CC DESPATCH ADVISE" is generated from a booked dispatch order with EDX partner.
So that a valid DESADV file can be created and, if necessary, processed further by an EDI converter, the following requirements must still be met when creating shipping orders:
- the shipping order must refer to a booked sales delivery, otherwise no valid EDX partner can be transferred to the booked shipping order.
- each line with packaging materials/cargo carriers must be assigned to at least one delivery line.
EDX Monitor#
The EDX Monitor is used to map the entire process associated with an incoming or outgoing message.
In the following example, an EDX sales order was received and a Microsoft Dynamics 365 Business Central1 sales order was created.
An EDX order confirmation was sent for the Microsoft Dynamics 365 Business Central1 sales order. The delivery and invoice were then posted and sent.
Representation in EDX Monitor (Germany):
| Nachrichten-/Beleg-Datum | Richtung | Quell Datensatz | Partner-Nr. | Nachrichten-Beschreibung | Status | Grund der Bestätigung |
|---|---|---|---|---|---|---|
| 27.11.2023 11:45 | Eingehend | Verkaufsrechnungskopf 103052 | C10000 | GS1 Application Receipt Acknowledgement Import |
EDX Beleg erzeugt | Akzeptiert |
| 27.11.2023 11:45 | Eingehend | Verkaufslieferkopf 102063 | C10000 | GS1 Application Receipt Acknowledgement Import | EDX Beleg erzeugt | Akzeptiert |
| 27.11.2023 11:40 | Eingehend | Verkaufsrechnungskopf 103052 | C10000 | GS1 Application Receipt Acknowledgement Import | EDX Beleg erzeugt | Empfangen |
| 27.11.2023 11:40 | Eingehend | Verkaufslieferkopf 102063 | C10000 | GS1 Application Receipt Acknowledgement Import | EDX Beleg erzeugt | Empfangen |
| 27.11.2023 09:46 | Ausgehend | Verkaufsrechnungskopf 103052 | C10000 | Verkaufsrechnung senden (IC) | Versendet | Akzeptiert |
| 27.11.2023 09:46 | Ausgehend | Verkaufslieferkopf 102063 | C10000 | Verkaufslieferung senden (IC) | Versendet | Akzeptiert |
| 24.11.2023 09:56 | Eingehend | Verkaufskopf Auftrag, 1026 | C10000 | GS1 Application Receipt Acknowledgement Import | EDX Beleg erzeugt | Akzeptiert |
| 24.11.2023 09:54 | Eingehend | Verkaufskopf Auftrag, 1026 | C10000 | GS1 Application Receipt Acknowledgement Import | EDX Beleg erzeugt | Empfangen |
| 24.11.2023 09:54 | Ausgehend | Verkaufskopf Auftrag, 1026 | C10000 | Auftragsbestätigung senden (IC) | Versendet | Akzeptiert |
| 24.11.2023 09:54 | Ausgehend | EDX Verkaufskopf Auftrag,00000037 | C10000 | GS1 Application Receipt Acknowledgement Export | Versendet | Akzeptiert |
| 24.11.2023 09:54 | Eingehend | EDX Verkaufskopf Auftrag,00000037 | C10000 | Verkaufsauftrag empfangen (IC) | EDX Beleg erzeugt | |
| 24.11.2023 09:26 | Ausgehend | EDX Verkaufskopf Auftrag,00000037 | C10000 | GS1 Application Receipt Acknowledgement Export | Versendet | Empfangen |
Representation in EDX Monitor (English):
| Message-/Document Date | Direction | Source Record | Partner No. | Document Description | Status | Confirmation Reason |
|---|---|---|---|---|---|---|
| 27.11.2023 11:45 | Inbound | Sales Invoice Header 103052 | C10000 | GS1 Application Receipt Acknowledgement Import |
EDX Document created | Accepted |
| 27.11.2023 11:45 | Inbound | Sales Shipment Header 102063 | C10000 | GS1 Application Receipt Acknowledgement Import |
EDX Document created | Accepted |
| 27.11.2023 11:40 | Inbound | Sales Invoice Header 103052 | C10000 | GS1 Application Receipt Acknowledgement Import |
EDX Document created | Received |
| 27.11.2023 11:40 | Inbound | Sales Shipment Header 102063 | C10000 | GS1 Application Receipt Acknowledgement Import |
EDX Document created | Received |
| 27.11.2023 09:46 | Outbound | Sales Invoice Header 103052 | C10000 | Verkaufsrechnung senden (IC) | Transmitted | Accepted |
| 27.11.2023 09:46 | Outbound | Sales Shipment Header 102063 | C10000 | Verkaufslieferung senden (IC) | Transmitted | Accepted |
| 24.11.2023 09:56 | Inbound | Sales Header Order 1026 | C10000 | GS1 Application Receipt Acknowledgement Import EDX Document created |
Accepted | |
| 24.11.2023 09:54 | Inbound | Sales Header Order 1026 | C10000 | GS1 Application Receipt Acknowledgement Import EDX Document created |
Received | |
| 24.11.2023 09:54 | Outbound | Sales Header Order 1026 | C10000 | Auftragsbestätigung senden (IC) | Transmitted | Accepted |
| 24.11.2023 09:54 | Outbound | EDX Sales Header Sales Order 00000037 | C10000 | GS1 Application | Receipt Acknowledgement Export |
Transmitted |
| 24.11.2023 09:54 | Inbound | EDX Sales Header Sales Order 00000037 | C10000 | Verkaufsauftrag empfangen (IC) | EDX Document created | |
| 24.11.2023 09:26 | Outbound | EDX Sales Header Sales Order 00000037 | C10000 | GS1 | Application Receipt Acknowledgement Export |
Transmitted |
Incoming documents#
Incoming documents are first temporarily stored in EDX documents.
Data flow of an incoming document#
The incoming message is first read into the EDX inbox. The system creates an EDX inbox item and saves the message in the item.
Then the EDX intermediate document is created from the EDX inbound item. Within the EDX intermediate document, users can intervene and correct data. Furthermore, users can reject the EDX intermediate document if necessary or create a Microsoft Dynamics 365 Business Central1 document from it.
EDX input items#
All incoming documents are first stored in the EDX Inbox table. When the business process for this document is completely finished, the item is automatically transferred to the transferred to the "EDX Inbox Archive".
| Field | Description |
|---|---|
| EDX Status | Indicates the current status. Unprocessed The document has been transferred to the EDX module and an EDX Inbound item has been formed. The item has not yet been sent. Error An error occurred while processing the item. The "Error" field displays the number of errors that occurred. Using the look-up of the "Error" field, the associated error items can be retrieved. EDX Document Created An EDX intermediate document was created from the incoming item. BC Document Created A Microsoft Dynamics 365 Business Central1 document was created from the EDX intermediate document created. The associated EDX inbound item has now been completed and will be moved to the "EDX Inbound Archive". |
| EDX Message | If there are system messages for this item, they can be retrieved via the look-up. |
| EDX Error | If there are processing errors for this item, they can be retrieved via the Look-Up button. |
| Action "Display file" | This action displays the document contained in the item. |
| Action "Manual Processing" | If an error has occurred during automatic inbound processing and this error has been corrected in the meantime, then the inbound item can be processed again using the action "Manual Processing". See section "EDX Edit and Reprocess Incoming Items". |
| Action "Archive processing errors | The following conditions must be met for the action to archive an incoming item: - The incoming item has a valid "Transfer GUID" - An archiving period is entered in the EDX setup, section "Reorganization" |
EDX Edit and reprocess incoming items#
The "View file" function can be used to download the XML message of the selected EDX input item and edit it if necessary. The "Save files" function downloads the XML message from all selected input items and saves it in a selected folder.
Note
Currently this action "Save file" is not available in the WebClient (.NET Framework).
The file must be stored with the action "Show file" and then save.
If an EDX inbox item runs into an error, for example because a field length in the EDX intermediate document is exceeded or the XML structure is incorrect, the XML message can be downloaded from the EDX inbox, edited and uploaded again for new processing.
Using the "Upload message" function, the XML message can be uploaded again to the document directory on the server.
After the successful upload, the message will be processed again.
Note
The new EDX input item does not appear immediately after calling the function, but only when the message has been retrieved again from the task queue.
Manual processing of an EDX document#
For the processing of EDX documents, a basic distinction is made between two cases.
Incoming EDX document, the Microsoft Dynamics 365 Business Central1 document has not yet been created.
Example:
A sales order is received. The corresponding Microsoft Dynamics 365 Business Central1 document has not yet been created.
If the incoming EDX document is created, it results in a new Microsoft Dynamics 365 Business Central1 sales order.
Incoming EDX document, the Microsoft Dynamics 365 Business Central1 document already exists.
Example:
An incoming EDX order confirmation relates to an existing Microsoft Dynamics 365 Business Central1 purchase order.
Before a Microsoft Dynamics 365 Business Central1 document can be created from an incoming EDX intermediate document, the incoming EDX document must first be checked. After a successful check, the EDX document receives the status "Ready for creation". All EDX documents with this status can be transferred to a corresponding Microsoft Dynamics 365 Business Central1 document.
EDX Intermediate document#
The EDX intermediate documents contain partly identical fields as the Microsoft Dynamics 365 Business Central1 documents (see EDX sales order). Specific EDX fields and associated functionality are described below.
EDX messages/errors
.
If there are any system messages or errors specific to this document, they can be retrieved via the Look-Up.
EDX Status
| Status | Description |
|---|---|
| Unprocessed | The EDX document was created automatically. No further processing steps have been performed yet. |
| Error | An error occurred during the processing of the document. |
| Ready to create | The EDX document has been checked and can be created. |
| BC voucher created | A Microsoft Dynamics 365 Business Central1 voucher has been created from the EDX voucher already created. This item is now done and will be moved to the "EDX Incoming Archive". |
| Unmatched data | An existing Microsoft Dynamics 365 Business Central1 document already exists for the incoming EDX document. |
| Rejected | The incoming document has been rejected. |
| Manual processing | If it is not possible to create an incoming EDX document as a Microsoft Dynamics 365 Business Central1 document, it will be given the status "Manual processing". |
| Archived | EDX documents that have already been archived. |
| Deleted | EDX vouchers that have been deleted by users. |
EDX Voucher Check#
During the verification, the system performs a validation of the data. In the process, the field contents are checked. The check of the field contents is based on the settings made in the message setup.
If errors are determined, the EDX document receives the status "Error". The number of errors that occurred is indicated in the "Error" field on the document header or lines. You can open related error items using the Look-Up button.
If errors are detected, then they can be corrected directly in the EDX document. Each field change in the EDX document is logged. By means of Lookup on the field "EDX Note" these changes can be called up.
After manual correction in the EDX document, the action "Check" must be executed again. After all errors have been corrected, the Microsoft Dynamics 365 Business Central1 document can be created using the "Create" action.
Processing of EDX documents with status "Inconsistent data"#
During the check, the data of the EDX document is compared with the data of the Microsoft Dynamics 365 Business Central1 document. This is the case, for example, with an incoming order change.
To avoid having to manually compare the existing Microsoft Dynamics 365 Business Central1 sales order with the EDX order change, EDX checks the discrepancies and displays them clearly.
If any discrepancies are found, the EDX status is set to "Inconsistent Data". Clicking on the lookup field "EDX Error" will display all discrepancies.
Example:
An order change for an item with a quantity increase from 20 pieces to 30 pieces has been received.
The EDX status is set to "Inconsistent Data."
By clicking on the EDX error number (line), a dialog is displayed in which the discrepancies are shown.
The selection "Apply changes" determines whether the displayed change is to be applied to the Microsoft Dynamics 365 Business Central1 document. The column "Value EDX" shows the currently transferred value. The column "Value BC" shows the current value of the Microsoft Dynamics 365 Business Central1 document.
Once it has been determined which changes are to be adopted, the "Accept changes" action must be executed.
Delete EDX document#
Deleting an EDX document depends on the status. If the EDX status contains one of the following values, deletion is not possible:
- BC Document created
- Rejected
- Manual processing
- Archived
If the document is not in this status, the EDX document can be deleted with the action "Delete EDX document".
After executing the action "Delete EDX document", a dialog box appears with a note that a deletion reason must be specified and whether you actually want to delete the document. This query must be confirmed with "Yes".
Subsequently, the reasons that led to the deletion of the message can be entered.
Create EDX document#
The "Create" action transfers the EDX intermediate document to the associated Microsoft Dynamics 365 Business Central1 document.
Reject EDX document#
It is possible to reject incoming EDX documents.
The rejection is sent to the message sender if the "Receipt confirmation check" field has been activated in the EDX message setup.
Rejection reasons must be recorded before completing the action.
EDX document with "Manual processing" status#
EDX documents with the status "manual processing" indicate that the EDX document cannot be created or confirmed as a Microsoft Dynamics 365 Business Central1 document. This may be due to the following reasons:
- The existing document has already been delivered
- Reservations exist
- A unique assignment of the document is not possible
- A unique assignment of the lines is not possible
- There are discrepancies that cannot be processed automatically
Since these EDX documents cannot be processed by the system, further processing must be done by the user.
The EDX document is closed by archiving it.
Automatic processing#
Within the "EDX Message Setup" the "Automatic Processing" can be activated. The received document will be checked automatically. If there are no errors during the check, the Microsoft Dynamics 365 Business Central1 document is created.
Up to now, incoming sales orders are processed automatically.
Outgoing document#
Outgoing EDX documents are not transferred to an EDX intermediate document. When the EDX message is created, an EDX outgoing item is created directly.
EDX information#
Each outgoing document contains information which is required for the transmission. This information is displayed in the "EDX" info tab.
The fields of the info tab that are required for the transmission are explained in more detail below:
| field | description |
|---|---|
| EDX Document | Yes The document has been recognized as an EDX document by the document device. Transmission of the document is possible. No No document facility exists for the document. Transmission is not possible. |
| EDX Status | Indicates the current status: Unprocessed The document has been transferred to the EDX module and can be sent. Processed The EDX outgoing item has already been created. Sent The EDX outgoing item has been sent. Receiver received The receiver can use a message acknowledgement to signal that the message has arrived in the target system. Error An error occurred during processing. This can be looked up in the EDX system error log. Ignored Documents with the status "Ignored" will not be sent. The status "Ignored" will be set automatically if the following conditions are met: If a sales invoice that has not yet been sent is cancelled, then both documents (invoice/credit note) will be set to the status "Ignored". If a sales delivery that has not yet been shipped is cancelled by a complaint, then the status of the sales delivery is set to "Ignored". Sales delivery, invoice as well as credit memo. In the sales order it can be defined that certain documents should not be sent during the next posting. If a posting number for delivery bill or invoice is reserved via the sales order and the sales order is deleted without using this posting number, then according to Microsoft Dynamics 365 Business Central1 standard a posted document is created with the note "deleted document". These documents will not be transferred. |
Manual processing#
Send EDX document manually#
Manual document dispatch takes place directly from the associated Microsoft Dynamics 365 Business Central1 document with the action "Send EDX document".
EDX output items#
All sent documents are first saved in the "EDX Outbox" overview. When the process is complete, the system automatically transfers the item to the EDX Outbox Archive overview.
| EDX Status | Description |
|---|---|
| Unprocessed | The document has been transferred to the EDX module. This item has not been sent yet |
| Error | An error occurred while processing the item. Please refer to the "Error Log" field for details. If the error occurred due to insufficient file permissions, then the EDX document can be processed again after correcting the permissions. To do this, select the "Reprocess" action. |
| Sent | The item has been sent to the partner. With the columns "Messages" as well as "Error" information about the outgoing item can be retrieved. |
| Actions | Description |
|---|---|
| Display file | This action displays the document contained in the item. |
| Display BC Document | This action displays the Microsoft Dynamics 365 Business Central1 document contained in the item. |
| Display archived BC document | Displays the archived document. |
Automatic processing#
So far, the following outgoing documents can be sent automatically:
- Sales delivery
The dispatch takes place when posting. - Sales invoice
The dispatch takes place when posting. - Purchase order
Shipment takes place upon release. - Purchase order changes
Shipping occurs when released. If the purchase order is released and has been previously sent via EDX, then the automatic dispatch of an order change takes place. There is currently no check for quantity or date change.
Automatic dispatch of Microsoft Dynamics 365 Business Central1 documents can be controlled within the EDX message facility.
The following conditions apply to the EDX message facility:
- The EDX partner must be of type "Customer" or "Vendor".
- The EDX "Transfer Date From" must be greater than or equal to the Work Date.
The following conditions apply to Microsoft Dynamics 365 Business Central1 documents: delivery bill, invoice as well as purchase order:
- The "EDX Partner" field has a value.
- The document date is greater than or equal to the "EDX Transmission from".
- The "EDX Status" is "Unprocessed".
The following condition applies to the Microsoft Dynamics 365 Business Central1 delivery bill:
- The "Sale to Customer" field must match the "BC Partner No." from the EDX message setup.
The following condition applies to the Microsoft Dynamics 365 Business Central1 Invoice:
- The "Invoice to customer" field must match the "BC Partner No." from the EDX message setup.
Reset EDX status#
With the action "Reset EDX status" documents can be sent again.
Enhancements in "Internal document exchange#
Purchasing deliveries without goods receipt#
In the case of purchasing deliveries, it was previously always assumed that the storage location used was posted by goods receipt. The processing of purchase deliveries has been changed so that now also storage locations without goods receipt can be used. In this case, the field "Quantity current delivery" is initialized with the reported delivery quantity in the respective order line.
The document must be posted by the user.
Purchase deliveries with batch / serial number#
Batch/serial numbers are supported for purchase deliveries.
The batch/serial number to be delivered is entered in the sales order. The batch is then transferred to the recipient with the posted sales delivery.
The transmitted batches/serial numbers can be retrieved in the "EDX Purchase Delivery" with the line menu.
After checking/creating the EDX purchase delivery, the item tracking data is transferred to the purchase order.
After posting the purchase order, the item/batch is available in the storage location.
Additions/deductions in "internal document exchange"#
Surcharges/discounts can now be used in internal document exchange. The prerequisite is that the "Sales price without VAT" field is activated in the field control for the sales order received. Otherwise, the order line will be created without a sales price.
Item variants in "internal document exchange"#
The item variants are supported in the internal document exchange.
Order date in "internal document exchange#
When sending the order, the "planned goods receipt date" is transmitted from the purchase order. The further processing looks as follows:
| Process | Field | Description |
|---|---|---|
| Send Purchase Order | "Scheduled Goods Receipt Date" | Send Date |
| Receive Sales Order | "Desired Delivery Date" | Validate "Planned Goods Receipt Date" from Purchase Order in "Desired Delivery Date" field. The validation automatically calculates the "Planned Delivery Date", "Planned Goods Issue Date" and "Goods Issue Date" fields in the sales order. |
| Send order confirmation | "Committed delivery date" as well as "Planned delivery date" |
Send date |
| Receive Purchase Confirmation | "Committed Goods Receipt Date" "Planned Goods Receipt Date" |
Validate "Committed Delivery Date" from Order Confirmation to "Committed Goods Receipt Date" of Purchase Order "Validate Planned Delivery Date" from Order Confirmation to "Planned Goods Receipt Date" of Purchase Order |
| Send order change | "Planned date of receipt of goods" | Send date |
| Receive order change | "Desired delivery date" | As for "Receive sales order" |
Remark texts#
During internal document exchange, the "remarks" are transferred from the Microsoft Dynamics 365 Business Central1 order, header as well as line. On receipt, the remarks are stored in the EDX sales order.
Likewise, remarks can be reported back with the EDX Purchase Order Confirmation. In this case, remarks are stored in the EDX Purchase Order Confirmation.
Received remarks are not transferred to the Microsoft Dynamics 365 Business Central1 sales order or to the Microsoft Dynamics 365 Business Central1 purchase order. Otherwise, it would no longer be possible to distinguish between remarks entered by the user and remarks from the other party.
Receive delivery schedules#
In the internal document exchange, previously sent purchase orders/framework orders can be received as delivery schedules. The setup for sending purchase orders can be done as described above. On the receiver side the message "IC SALES DELFOR" is set up.
When a delivery schedule is received, a delivery schedule and a scheduling agreement are created for each purchase order/article.
This functionality is only available within KUMAVISION factory365.
Direct delivery#
When sending a purchase order with reference to a sales order (direct delivery) the data of the sales order will be transmitted as well.
On receipt, the data of the direct delivery is transferred to the EDX intermediate document for sales orders.
Further processing of this data must be implemented in the customer project.
Credit Memo#
The Direct Purchase Invoice/Cr.Memo toggle in the EDX Message Setup controls the processing of purchase credit memos.
Direct purchase invoice credit memo disabled#
The following processing sequence must be observed:
| Role | Action |
|---|---|
| Customer | Create purchase complaint. Transfer purchase delivery line. Post delivery. The posted return delivery number must be communicated to the supplier. |
| Supplier | Create sales credit note The reported "booked return delivery number" must be entered in the "External document number" field. Transfer sales delivery line Send sales credit note. |
| Customer | The posted return delivery is determined using the "External document number" = "Credit delivery no." The purchase complaint is then posted. |
Direct purchase invoice credit memo activated#
| Role | Action |
|---|---|
| Supplier | Create sales credit note Transfer sales delivery line Send sales credit note. |
| Customer | The purchase credit is posted without further verification. |
Productive -/Test database#
When copying the production database to the test database, overlaps may occur in the interface directory area. Furthermore, it should be ensured that test messages do not get into the productive system.
The steps required to secure the production database are explained in more detail in the following sections.
Before the copy#
Before copying the production database to the test database, all task queue items (all clients) should be set to "Wait".
After copying the production database to the test database#
When the production database is copied to the test database, there is usually an overlap of the interface directories. The document directories in the production and test database are identical. This can lead to the fact that current EDI documents are not imported into the productive but into the test database.
For this case a security query was integrated, which is displayed when opening the test database.
If the query is answered with "Current database is the test database", the option "Test environment" is automatically activated in the EDX setup.
All clients with active EDX setup should be opened once after copying the database. Furthermore, the interface directories must be copied from the "Prod." subdirectory to "Test".
EDX voucher setup (FTP)#
FTP transfer is no longer supported. An Azure storage is required. The test and production path must be defined for this storage.
Task queue items#
Task queue items can now be reactivated in both databases.
Test indicator#
The "Test Indicator" is used to identify incoming and outgoing messages during the EDI test phase. For EDIFACT messages this indicator is contained in the UNB segment (Interchange Header). The message recipient can use this indicator to control whether the message is transferred to the production or test system.
However, this "Test Indicator" is not available in all message formats (VDA, OpenTrans etc.).
In the EDX message setup it can be set whether the message (order, delivery bill, invoice etc.) is a test message.
Effect of the test indicator on processing in Microsoft Dynamics 365 Business Central1:
| Direction | Description |
|---|---|
| Document received in BC: Sales order Sales order change Purchase order confirmation Purchase delivery Purchase invoice |
If the test indicator is enabled within the incoming message or in the message setup, then the EDX document will be marked as a test document. This allows the test to be enabled for messages even if the original message (e.g. VDA) does not support the test indicator. EDX documents with the test indicator enabled will only be processed automatically if the "Test Environment" option is enabled in EDX Setup at the same time. Otherwise, an error will be generated and sent by mail. |
| Document sent from BC | The test indicator from the message setup is transferred to the outgoing document. |
Receiving a sales order with test indicator
.
The test indicator is transferred from the Microsoft Dynamics 365 Business Central1 sales order to the delivery as well as invoice.
This means that if a Microsoft Dynamics 365 Business Central1 sales order was received as a test message, then the outgoing delivery/invoice messages will also be marked as a test message.
Azure FileSync#
Azure FileSync can be used to exchange files between networks. The synchronization between source and target directory can take up to several minutes.
If time-critical messages have to be exchanged, which is the case, for example, when messages are provided for a label printer, then the switch should be made to the "Azure Fileshare" file transfer.
EDX MasterDataExport#
EDX master data export can be used to export the following master data:
- Item
Subtables: Item variants, Item units as well as Item references. - Customer
Subtables: Contacts - Vendor
Establishment#
The setup is done with the EDX setup.
EDX Setup#
At the beginning, the necessary setups are done via the setup wizard. This setup wizard can be called up via the EDX Setup menu ribbon ("More options" > "Action" > "Setup" > "EDX setup wizard"). The EDX setup wizard is started. Via the selection "General" the required document types as well as number series are created.
EDX Document types#
After setup via the setup wizard, the following document types are available:
| Document | Description | Document direction |
|---|---|---|
| BASE CUSTOMER | Basis debtor export | Based on |
| BASE ITEM | Base article export | Based on |
| BASE VENDOR | Base Vendor Export | Based on |
Setting up the document types#
For each EDX partner different voucher types can be defined. With the "EDX voucher setup" the previously created voucher types are assigned to the EDX partner as well as configured.
Field settings#
The "Field settings for document verification" function in the EDX document setup card ribbon allows you to configure which fields are to be exported from the associated master data table.
| Field | Description |
|---|---|
| Table name | Specifies the table name for which the master data is to be transferred. For example, "Article" or a sub-table of the article, such as "Article variant". |
| Field name | Specifies the respective field name for which the master data is to be transferred. |
| Validation sequence | The validation order sets the element order in the XML output message. |
| Default value | This option is not available for the master data export |
| Create field content | Specify which fields will be exported. |
Master data export#
The master data export takes place automatically as soon as a change is made to the master data record. Here, only field changes that were specified in the field settings are monitored.
Example:
The article description has been changed for an article. After the data record has been saved, the export takes place.
The output file contains the following elements:
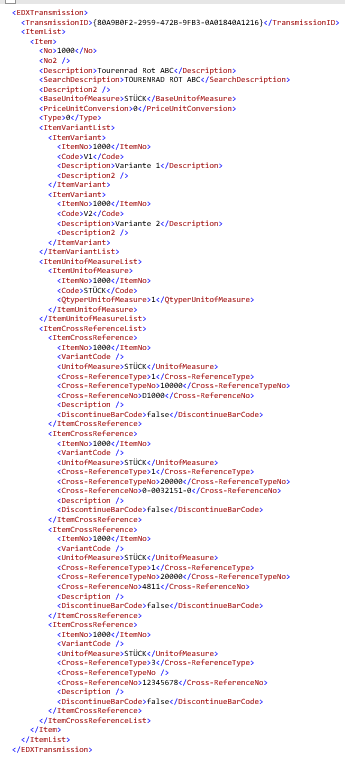
Calculated fields#
Currently, only the calculated field "Stock" is provided. Calculated fields of the debtor or creditor are not provided by this AddOn, but can be implemented in the project.
Bulk data export#
At the beginning of a project, a function is usually needed to export all records of a table.
This can be controlled via the "Collective item" option within the document setup.
As soon as you activate the switch, all records of the table will be exported during the next data export. Afterwards, the "Collective export" option will be deactivated automatically.
EDX OpenTrans 1.0#
With the EDX AddOn OpenTrans 1.0 the following OpenTrans messages are provided:
- DISPATCHNOTIFICATION (shipping notification)
- INVOICE (Invoice)
- ORDER (sell order)
- ORDERRESPONSE (order confirmation)
Establishment#
The setup is done with the EDX setup.
EDX Setup#
At the beginning, the necessary setups are done via the setup wizard. This setup wizard can be called up via the EDX Setup ("More options" > "Action" > "Setup" > "EDX setup wizard") menu ribbon. The EDX Setup Wizard is started. Via the selection "General" the required message types as well as number series are created.
EDX Document types#
After setup via the setup wizard, the following message types are available:
| Document | Description | Document direction |
|---|---|---|
| BASE CUSTOMER | Base Customer Export | Outgoing |
| BASE ITEM | Basic Article Export | Outgoing |
| BASE VENDOR | Basic Vendor Export | Outgoing |
Setting up the document types#
The message types listed above are then assigned to an EDX partner.
Field settings#
The field setting is only available for the OpenTrans message "OT1.0 SALES ORDER". See "Document check field setting".
Processing#
The processing of OpenTrans 1.0 messages is done in EDX standard. Incoming sales orders are provided as "EDX sales order". The order confirmation can be created via the associated Microsoft Dynamics 365 Business Central1 sales order. The sales delivery as well as sales invoice can be sent manually or automatically.
GS1 Messages#
The existing EDX ClearingCenter (CC) messages largely meet the requirements for the retail industry.
Requirements from the electrical industry and the healthcare sector are only covered to a limited extent.
The GS1 Business Message Standard (BMS) includes requirements from the healthcare and electrical industries. Corresponding schema and sample messages are available for all GS1 BMS messages. The section "Distribution of EDX message types" lists the GS1 messages supported by EDX with a link to the respective guideline.
Further information on GS1 messages can be obtained directly from GS1 under the following link: GS1 XML
However, the use of the GS1 message format does not mean that new requirements for a business process are covered by GS1 messages.
Example:
A marketplace transmits an order to EDX using the GS1 ORDERS message. According to a marketplace rule, the Microsoft Dynamics 365 Business Central1 sales order may only be delivered once the marketplace has reported the release for delivery to EDX. In this case, an extension of the business process is required.
Note
The GS1 messages implemented in EDX contain all mandatory information and are validated against the respective xml schema. If optional information is required within the GS1 messages, an extension is necessary.
Within the GS1 invoice message, it is not intended that several deliveries are invoiced with one invoice line. However, if several deliveries are invoiced with one invoice line, the deliveries are mapped as additional data (see Attribute Value Pair List) in the GS1 message. This must be agreed with the EDI service provider/message recipient.
In principle, the GS1 messages only provide lines of the type "Article" for delivery, invoice lines, etc. All Microsoft Dynamics 365 Business Central1 line types are exported within the EDX GS1 messages. The respective line type is mapped in the additional data. This must be agreed with the EDI service provider/message recipient.
Technical description#
Default business document header#
- All EDX GS1 messages have a standard business document header.
- The Sender element is always initialized with the data from the company setup.
- Depending on the business transaction (order, send sales invoice etc.) the Receiver element is initialized with the data of the "Purchase from vendor" or "Sale to customer".
- The document identification is currently set to GS1 version 3.4.1.
Attribute value pair list#
The avp List is additional data that is sent for a GS1 xml element. Within the customer project, further additional data can be defined and extended with the avp List.
The following additional data is transmitted with the EDX GS1 messages:
| Message | Range | Element Attributname |
Description |
|---|---|---|---|
| All Messages | header | invoice base64, |
In the EDX message setup, you can set that the associated PDF document can be sent with the message as a base64 character string. The table name depends on the respective message. When sending purchase orders, the table name is "Purchase Header". When sending an order confirmation, the table name is "Sales Header" etc. |
| Line | TransactionalItemData KVSEDX Qty. per Unit of Measure |
Unit of Measure | |
| lineItem KVSEDX Line Type |
Line-Typ 0=Text 1=G/L account 2=Item 3=Resource 4=WG/Anlage 5=Zu-/Abschlag (item) 9=Heading 10=From subtotal 11=End Intermediate/Bundle 12=Bundle,300=Cost |
||
| lineItem KVSEDX Line No. |
Line number assigned by EDX, e.g. if a purchase order is sent, the EDX line number may differ from the Microsoft Dynamics 365 Business Central1 line number. The EDX line number must be reported back with the order confirmation for synchronization with the Microsoft Dynamics 365 Business Central1 line. | ||
| lineItem KVSEDX Position No. |
Position number of the line. | ||
| ORDER | lineItem KVSEDX DSSO… |
Additional data for orders with direct delivery / special orders. | |
| INVOIC | header | invoice KVSEDX Invoice List Total Amount |
Total sum of all items on the invoice. |
| KVSEDX Invoice List Total Amount Including VAT | Total sum of all items incl. VAT. | ||
| KVSEDX Invoice List Total VAT Amount | Total amount of VAT for all items. | ||
| KVSEDX Invoice List Total Discount Amount | Total sum of additions/deductions for all items | ||
| KVSEDX Invoice List Total VAT | List of value-added tax rates used.<?xml version="1.0" encoding="utf-8"?><TotalsVAT>'<br>'<VAT><Percent>19</Percent><Line_Amount>21500</Line_Amount><VAT_Amount>4085</VAT_Amount><Amount_Including_VAT>25585</Amount_Including_VAT></VAT><VAT><Percent>7</Percent><Line_Amount>900</Line_Amount><VAT_Amount>63</VAT_Amount><Amount_Including_VAT>963</Amount_Including_VAT></VAT></TotalsVAT> |