WBS and Scheduling#
Overview#
Each project requires at least one work breakdown structure (WBS).
You can use this structure, in conjunction with a graphical planning tool, to allocate staff to a project according to available capacity and to budget the consumption of resources and items on its lines.
Work breakdown structure#
A work breakdown structure organizes a project into smaller components, making it more manageable. The smallest element of a WBS is often called a work package.
In some cases, a package might again be divided into subtasks, which are known as budget line activities in the system. These are assigned to individual resources.
You can enter one package code on each line. The system then combines this code with a phase, a task, and a step code to create a unique identifier for a line. You can therefore use a package multiple times for the same WBS if at least one of the other codes differ. What you assign as a phase, a task, or a step code is solely a matter of company organization.
If you want the system to create phase, task, and step codes for you, you can turn on the Auto PTS Code toggle in Projects Setup.
Each WBS consists of a header, where you see the General FastTab, and lines. You can assign multiple structures to each project. To view a WBS set up for a project:
- Choose the Search icon, enter Projects, and then choose the related link.
- Open a project.
- On the ribbon, choose Project > WBS or WBS Incl. Budget View.
Set up a WBS#
There are several ways to set up a work breakdown structure for a project:
Copy a WBS#
A convenient way for you to create a WBS is to copy a structure from another similar or sample project. The copy function is also used to create new versions of a WBS. For more information, see Copy WBS.
Create a WBS from a template#
Another easy way for you to create a WBS is to copy all relevant fields from a project template.
For more information, see Create Project Templates.
Project Configurator#
The Project Configuration allows you to create the work breakdown structure by merging various project templates. You can select the required project templates in the desired order. The same project template can be used multiple times. In additional Main, sub, partial tasks, customer, and project manager for the project template block to be imported optionally. In addition, headings can be inserted as breakdown elements between the various project template blocks.
The configurator can already be used in the project creation wizard. Additional project template blocks can also be imported later using the project configurator.
Insert a block from a project template#
Block-type WBS lines can be used to copy a group of field values from a project template to any part of the structure. We recommend that you set up special project templates for this purpose, as the entire WBS is copied as a block from the template.
After you selected Block on a WBS line, you can choose in the No. field the template from which you want to copy a structure. You then explode (copy) the block by using the Explode Block function on the WBS Lines FastTab.
Tipp
In a block line that has not yet exploded, certain fields can be used to store default values. For example, in the Subproject Lead field, you can select a resource that, after the block is exploded, will be entered as the subproject lead in all newly generated WBS lines. The Phase Code, Task Code, Step Code fields are especially suitable for this purpose.
WBS header#
On the header, you can see the number of the project for which you created the WBS, the name of the related project budget, and the version of the work breakdown structure. All structures are managed based on these three fields.
For a complete list of WBS header fields, see the following table.
| Field | Description |
|---|---|
| Project Budget Name | Shows the name of the project budget tied to the work breakdown structure. This field is filled in with the default name specified on the Project Budget Name page, although you can change the name here if necessary. For each project, you can set up any number of work breakdown structures with different or identical project budget names. A name included more than once in the same project will receive a version number, which is incremented every time the name is reused for the project. |
| Version No. | Shows the version number of the WBS. The number is assigned automatically. |
| Project Description | Shows the content of the Description field from the project. |
| Description | Shows a text that describes the WBS. |
| Blocked | With the toggle turned on, the WBS version is blocked for further planning. In this status planning values cannot be changed, nor can WBS lines be added or deleted. However, postings and billings against in this version remain possible. |
| Sales Budget Blocked | Turning on the toggle keeps the current sales budget fixed. Whereas unit costs can still be changed, budget lines can no longer be added to the project, as they provide sales prices automatically. If the Fixed Sales Budget when Ordering toggle is turned on in Projects Setup, this toggle is turned on automatically when you set the project status to Open. |
| Active | Specifies the WBS that is currently active. If the toggle is turned on, the WBS is in use. You must release a WBS before you can set it to Active, and you cannot have more than one active WBS per project. Postings and billings can be made exclusively against the active version. |
| Budget Status | Specifies if the work breakdown structure and its budget entries are pending approval, have been released, or have been rejected. |
| Released By Released On |
These fields show who released the structure and when. Users can only post to a project and an active WBS upon release. |
| Main WBS | For more information, see Main WBS. |
Lines#
The lines of a work breakdown structure are set up with certain project criteria, such as deliverables or phases, in mind. For each line, you can specify whether to make it a Work Package, a Heading, a Begin-Total, an End-Total, or a Total. The Block option, on the other hand, isn’t used as a structural element but is a function to copy a group of fields from a project template to an active WBS.
A begin-total marks the beginning of a series of line values to be totaled, the result of which is given as the end-total. Calculations enclosed by begin- and end-totals might be nested inside one another. The sum of all calculations is then shown on a line of the total type. This line, in turn, is linked to the heading entered above the first begin-total. To budget and post revenues and expenses to a project, you need lines of the work package type.
The most important line fields are explained in the following table.
| Field | Description |
|---|---|
| Position No. | Shows the number of the WBS line. When you create a WBS, you can use a series to have numbers added automatically by choosing Actions > Functions > Assign Position Nos. on the ribbon. |
| Type | Specifies the nature of the WBS line. (blank) The line contains text only. Work Package The No. Field specifies a work package for the project. Heading The Description field contains a heading, shown in bold on printouts. Begin-Total The line marks the starting point for totaling numbers and amounts. End-Total The line shows the result of adding up numbers or amounts starting from a Begin-Total. Note Begin-total and end-total calculations might be nested. Total The line shows the sum of all subtotals. Note Total fields cannot be nested. To have the system calculate a total, you need to run the Assign Position Nos. function first. Block Fills in the line with a group of project template values. |
| No. | Specifies a number if Work Package or Block is selected in the Type field. |
| Starting Date | Shows, if Work Package is selected in the Type field, when the project usage budgeted on the line is supposed to start. This field is filled in automatically with the starting date of the project but can be changed, if needed. |
| Ending Date | Shows, if Work Package is selected in the Type field, when the project usage budgeted on the line is supposed to end. This field is filled in automatically with the ending date of the project but can be changed, if needed. |
| Duration (Days) | The duration is calculated automatically based on the starting and the ending dates. However, you can also use the field actively to have the system calculate an ending date from the starting date. |
| Billing Type | Indicates how services included in a work package are billed to customers. (blank) Treats the line as if it were set to No Billing. Used for lines structuring the WBS view (headings, begin-totals, end-totals, and totals). Time & Materials Invoices the line based on unbilled costs, for example, because hours were posted to it. For each project ledger entry, you can also enter an invoice quantity that is different from actual expenditures. Fixed Copies the value entered on the line as a fixed price to invoice suggestions. For installments, the price suggested is a portion of the total price. We recommend this option for WBS lines that are linked to sales lines or payment plans, but you can also use it for other billing sources. No Billing Posts the line without billing a quantity. Milestone Bills the line at agreed-on rates as part of a milestone-based payment plan. The related plan line is copied to an invoice suggestion when the Milestone Reached checkbox is selected on the payment plan. You can set up milestone plans for individual WBS lines or an entire project. POC Bills the line at agreed-on rates based on the Project Completion % field. The suggested invoice total is proportionate to measured progress, minus the amounts already billed for the project. TE Flat Rate Specifies a lump sum for travel expenses. You can only use this option if you installed and (set up) the Continia Expense Management app. The line that contains the TE flat rate must show the total price on which you agreed with the customer. You do not need to plan anything here. The WBS might also contain other work packages with app-related travel expenses. However, these should be set to No Billing unless, for example, you want to additionally invoice a customer for miles travelled. Posting travel expenses through the Continia Expense Management app posts the expenses to TE work packages and copies a project ledger entry with no unit cost—but with the specified rate—to the TE Flat Rate package. When you settle the associated invoice, this rate is then suggested for each business trip on an invoice. Package Invoice Bills the line based on work package costs whenever project effort is of a different nature. This includes travel expense scenarios in which you cannot simply add up times and routes and multiply them by a line amount but where you need to collect receipts, such as for parking fees and hotel bills. During billing, all expenses you want to charge to the customer are entered in sum with a quantity of 1 on an invoice line. On the proof of performance document, however, the expenses are itemized, as usual. Because expense items are often difficult to budget—as you do not know how many package invoices you will need for a certain project and what price you will have to set on each invoice—having one order line refer to the work package is enough in this context. The line does not require a quantity or a price, as the invoice suggestion feature ensures that the correct amount is billed. Meanwhile, the quantity on the order is increased by 1 so that you can rebill the order as often as you want. |
| Ignore Payment Plan | If selected, decouples the line from being billed based on a payment plan. For example, despite a payment plan covering the entire project, you can select this field to bill travel costs on invoice suggestions based on the actual costs incurred. These costs are then excluded from the final invoice. This field is only relevant if you use a payment plan for the project and have set the Payment Plan Level field on the project card to Project. |
| Suspend Billing | Selecting the field removes the line from invoice suggestions temporarily but retains the original billing type. This option is used in milestone billing. |
| Copy to Sales Doc. | Specifies what information is copied to sales documents. WBS Line Copies the values stored on the current line. Budget Lines Copies the values stored on the budget lines related to the current line. No Transfer Ignores the line in transfers. This option is primarily selected for WBS lines that are used for informational purposes only or that have been transferred previously. |
| Copy as Bundle | If this checkbox is selected and the Copy to Sales Doc. field is set to Budget Lines, the system will transfer all relevant budget values in the form of a bundle to sales documents instead of placing them between a begin-subtotal and an end-subtotal on the lines. If you select the checkbox on a WBS line of type Begin-Total, on the other hand, the bundle in sales will consist of all values that were added directly to the structure (between the begin-total and the end-total on the project document). |
| Billing Integration | Specifies if a fixed-price entry was copied to a sales document from the WBS or from an associated budget line so that the system knows at which level to include the entry in an invoice suggestion after billing has occurred. Essentially, the billing level is already indicated in the Copy to Sales Doc. field. The difference is that you might set a filter there for when you create follow-on orders. For example, when you create an order with only new WBS lines, you need to select No Transfer in the Copy to Sales Doc. field on existing lines before running the Create Sales Document action. This means, however, that information required for billing will be lost. The value in the Billing Integration field, on the other hand, matches that of the Copy to Sales Doc. field unless you select the No Transfer option. You cannot edit this field manually. |
| Status | Shows the status of the line. A line can be set to Quote or Open. This field is inextricably linked to the Status field on the project header. If the status there is set to Open, the status in this field changes to Open as well. But when the status on the header is Planning or Quote, the status of this line cannot be Open. When you create a sales order from a quote, the status of both the project and the WBS line is set to Open. Lines with work packages must be filled in immediately. |
| Work Status | Specifies the status of a work package. Resource consumption can only be posted to a package that is set to In Progress. Purchase order and inventory usage, on the other hand, can be recorded in any status. Statuses only differ in the information that they provide to the project manager. They have no other purpose. Note The work status can only be set to In Progress when the status of the project is Open. The following options are available in this field: (blank) Used for lines that structure a WBS view. This includes headings, begin-totals, and end-totals. Open The line has been set up. In Progress The line can be filled in. Postponed The line has been filled in but put on hold for project-related reasons. Finished Work on the line has been completed. Accepted Work on the line has been accepted by the customer. Canceled The related work package has been canceled for project-related reasons. |
| Blocked | If selected, the line is blocked, and budget values can no longer be changed. You can still post to the line, however. Deselect the field to unblock the line for editing. |
| Requisition | Specifies if items on related budget lines are included in purchasing. Select this field if you want the system to check to what extent these items are available for purchase or up to when they are via an order. |
| Phase Code | Indicates the level of a work package line on the WBS. Phase codes are set up across projects. Among other things, they can help you create work breakdown structures from sales documents. The combination of work package, phase, task, and step codes on the WBS must be unique, as it will be used as a reference on all document lines and entries that you create from the structure. A line or entry with this reference can then no longer be changed unless it is entered on sales quote or order lines only (in which case code changes will be copied to them). If the code is specified as an Auto PTS Code in Projects Setup, this field is filled in automatically and you might no longer be able to change it. |
| Task Code | Indicates the level of a work package line on the WBS. Task codes are set up across projects. Among other things, they can help you create work breakdown structures from sales documents. The combination of work package, phase, task, and step codes on the WBS must be unique, as it will be used as a reference on all document lines and entries that you create from the structure. A line or entry with this reference can then no longer be changed unless it is entered on sales quote or order lines only (in which case code changes will be copied to them). If the code is specified as an Auto PTS Code in Projects Setup, this field is filled in automatically and you might no longer be able to change it. |
| Step Code | Indicates the level of a work package line on the WBS. Step codes are set up across projects. Among other things, they can help you create work breakdown structures from sales documents. The combination of work package, phase, task, and step codes on the WBS must be unique, as it will be used as a reference on all document lines and entries that you create from the structure. A line or entry with this reference can then no longer be changed unless it is entered on sales quote or order lines only (in which case code changes will be copied to them). If the code is specified as an Auto PTS Code in Projects Setup, this field is filled in automatically and you might no longer be able to change it. |
| Copy Budget | The Copy from Budget function transfers the sum of all unit costs and total prices from the project budget to certain WBS lines. Clear this field if the current line should not be part of that transfer. As a result, the unit price or unit cost specified for the billing resource on the work package is not multiplied with a budget line value but with the quantity or invoice quantity that you enter here. |
| Description Description 2 |
These fields describe the line. Headings, begin-totals, and end-totals are shown in bold. Work package descriptions (which are retrieved when you select a package) are displayed in normal font. When you create a WBS from a project template, both descriptions are copied from the template but can be changed manually, if necessary. They are also copied to sales quotes and orders that you create from the WBS by running the Create Sales Document function (unless you filled in the sales description fields as well). |
| Description in Sales Description 2 in Sales |
These fields contain alternate descriptions for use in sales. They specify notes that are shown to customers so that you can use the standard description fields for internal comments. When you enter a work package on the line, translations that exist for the package are copied to these fields by default. You can fill in the fields as early as creating a project template. |
| Project Completion % | The project manager can use this field to specify how far the project on the line has progressed in relation to overall project performance. What you enter here has an impact both on the completion values in project statistics and on the calculation of earned values and variances in budget-to-actual comparisons. The field is also used on invoice suggestions for time and materials billing. |
| Posting Progress % | Shows how much of the project budget has already been used. The calculation is based on the following formula: Posting Progress % = Usage Total Cost (LCY) * 100 / Unit Cost You cannot change this field manually. |
| Line Activity Progress % | If a work package includes budget line activities, an employee can report in time tracking how far a certain activity has progressed. This progress is weighted when a package contains more than one activity. The line then shows the average value across all activities. You cannot change this field manually. |
| Comments | Indicates the number of comments that are stored on the line. This field cannot be changed manually. To see or edit a comment, choose Related > Texts > Comments on the ribbon. |
| Beginning Text | Specifies whether text lines have been created for the line. Beginning texts are used, for example, as headings for work packages. To create a text, choose Related > Texts > Beginning Text on the ribbon or use the drill-down option. You can only create and edit text for the selected line. With the help of checkboxes, you can also specify the types of documents you want to print this text on. |
| Ending Text | Specifies whether text lines have been created for the line. Ending texts are used, for example, as additional work package descriptions. To create a text, choose Related > Texts > Ending Text on the ribbon or use the drill-down option. You can only create and edit text for the selected line. With the help of checkboxes, you can also specify the types of documents you want to print this text on. |
| Work Type Code | Shows the work type of the line. This field is filled in from the work package by default but can be changed manually. The code is also copied to available budget lines for the detailed planning of resource budgets. Work types are used to post consumption and sales, for example, to a project, a resource journal, or a sales document. They specify the kind of work a resource can be tasked with, such as overtime or transportation. For example, you can link work types to prices for budgeting or for posting project usage based on the kind of activity performed by a certain resource or resource group. Each type comes with its own unit of measurement, although you can assign several units to a resource or group. |
| Cost Center Code | Specifies the first global dimension to which the line is assigned. The field is filled in with a cost center code. Choose the lookup next to the field to see the codes that you have set up for this dimension. |
| Cost Object Code | Specifies the second global dimension to which the line is assigned. The field is filled in with a cost object code. Choose the lookup next to the field to see the codes that you have set up for this dimension. |
| Subproject Lead | Specifies the subproject manager in charge of the chosen work package. This field is used for informational purposes only. After you enter a manager, the relevant project team is automatically expanded to include the new resource. |
| Quantity | Specifies the planned quantity per unit for a work package. Multiplied by the cost and price per unit, the value in this field results in the amounts budgeted for the line. For a lump-sum amount, we recommend that you enter a quantity of 1, especially if you use the Copy from Budget action to fill in the line with budget line values through detailed planning. If the WBS and the budget lines use the same unit, such as hours, the function also transfers the budgeted quantity to the WBS. |
| Unit of Measure Code | Shows the unit of measure for the entered quantity. If you need to set up multiple types of budget lines, such as resource group, item, and G/L account lines, we recommend that you choose a unit that can be used to enter a line quantity of 1. Rerunning the Copy Values from Budget action then refreshes the associated price data. |
| Location Code | Specifies the code of the location where items shown on the line are stored. Choose the lookup to the right of the field to select a code. This field can additionally be filled in with a default value to maintain item lines sourced from a project budget. |
| Direct Unit Cost (LCY) | Specifies the unit cost for the line if you use a work package to enter items or resources. If you work with detailed planning, the direct unit costs are stored on budget lines and are not copied to this line. |
| Unit Cost (LCY) | Specifies the unit cost. This field can be filled in manually. If you work with detailed planning and have entries copied to this line, the field is filled in with the average unit cost, which is calculated by dividing the sum of the unit costs on the budget lines by the WBS line quantity. If detailed planning includes multiple units of measurement—such as hours and pieces—a quantity of 1 is entered for this work package line and the unit cost is equal to the cost amount. |
| Total Cost (LCY) | Shows the result of multiplying the quantity with the unit cost. |
| Invoice Qty. | The value in this field is copied from the Quantity field but can be changed manually, as the usage quantity that has been budgeted might differ from what you quote or bill to the customer. When you use detailed planning, the invoice quantity is copied from the budget lines after running the Copy Budget action (provided the unit of measure stored there is identical to the quantity on this line). |
| Invoice Unit of Measure Code | Specifies the unit of measure in which services are billed. This unit might differ from the unit in which services are rendered. For example, work might be recorded in hours but invoiced in days. Note The unit of measure is retrieved based on the work type entered for this line. You must change the work type if you want to use another unit. |
| Billing Cap | Specifies an amount by which you can exceed billing by time and materials. Select this field if you agreed with the customer on a billing cap. This cap is then used on invoice suggestions. |
| Billing Cap % | Specifies the billing limit as a percentage. If you enter 0, a bill cannot exceed the sales budget, that is, the total price on this WBS line. If you enter 10, invoices can include amounts that exceed the budget by up to 10%. |
| Cost Factor | This field must be filled in manually. It is used by the system to modify the unit price. If the unit cost changes, the system will recalculate the sales price, too. If you change the quantity or the starting date, the sales price will not be recalculated. Thus, the cost factor protects the calculated sales price. The sales price can only be changed by specifying a different cost factor or by making a direct manual change. See also the Copy Budget field. |
| Custom Unit Price | If you enter a custom unit price in the WBS line, this checkbox is automatically activated. This prevents a new sales price determination if the starting date or billing quantity is changed. The checkbox can also be activated/deactivated manually in order to influence the sales price determination. If you change the work type (only for resources) or the type (e.g. from Item to Resource) or if you select a different item, a new price will be picked automatically and this checkbox will be deactivated. See also the Copy Budget field. |
| Custom Discount | If you enter a custom sales unit cost in the WBS line, this checkbox will be activated automatically. This avoids new pricing in case the starting date or the quantity to be billed is changed. You can also change the setting in this field manually to influence the pricing procedure. If you change the work type (only for resources) or the type (e.g. from Item to Resource) or if you select a different item, a new price will be picked automatically and this checkbox will be deactivated. |
| Unit Price (LCY) | Shows the unit price. This field can be filled in manually. If you work with detailed planning and choose to copy budget values to a WBS, the total price is averaged according to the following formula: total budget price / sales quantity on the WBS line. If a work package is budgeted with a quantity of 1 because detailed planning includes differing units, such as hours and pieces, the price for a unit equals the total price. |
| Total Price (LCY) | Shows the result of multiplying the invoice quantity with the unit price and then subtracting the line discount. This field cannot be changed manually. |
| Line Discount % | Shows the line discount in percent. This field is used to calculate the total price and is copied to a quote or order line. If you use detailed planning and choose to copy budget values to the WBS, the field shows the percentage average of all discounts on the associated budget lines. |
| Line Discount Amount (LCY) | If you use detailed planning and choose to copy budget values to the WBS, this field shows the average of all discounts on the associated budget lines. |
| Budget Lines Quantity | Shows the total quantity budgeted (in detail) on the line. This field cannot be changed manually. For more details, select the entry to open the Project Budget Entries page. |
| Budget Lines Total Cost (LCY) | Shows the total unit cost budgeted (in detail) on the line. This field cannot be changed manually. For more details, select the entry to open the Project Budget Entries page. |
| Budget Lines Total Price (LCY) | Shows the total unit price budgeted (in detail) on the line. This field cannot be changed manually. For more details, select the entry to open the Project Budget Entries page. |
| Usage Qty. (Base) | Shows the quantity consumed on the line so far. This field cannot be changed manually. For more details, select the entry to open the Project Ledger Entries page. |
| Usage Total Cost (LCY) | Shows the total unit cost consumed on the line, that is, how much time and how many materials budgeted for the project have been spent. The sum of all usage cost fields on a WBS equals total project usage. This field cannot be changed manually. For more details, select the entry to open the Project Ledger Entries page. |
| Usage Total Price (LCY) | Shows the unit price of project ledger entries consumed on the line. This field cannot be changed manually. For more details, select the entry to open the Project Ledger Entries page. |
| Sales Qty. (Base) | Shows the quantity sold (billed) to the customer on outgoing invoices. This field cannot be changed manually. For more details, select the entry to open the Project Ledger Entries page. |
| Sales Total Cost (LCY) | Totals the unit cost of sold quantities. This field cannot be changed manually. For more details, select the entry to open the Project Ledger Entries page. |
| Sales Total Price (LCY) | Totals the unit price of sold quantities per line, that is, the sales generated on this line. The sum of all WBS lines equals total project sales. This field cannot be changed manually. For more details, select the entry to open the Project Ledger Entries page. |
| Profit Profit % |
Shows in number and percent the profit margin expected for the line. |
| Current Profit Current Profit % |
Shows in number and percent the profit margin achieved on the line so far. This field is only relevant if, in addition to consumption, sales are posted to the line. |
| Rem. Total Price Calc. Base |
Specifies based on the billing type of the line how the system calculates the value in the Unbilled Work field. Basically, this field is only relevant if you bill by time and materials. For every other billing type, it serves informational purposes only. Fixed Calculation base: Budget - Invoice The total price stored on the work package, that is, the WBS line, is compared to the amount billed for the package so far, with the difference between them shown in the Unbilled Work field. To compare the values, the system retrieves the total price from a sales line linked to the WBS line. If none is available, the budgeted total price entered on the WBS line is used. No Billing Calculation base: (blank) The Unbilled Work field shows 0. Time & Materials Calculation base: Usage - Invoice or Invoice Entries If you choose the first option, invoice entries will not be considered. Choosing the second only makes sense if you do work with invoice entries; otherwise, the Unbilled Work field will remain unchanged throughout the life of the project. Invoice entries are meant to document on which invoice and when you billed a certain usage quantity so that no entry is billed twice. Calculation base: Usage - Invoice Actual consumption for a WBS line (total price of a usage entry) is compared to the quantity for billing to ensure that you bill neither too little nor too much. In short, the value in the Usage Total Price (LCY) field is compared to that of the Sales Total Price (LCY) field. If an invoice does not match the exact expenses, however, the field might never go down to zero. Example (a) Consumption of 10 hrs. at $100 = total price of $1,000 (b) Consumption of 10 hrs. at $120 = total price of $1,200 Invoice total: $1,960 Total price remaining = $240 Calculation base: Invoice Entries The system checks every consumption entry included in a work package for whether an invoice entry has been created for it, that is, if the entry denoting usage has been billed. It does not matter in this context if the usage entry was invoiced at a higher or lower price (or based on more or fewer hours) than previously recorded. Only project ledger entries without invoice entries are added up in this field. (a) Consumption of 10 hrs. at $100 = $1,000 (b) Consumption of 10 hrs. at $120 = $1,200 Invoice: (a) Ledger entry of 10 hrs. at $100 = $1,000 (b) Ledger entry of 8 hrs. at $120 = $960 (changed on invoice) Invoice total = $1,960 Total price remaining = 0 Milestone Calculation base: Milestone The payment plan set up for a WBS line is understood as a milestone plan. All plan lines that have not been invoiced but that the Milestone Reached checkbox is selected on are considered billable and their total is copied to this field. Percentage of Completion Calculation base: Budget * Percentage of Completion - Invoice Calculates a value based on a formula that links the budgeted total price to project progress (the percentage of completion) and then subtracts the amount billed so far. The system retrieves the total price from a sales line related to the WBS line. If none is available, the budgeted price from the WBS line is used. TE Flat Rate Calculation base: Invoice Entries Calculates, based on invoice entries linked to a TE work package, what can still be billed using this work package. Package Invoice Calculation base: Invoice Entries Calculates, based on invoice entries, what billable costs remain. |
| Unbilled Work | Shows the difference between consumed and billed amounts based on the Rem. Total Price Calc. Base field. |
| Sell-to Customer No. | In this field, you can specify an invoice recipient recipient who is not the customer of the project. Alternatively, you can fill in the field on the budget lines (if billing integration is available there). If Billing Integrationis set at the WBS line level, a different customer specified on the respective WBS line is decisive. In this case, it is not permitted to change the customer on the associated budget lines. If Billing Integration is set at the budget line level, the different customer specified on the budget lines is relevant. In this case, the Customer field on the WBS line can be left empty. However, if a value is entered here, it will serve as a fixed default in the budget lines and cannot be changed. If this field is filled in, the system creates separate documents when you set up a sales document or an invoice suggestion for the WBS. Note It is no longer possible to change the customer once sales lines reference the respective wbs line. |
Note
The following fields on a begin-total line are filled in automatically on all subsequent work package lines until the end-total to help ensure data consistency in your app: Work Status, Status, Phase Code, Task Code, Step Code, Copy to Sales Doc., and Billing Type.
For example, changing the work status on a begin-total line also changes the status on all other lines before the end-total line (provided they contain work packages).
WBS functions#
Assign Position Nos#
Adds a position number to every line of the work breakdown structure.
Renumber Lines#
All WBS lines are automatically given internal numbers in 10 000 increments so that you can insert more lines between them. For example, the first line you add between 10 000 and 20 000 will be assigned internal number 15 000.
Done too often in one place, however, the line numbers will eventually go outside the integer range, and insertion will no longer be an option. To create the space required for inserting more lines, you can use this action to reassign the numbers throughout the work breakdown structure.
Calculate Predecessors#
Requires the Milestone, No. of Predecessors and Predecessor Position Nos. fields, which specify WBS line dependencies. Predecessors can be assigned to WBS lines that were selected as milestones, and you can enter more than one predecessor on each line manually. Running this function then fills in the Predecessor Position Nos. field for informational purposes.
Update Totals and Unbilled Work#
Refreshes the totals and the Unbilled Work value if, after opening the WBS, you have made changes to the structure—for example, by posting something or by creating an invoice. Continuously updating the data stored on a WBS isn’t a sensible strategy for performance reasons.
Entries are updated, however, each time the structure is reopened.
Create Sales Document#
Creates a sales quote or order from the WBS.
You can specify the information you want transferred to the document in the Copy to Sales Doc. field on individual lines. You can select there whether to copy values from the WBS line, transfer information from its budget lines, or ignore the line altogether.
Create Purchase Document#
The Create Purchase Document function allows you to create purchase quotes, purchase orders, requisition worksheets, and (if licensed) purchase requests directly from within the WBS (work breakdown structure). It is also possible to add lines to existing purchase orders. All items and services (external resources) specified in the project budget (itemized budgeting) can be purchased. For more information, see External Resources.
Create Project Shipment#
For more information, see Project Shipments.
Create Project Vendor Shipment#
For more information, see Project Vendor Shipments.
Create User Task#
Creates user tasks associated with the current project. The function connects a task to the project through the TableRelation property and Record.Relation method.
Copy WBS#
Copies a structure from the same or another project.
Budget values from the WBS template can be copied as well. This function is mainly intended for the creation of new WBS versions. We recommend that you set up new projects from a project template.
You can transfer an entire WBS or only selected lines. To copy a group of lines, turn on the Selected Lines Only toggle, and then choose OK to specify the lines you want transferred. You can also use this option to copy part of the current WBS onto itself.
If you transfer to a WBS that already has lines, the new lines are moved to the end of the structure. However, you must turn on the Auto PTS Code toggle in Projects Setup to ensure that the function creates unique work package lines in this case.
Copy WBS is most often used to create a new version of a work breakdown structure so that an ongoing project can be frozen. The new WBS is based on the same up-to-date values as the old one—except for project budget entries, which need to be managed separately. For posted ledger entries, only a relation is created.
A WBS line can no longer be deleted after you have posted something to it. For data security reasons, this remains true even if the related work breakdown structure was copied by mistake, and the line must be set to Finished instead.
Copy from Budget#
Copies to a WBS line the values from its budget lines, in effect totaling them at the work package level.
This function is only used on lines on which the Copy Budget field has been selected.
Update Project Account Entries#
Updates project account entries. If you change quantities or prices on WBS lines, the budget entries used to monitor the project will change as well.
This action is also available unfiltered on the projects list.
WBS Incl. Budget View#
Shows the entire WBS in detail. For more information, see WBS Incl. Budget View.
Statistics#
Shows the WBS budget from two different perspectives.
- The WBS Budget FastTab indicates the values stored on all WBS lines by adding up their Total Price and Total Cost fields.
- The values entered on budget lines, on the other hand, are shown on the Detailed Planning FastTab, where they’re broken down by budget type. Any WBS line without dedicated budget lines, that is, with no detailed plan, will not be included here. The values on this tab are identical in content to the sum of the project's Budget Lines Total Cost and Budget Lines Total Price fields.
Comments#
Shows comments about the WBS. You can also use this action to create new ones.
Documents#
Shows all open and posted documents for the project.
You can view a document by selecting an entry from the list.
Budget vs. Actual#
Compares project targets to actuals.
For more information, see Budget to Actual Comparisons.
Project Account Entries#
All budget values entered in projects are turned into project account entries. Stored with the chart of accounts, these values can be used to perform additional analyses based on a variety of criteria and your own methods of tracking project progress.
The function considers all account entries in each WBS version related to the current project. Like in finance, however, posting procedures must be set up in advance.
Project Gantt Viewer#
Opens a graphical project planning view. The WBS lines and the associated budget lines are shown in a chronological display. In addition to the work packages, the begin-total blocks and milestones are visible. If relationships have been defined between WBS lines or budget lines, these links are also displayed. Since this is a viewer, you cannot make any changes in the graphical display here.
Note
A Project Gantt Planner is available in PSP scheduling, allowing you to flexibly move both PSP and budget lines along a timeline.
Plan resources for project#
By this function, you initiate the simple and direct assignment of resources as new project budget lines. The project is automatically entered as a project filter in this section. See Capacity planning - Plan resources for project.
Line actions#
Work Package Card#
Provides detailed information about a WBS line. For a better overview, the data is arranged into FastTabs, with a subpage showing the related budget lines.
The aim of the card is to make it easier for you to maintain the wide variety of field values available on each line of the structure. The card also provides you with all the actions that can be run on single WBS lines (and not the structure as a whole) so that, for example, you can see what texts and comments were added to the line or retrieve values from the project budget.
Move Line#
Rearranges WBS lines. You need to select a line before you run this function. Once you have started the process, you need to choose OK to see a list of all lines related to the current project.
On this list, you can then decide above which line you want to insert the one that you selected at the beginning. To move it, choose Yes again.
Afterward, you must run the Assign Position Nos. function to ensure that all position numbers on the WBS are in the right place.
Change Dates#
Change Dates shifts the starting and ending dates of a WBS line by a period of your choosing using a date formula or specific starting and ending dates. Specific dates are transferred to the budget lines; date formulas are used alike in the budget lines so that chronology will be maintained.
Formula Calculation#
Specifies what other WBS lines you want the system to use for determining budget values on the selected line automatically. You can specify a formula as early as creating a project template.
Fill in the Use as Calc. Base and Use as Calc. Base (Total Price) fields if you want the calculation of the Budget Lines Total Cost and Budget Lines Total Price on the line to be based on different sets of values.
You can then enter a percentage in the Share to Allocate % and Share in Total Price % fields, for example, to cover a scenario where maintenance costs stored on a WBS line were determined to be 15 % of the total value that you entered on two other lines representing the cost of production and procurement.
You can also specify in the Auto Assign New WBS Lines to Purchase Calc. and Auto Assign New WBS Lines to Sales Calc. fields whether you want to link every other part of the WBS in this scenario to a special line that you set up for this purpose while the entered formula will be used on new lines automatically.
Skills#
Stores qualifications needed to fulfill a work package. These can be set up as early as creating a project template.
The skills are later used to filter for suitable resources when you run the Assign Skill-Specific Resource function.
Dimensions#
Shows the dimension values assigned to the selected WBS line.
Work Package Info#
Shows the documents that contain the work package of the project.
To open a document, select an entry from the list.
Interaction Log Entries#
Shows entries that are generated when you create interactions.
If you turned on the synchronization feature to update a project from sales documents, you can choose Related > Project > Sales Doc. Project Budget Change Log to see a list of all changes made to interactions.
Project Documents#
All open and posted documents that include a document line referencing this WBS line are displayed. To open the respective document, click it in the list.
Texts#
This action provides the following options:
Beginning Text / Ending Text#
Beginning and end texts are copied to project sales documents, on which they can also be printed. Whereas beginning texts are printed before sales lines, end texts appear after the lines.
Comments#
Stores line-related comments.
Note
None of these comments are copied to documents created from the WBS.
(Advance) Payment Plans#
Milestone Definition#
You can assign other WSB lines to a WSB line defined as a milestone. This is relevant to milestone invoices. For more information, see Milestone Billing.
Sales Amount vs. Payment Plan#
Compares the sum of all payment plan lines to the sales amounts of all work package lines (WBS lines) independent of the payment plan level assigned to the project.
Update Payment Plans#
Creates or updates the payment plans for the project. If the payment plan has been defined on the project level (=Project), the function applies to the entire project. If the payment plan has been defined on the WBS line level (=WBS Line), it applies to the payment plans of all work package lines (WBS lines).
Update Payment Plan (Current Line)#
Creates or updates the payment plan for the current work package line (WBS line). This function is only available if the payment plan has been set up on the WBS Line level on the Project Card.
Update Project Milestone Plan#
Creates or updates the payment plan based on the milestone WBS lines if the entire project is to be invoiced according to the milestone plan. For more information, see For a project.
Payment Plan#
Opens the payment plan. A payment plan at the Project level applies to the entire project. A payment plan at the WBS Line level applies to the current work package line (WBS Line).
Budget lines#
WBS lines help you create a project budget. You can later compare the target values on these lines to the actual numbers that are being generated over the course of the project.
You can also budget a project in detail. This means that you can allocate the quantities required for project completion to the lowest planning level, where you assign them directly to resources or resource groups, items, or G/L accounts.
Some of the values are then also used as a basis for scheduling capacity, for example, when you later assign a task to a certain staff member.
Although each time you budget, only a single work package is involved, you can open a special page to get an overview of the budget lines set up for all project-related packages. For more information, see WBS Incl. Budget View.
Use budget lines#
To be able to use detailed planning in a meaningful way, you might need to adjust the WBS line that you want to create budget lines from.
Copy Budget
Select this field on the WBS line so that you can copy to it the sum of all values from the Total Cost and Total Price fields on the associated budget lines.
If the WBS and its budget lines use the same unit of measurement, the system also transfers all planned quantities from the work breakdown structure to the budget view to show the average total cost or price.
Copy to Sales Doc.
Specify if the WBS line or one or more budget lines should be copied to a sales quote, a sales order, or a sales invoice.
Regardless of the option you choose in this field, you can still record expenses, for example, from time tracking, on the WBS and the budget lines.
Set up budget lines#
To create budget lines:
- Open a project card.
- Choose Project > WBS Incl. Budget View on the ribbon. If you’ve already opened a work breakdown structure without the view, choose Related > WBS Incl. Budget View on the header.
- You can also open a WBS without a budget view first and choose Related > Budget Lines on the WBS Lines FastTab.
The fields found on budget lines are described in the following table.
| Field | Description |
|---|---|
| Budget Type | Specifies what is being budgeted on the line. Resource Includes in the budget a resource that is not a billing resource. Item Covers materials and finished goods. Group (Resource) Includes a resource group in the budget. This group can later be replaced with a specific resource. G/L Account All costs not covered by the previous categories are budgeted with the help of G/L accounts. You can use any account for this provided the Direct Purchase on the related G/L account card is turned on. |
| No. | Specifies the number of a resource or a resource group, an item, or a G/L account, depending on the option selected in the preceding field. |
| Item Reference No. | Contains a reference assigned by the customer to help you find a specific item. |
| Starting Date | Shows the planned start of the line. This field is filled in from the WBS line but can be changed manually. |
| Ending Date | Shows the planned end of the line. This field is filled in from the WBS line but can be changed manually. |
| Description Description 2 |
These fields describe the item, resource, or account entered on the line. The descriptions are copied from a table containing base data (for example, the Item table) but can be changed manually. Both are also copied to sales or purchase quotes or orders that you create from the structure by running the Create Sales Document or Create Purchase Document action—unless you also fill in either the Description and Description 2 in Sales or Purchase fields. |
| Description in Sales Description 2 in Sales |
These fields contain alternate descriptions for use in sales. They specify notes that are shown to customers so that you can use the standard description fields for internal comments. When you enter an item or a resource on the budget line, translations that exist for the item or resource are copied to these fields by default. You can fill in the fields as early as creating a project template or edit the descriptions here manually. |
| Description in Purchasing Description 2 in Purchasing |
These fields contain alternate descriptions for use in purchasing. They specify notes that are shown to vendors so that you can use the standard description fields for internal comments. When you enter an item or a resource on the budget line, translations that exist for the item or resource in the vendor’s language code are copied to these fields by default. You can fill in the fields as early as creating a project template or edit the descriptions here manually. |
| Language Code (Vendor) | Shows the language code of the vendor entered on the budget line. The code is used to find item or resource translations for filling in the Description in Purchasing and Description 2 in Purchasing fields. If changing vendors also leads to a change in languages, the system will search for translations in the new language. You can then decide which of these should be copied to the budget line. |
| Work Type Code | This field is filled in from the WBS line if you select Resource as the budget type on the line. It cannot be used for items or G/L accounts. Work types are used to post consumption and sales, for example, to a project, a resource journal, or a sales document. They specify the kind of work a resource can be tasked with, such as overtime or transportation. Depending on the work performed, the types can help you in setting up a variety of prices and units of measure for the consumption and billing of resources and resource groups. |
| Copy Budget Text to Purch. | If this field is selected, the system copies all budget text (lines) to purchase orders that you create from this line. |
| Copy Budget Text to Sales | If this field is selected, the system copies all budget text (lines) to sales documents that you create from this line. |
| Customer Price Group | Specifies the code of a customer price group. |
| Quantity | Specifies the quantity planned for the line. If you press Enter to confirm the quantity in this field, project budget entries are created automatically. |
| Quantity (Base) | Gives the quantity in the base unit of measure. This field cannot be changed manually, as quantities are budgeted in the unit of measure specified for the Quantity field. |
| Reserved Quantity | Menge für Artikel, die bereits für diese Budgetzeile reserviert wurden. Reservation is done either through a scheduling run in Purchasing (this considers all items in budget lines that have the scheduling flag) or through the manual Reserve function call. |
| Reserved Quantity for Project Shipment | When you create a project shipment line for a budget line, the reservations set in the latter will be copied to the project shipment line. While this empties the Reserved Quantity field, the reservation remains visible in the Reserved Quantity for Project Shipment field. In a manual reservation function call, the system will use both the reserved quantity from the budget line and the reserved quantity in the project shipment lines. |
| Requisition | If this field is selected, the item on the line will be requisitioned during a planning run. |
| Buy-from Vendor No. | Shows the vendor from an item card (or a resource card in the case of an external resource). This field is filled in automatically if you select Item or Resource in the Budget Type field but can be changed, if necessary. It can later be edited again should you run the Create Purchase Order function from the WBS. |
| Purchase Currency Code | This field shows the currency in which the purchase document for the respective budget lines is created and for which currency the purchase price finding was carried out. The currency is automatically taken from the vendor entered in the Buy-from Vendor No. field and cannot be changed. The purchase price finding from the purchase price lists is entered into the Direct Unit Cost (FCY) field and is automatically converted into the Unit Cost (LCY). If no price is available in this currency, a price is found in the local currency and then converted into the purchase currency. The corresponding unit cost from the purchase price lists is also entered into the designated fields for unit cost according to the same principle. |
| Qty. on Purch. Quote (Base) |
Shows the quantity available on purchase quotes related to this line (a link to the field is created when you use the Create Purchase Document action to make project purchases). |
| Qty. on Purch. Order (Base) |
Shows the quantity available on purchase orders related to this line (a link to the field is created when you use the Create Purchase Document action to make project purchases). |
| Qty. Received (Base) | Shows the line quantity already delivered by the supplier. |
| Usage Qty. (Base) | Shows the quantity consumed on the line. Quantities from posted project ledger entries are shown in this field regardless of their source. This means they might originate with a project purchase, stock consumption (for items), or a time posting (for resources). |
| Outstanding Qty. (Base) | Shows the result of subtracting the quantity planned for the line from the quantity consumed on it so far. |
| Unit of Measure Code | If you select Resource or Item as the budget type, this field is filled in with the base unit of measure specified on a resource or item card. The field can be changed for items but not for resources, as the unit of measure of a resource depends on the work type that you choose for the resource. |
| Location Code | Shows the code of the location where an item entered on the line is stored. You can choose the lookup to the right of the field to select a code from the Location page. |
| Bin Code | Shows the code of the bin where a possible line item is stored. To make use of this field, you must select a location on the line. |
| Variant Code | Specifies an item variant. |
| Direct Unit Cost (LCY) | Shows the direct unit cost as calculated by the pricing functionality for a resource or a resource group, an item, or a G/L account when the No. field has been filled in. You can, however, change this field manually, if necessary. |
| Unit Cost (LCY) | Shows the unit cost as calculated by the pricing functionality when the No. and Type fields have been filled in. You can, however, change this field manually, if necessary. Note If you change the Direct Unit Cost (LCY) on a resource line, the value in this field is recalculated based on the group of indirect costs specified for the resource (if available). |
| Direct Unit Cost (FCY) | The purchase price in the purchase currency is shown in this field. It is determined through price finding and cannot be changed. For further information, see the description of the Purchase Currency Code field. |
| Unit Cost (FCY) | The unit cost in the purchase currency is shown in this field. It is determined through price finding and cannot be changed. For further information, see the description of the Purchase Currency Code field. |
| Total Cost (LCY) | Shows the result of multiplying the quantity with the unit cost. This field is part of the Project Budget Entries page and is copied from there. |
| Invoice Qty. % | If the Billable checkbox is selected and the associated WBS line is invoiced by time and materials, you can specify here how much of the line activity you want to bill. For example, instead of 100, you can enter 50 if you want to bill only half of the work performed on this line to the customer. After you fill in the field, the quantity to bill is determined from the value entered in the Quantity field. Unlike clearing the Billable field on the line, setting this quantity to 0 means project ledger entries that are not invoiced are still shown on proof of performance documents with the actual quantities worked. A later change in the value of this field will not affect ledger entries that already exist. |
| Invoice Qty. % fixed | The functionality of the field Invoice Qty. % can be overridden by the field Invoice Qty. % fixed. In this case, it is not possible to adjust the field Invoice Qty. %, so that no invoiced quantity can be determined based on the quantity. Changes to the invoiced quantity do not affect the field Invoice Qty. %. The Invoice Qty. % field always remains at 100 %, unless the Billable checkbox is deactivated; in this case, the value is 0 %. It is possible to calculate using a different invoiced quantity, but this deviation does not affect the consumption posting. This means that consumption postings are made either with 100% or 0% of the invoiced quantity. There is no automatic proportional invoicing of the effort. The field Invoice Qty. % fixed can already be set as a default for all newly created budget lines within the project (in the Posting FastTab using the Invoice Qty. % fixed in Budget Lines toggle). |
| Billable | Specifies whether the time and materials entries that you want to set up for the line can be invoiced to the customer if the associated WBS line is billed by time and materials. This means that you need to clear the field if you do not want the created project ledger entries included on proof of performance documents. If non-billable services are to appear in the service record, the Billable checkbox must be activated. In this case, the billing quantity of the associated effort project items can be set to zero – this can already be preset in the budget line using the Invoice Qty. % field. A later change in the value of this field will not affect project ledger entries that already exist. |
| Invoice Unit of Measure | Specifies the unit in which invoice quantities will be budgeted. The base unit of the item is filled in automatically here, although you can change the unit, if necessary. You cannot change it for resources, however, as theirs depends on a work type. |
| Invoice Qty. | This field can be filled in if the customer receives sales quotes and invoices for quantities that differ from budgeted expenses. In all other cases, the line quantity and the quantity to invoice will be identical. |
| Invoice Qty. (Base) | Gives the quantity to bill in the base unit of measure. You cannot change this field manually. Note The quantity is budgeted in the unit specified in the Invoice Unit of Measure field. |
| Unit Price | Shows the unit price specified for a resource or a resource group, an item, or a G/L account as stored on the relevant card or as set up for the project. You can also fill in this field manually. |
| Line Discount % | Like the Unit Price field, shows a value from a card or a project-specific price. This field cannot be changed manually. |
| Line Discount Amount | Filled in based on the line discount in percent. This field cannot be changed manually. |
| Total Price | Shows the result of multiplying the invoice quantity with the unit price. The field is also used to create in the background project budget entries that match the calculated value. |
| Not Billable | The selection field allows you to specify a line as a position that will not be billable to the customer, for example, by assigning a price of zero or a 100% discount. Further information about non-billable lines and their impact, including in sales lines, see: Non-billable lines |
| Sales Price Origin | Shows information about the source of the price. During price determination, the following sources are assigned automatically: • Default Price • Job Specific Price • Manual Price • Calculation • Not Billable (see Not Billable Field) Note Sales Price Origin replaces the Manual Price field and must be activated in KUMAVISION Feature Management. |
| Custom Discount | If a manual sales line discount is entered into the budget line, this checkbox is automatically activated. This prevents a new line discount from being determined if any of the price-relevant fields (date, resource number, etc.) are changed. |
| Cost Center Code | Specifies the first global dimension to which the line is assigned. This field is filled in automatically with the dimension specified for a resource, an item, a work package, or the project itself. It is also renamed to match the name of the dimension that is chosen. You can change the field, if necessary. To see the codes set up for the dimension, use the lookup to the right of the field. |
| Cost Object Code | Specifies the second global dimension to which the line is assigned. This field is filled in automatically with the dimension specified for a resource, an item, a work package, or the project itself. It is also renamed to match the name of the dimension that is chosen. You can change the field, if necessary. To see the codes set up for the dimension, use the lookup to the right of the field. The FactBox that appears on the page at the bottom (when you use the Budget Lines action) or on the right (when you choose WBS Incl. Budget View) shows you the total costs and prices for resources, for items, and for budget lines posted directly to G/L accounts from the lines. |
| Sell-to Customer No. | As in the WBS line, it is also possible to specify a customer that differs from the project in the budget lines. If Billing Integrationis set at the WBS line level, a different customer specified on the respective WBS line is decisive. In this case, it is not permitted to change the customer on the associated budget lines. If Billing Integration is set at the budget line level, the different customer specified on the budget lines is relevant. In this case, the Customer field on the WBS line can be left empty. However, if a value is entered here, it will serve as a fixed default in the budget lines and cannot be changed. If this field is filled in, the system creates separate documents when you set up a sales document or an invoice suggestion for the WBS. Note It is no longer possible to change the customer once sales lines reference the respective budget line. |
The FactBox that appears on the page at the bottom (when you use the Budget Lines action) or on the right (when you choose WBS Incl. Budget View) shows you the total resource, item, and budget line costs and prices that have been posted directly to G/L accounts from the lines.
Calculate unit prices#
Typically, a unit price is copied from a price list or entered manually on a budget line. The third option is to have the price calculated based on the unit cost entered for the item. You can then add up to three surcharges or reductions to the total.
For this purpose, you need to unhide certain fields on the budget lines and fill them in as described in the following:
| Field | Description |
|---|---|
| Unit Cost (LCY) | Specifies the base value that will be used to calculate the unit price. You can change the value manually if necessary. |
| Calc. Extra 1 % | Specifies the first calculated surcharge or reduction on the unit cost in percent. |
| Factor 1 | Specifies the first calculated surcharge or reduction as a factor on the unit cost. |
| Calc. Extra 1 | Specifies the first calculated surcharge or reduction in local currency. |
| Base Amount for Calc. 2 | Specifies the base of the second surcharge or reduction according to what is entered in the Unit Cost (LCY) and Calc. Extra 1 fields. |
| Calc. Extra 2 % | Specifies the second calculated surcharge or reduction on the base amount in percent. |
| Factor 2 | Specifies the second calculated surcharge or reduction as a factor on the base amount. |
| Calc. Extra 2 | Specifies the second calculated surcharge or reduction in local currency. |
| Base Amount for Calc. 3 | Specifies the Unit Cost (LCY) without surcharges or reductions as the base for the third calculated charge. |
| Calc. Extra 3 % | Specifies the third calculated surcharge or reduction on the unit cost in percent. |
| Factor 3 | Specifies the third calculated surcharge or reduction as a factor on the unit cost. |
| Calc. Extra 3 | Specifies the third calculated surcharge or reduction in local currency. |
| Unit Price (LCY) | Shows the result of combining the Unit Cost (LCY), Calc. Extra 1, Calc. Extra 2, and Calc. Extra 3 field values. |
Note
If the unit cost and unit price are retrieved by the price function, the difference between cost and price is entered as Calc. Extra 1 on the budget line; manual changes to either will update the extra calculation value. See the following for an example of how all three values are used:
| Unit Cost (LCY) | 100 |
| Calc. Extra 1 % | 10 |
| Factor 1 | 1.1 |
| Calc. Extra 1 | 10 |
| Base Amount for Calc. 2 | 110 [100 + 10] |
| Calc. Extra 2 % | 15 |
| Factor 2 | 1.15 |
| Calc. Extra 2 | 16.50[15 percent of 110] |
| Base Amount for Calc. 3 | 100 |
| Calc. Extra 3 % | 20 |
| Factor 3 | 1.2 |
| Calc. Extra 3 | 20 |
| Unit Price (LCY) | 146.50 [100 + 10 + 16.50 + 20] |
Charges 1 and 2 are added one after another, whereas charge 3 is added independently.
Note
If a budget line of type Item or Resource uses the same extra calculation values for a project, you can also fill them in on the Project Budget Calculation Defaults page. If you enter a new item or resource line for the project, the Calc. Extra 1, 2, and 3 values stored there are then entered on the line by the system. With the unit cost filled in, the automated unit price calculation is also started right away.
Custom unit prices#
Despite manual marking, the sales price can be overridden by price finding in certain cases.
The first column of the table contains the respective planned type (resource, resource group, item, G/L Account). The subsequent columns list the field changes that trigger a new price finding. The classification n/a for items and G/L Accounts means that the work type plays no role in price finding for these two types.
| Budget Type | Type | No. | Quantity | Work Type | Starting Date |
|---|---|---|---|---|---|
| Resource Group | Type changes from one resource to another: No Changes to item or G/L account: Yes |
No | Yes | No | |
| Item | Yes | Yes | No | n/a | No |
| G/L Account | Yes | No | No | n/a | No |
Line activities#
For rough planning, budget lines can be assigned to resource groups. This kind of budgeting includes the expected number of hours it will take to complete a certain work package.
However, budget lines can also be used to assign project activities to specific resources or their groups. By providing a detailed structure for activities, these lines are then no longer just planning lines but also contain budgeted activities, which resources and resource groups can use to record the time they spent on the project.
A unique number is assigned to each activity from the series that was chosen for this purpose in Projects Setup. This number cannot be changed manually.
Basically, line activities provide you with a highly granular project budget. Whereas the rough planning capabilities provided by the system might be sufficient in the early stages of a project (while quoting and costing), long-term projects in particular might become increasingly difficult to manage over time.
In this case, you can use the Split Line action to create a resource-specific activity from a budget line that belongs to a resource group. If you cannot assign a certain activity to a specific resource, it can also remain with the group.
To see all activities for a certain project:
- Open a project card.
- Choose the Search icon, enter Budget Line Activities Overview, and then choose the related link.
The fields required for line activities are described in the following table.
| Field | Description |
|---|---|
| Line Activity No. | Consecutive numbers are assigned to activities performed by a resource or a resource group on budget lines. As a result, each activity number created within a company is unique. This field is filled in with a number from the relevant series entered in Projects Setup and cannot be changed manually. |
| Priority | Indicates task priority. This field is used for informational purposes only. |
| Status | Shows how far the line activity has progressed. Each new activity is set to Not Started. The status changes to In Progress when you post to the activity for the first time. Employees can use only these statuses to post work hours; activities in a different status aren’t visible to them in time tracking. An activity is set to Completed when the resource working on the activity reports it as completed. All other statuses are set by the project manager, who can also reset a task from Completed to In Progress so that it can be posted to again. Note Budget lines of type Item or G/L Account are set to In Progress automatically when consumption is posted for them. The project manager can also change their status manually. When an attempt is made to set these budget lines to Completed, the system will check for unfulfilled commitments (reserved and open quantities, as well as open purchase, time, and inventory commitments) to ensure that the lines can still be posted to. If the check fails, the lines cannot be set to Completed. |
| Completion % | In time tracking, staff can record the progress of their activities in percent or by using the Qty. to Complete field. Filling in one of these fields will fill in the other field on the budget line, as well as the Estimated Total Qty. and Estimated Total Amount (LCY) fields, based on the budgeted quantity and the hours posted by staff, that is, the values in the Usage Qty. (Base) and Time Commitment Qty. (Base) fields. If a budget line shows a progress of 99%, this may have been caused by the Change Budget Line function. In such a case, a project ledger entry has been moved from one budget line to another, with the progress being recalculated for both the target and source budget lines. If the new progress was ≥ 100%, the system would close the budget line activity automatically. To prevent this, the function limits the progress to a maximum of 99%. Once the budget line activity has actually been completed, you need to close the budget line manually. |
| Quantity | Shows the quantity budgeted for the line activity. |
| Usage Qty. (Base) | Shows the hours spent on the activity and released by the project manager. |
| Time Commitment Qty. (Base) | Shows the hours posted to the project but not released by the project manager. |
| Qty. to Complete | Shows a quantity that was calculated automatically, as in the Completion % field, or was entered by an employee in time tracking. |
| Estimated Total Quantity | Shows a quantity calculated automatically. See the Completion % field. |
| Estimated Total Amount (LCY) | Shows a quantity calculated automatically. See the Completion % field. |
| Profit Profit % |
Shows the profit margin budgeted for the activity. |
| Current Profit Current Profit % |
Shows the current profit margin for the activity. This field is only used if, in addition to expenses, sales are posted to the line. |
| Sell-to Customer No. | Shows an invoice recipient who isn’t the customer of the project. A recipient can be entered but only if you selected Budget Lines in the Billing integration field as the level at which to create sales documents. If this field is filled in, the system will create separate documents when you create a sales document or an invoice suggestion for the line. |
Find line activities#
To find a line activity by its number across all projects:
- Go to the Project Lead role center, and then choose Find Budget Line Activity on the Actions ribbon. Alternatively, open the page by running the general search function.
- Fill in the Line Activity No. field.
- Choose Find to run the action.
The system then searches for the specified activity in all available projects and opens the relevant Budget Line Activity Card if it finds a match.
The function only looks through active WBS versions unless you also turned on the Include Inactive WBS Versions toggle on the request page.
Turning on the toggle can be useful if different versions of the same structure contain different line activities, for example, because a finished activity wasn’t copied along to a more recent version. You see a selection window should the same activity be part of multiple versions.
Actions#
Explode BOM#
Adds a line for each component of a bill of materials that has been assigned to the budgeted work package on the Work Packages page.
Note
You can use this function for more than one work package line at the same time by selecting multiple lines on the upper part of the WBS Incl. Budget Lines page.
Explode Assembly BOM#
Adds a line for each component of an assembly bill of materials assigned to an item on a budget line. This involves removing the original budget line and distributing the component quantity across the new lines.
Create Assembly Order#
If an item with an associated assembly bill of materials is entered in a budget line, this function can be used to generate an assembly order for the creation of the item.
The assembly order is reserved for this budget line. Likewise, the item booked into location after completion is also reserved for this budget line.
Allocate Qty#
Distributes the line quantity evenly over the period between the starting and ending date entered on the line. You can choose whether you want the quantity distributed across weeks, months, or a day. A default interval can be specified in Projects Setup.
The budget entries set up for the project are adjusted when you run this function. This means that a quantity of 20 is broken up into quantities of 10 a month over a period of two months.
Split Line#
Assigns to a resource part of a line activity that has been roughly budgeted for a resource group. In other words, you can use this function to divide a task into two and distribute the quantity entered for it among different resources or change data in other ways (by entering a new completion date, for example).
For a better estimate of how much work can be split off, the function will list all line-related quantities. After you have specified in the New Type and New No. fields the resource or resource group to whom a portion of the task should go, you can enter a quantity in either the Distributed Qty. New Line field or Remaining Qty. Old Line field, with the system filling in the value in the other based on the total quantity budgeted on the line.
Note
You cannot increase a line quantity in this way but must do so following the split.
To have the system assign identical numbers to both the old and the new line, turn on the Keep Line Activity No. toggle before you choose OK. This might be useful, for example, if a line pairing needs to be considered in combination at some future date.
If you fill in another starting date or another resource, the Recalculate Prices toggle is turned on automatically on the new line so that the associated unit costs or prices are recalculated. If the prices are to be kept, the toggle can be manually turned off again.
Change Work Package#
Copies the budget line, and entries posted to it, to another WBS line. To move more than one budget line, you can select multiple lines on the upper part of the WBS Incl. Budget Lines page and run the Change Work Package Multiple function.
Note
Moving a budget line in this way might lead to a change in prices.
Update Total Cost (=Moving Average)#
The more time a budgeted task needs, the more likely it is that you will see an increase in the costs of items or services required for its completion.
One solution to keeping costs up to date is to split the relevant line activity so that you can enter a new cost value on a second budget line. As an alternative, you can also run the Update Total Cost function to change costs mid-project.
To be able to run this function, the budgeted quantity that you want to change the cost for needs to be available across the planning period set on the budget line.
In other words, before you can update costs, you need to create project budget entries with the help of the Allocate Qty. or Allocate to Dates action so that the task quantity is distributed across the period between the starting date and the ending date found on the budget line. You also must have entered the new unit cost with a starting date on all price lists related to the line.
When running the update function, you can then decide from when you want project entries to be updated. This field is set to the work date by default so that the system updates all budget entries created on or after that date (but you can change the filter, if necessary).
After you choose OK on the request page, the system recalculates the costs of all project budget entries in the filter period and copies the new unit cost to the specified line.
Example
On 01/01, the cost of an item that you need for a year-long project is USD150. The item is budgeted with a quantity of 12 throughout the year, with one item expected to be bought per month. In total, that makes USD1800.
Starting on 10/15, however, the cost increases to USD170. But you’ve known about that increase since 05/08, so you enter ‘05/08..’ in the Date field.
When you run the function, the previously budgeted unit costs remain in effect from 01/01 to 10/01; only those specified for 11/01 and 12/01 are updated by the system to USD170. This results in a new total cost value of USD1840 and a unit cost of USD153.3333, with the latter being copied to the budget line.
Only the Unit Cost is changed, as this is relevant for the assessment of a budget line. The purchase price remains unchanged.
Additionally, the following fields are updated on the line:
| Field | Value |
|---|---|
| Moving Average | Specifies whether the unit cost has been updated over the course of the project. |
| Unit Cost Updated On | Specifies when the Update Total Cost function was last run. |
| Unit Cost Updated By | Specifies who last updated the cost. |
| Last Unit Cost | Shows, based on the starting date, the most recent unit cost that the budget entry was updated with. In our earlier example, the value in this field would be 170. |
| Current Unit Cost (LCY) | The function stores the purchase price that is valid as of today’s date. This corresponds to the purchase price that would be determined for a new budget line with today’s start date. |
Note
After the function is run, the unit cost on the budget line can no longer be changed manually.
Order Tracking#
Checks if line demand is met, for example, by a purchase order.
Running this function opens the Order Tracking page, where you can see the supplier who meets demand originating from the budget line. This line, in turn, can be seen by choosing Order Tracking on the related purchase order.
Search for Attributes#
Searches for items based on certain attributes, a feature also available on purchase and sales documents.
Send to Calendar#
Sends a line activity as an Outlook task to a staff member.
This function requires that a valid email address has been stored for the employee (resource) in User Setup. After you hit Send, the employee receives an email with a calendar event and the relevant
- Line Activity Description
- Starting Date
- Ending Date
- Project No.
- Line Activity No.
- Project Manager Name
- Customer Name
- (Customer) Company Phone No.
If a line activity is canceled or put on hold, the calendar task is deleted from Outlook automatically.
Change Dates#
Reschedules a budget line.
When you run this function, you are asked to specify by way of a formula the amount of time that the line should be moved up or back.
The formula must include at least one mathematical operator and a time expression such as D = day(s), W = week(s), M = month(s), Q = quarter(s), or Y = year(s).
A message appears if you make an incorrect entry, explaining the reason why.
You can use this function, for example, to adjust a project budget because of a change in shipping dates for the project. The starting and ending dates of the affected budget lines are then edited automatically to match the new schedule.
Allocate to Dates#
Opens a matrix that shows the budget lines set up for the project, with activities broken down on each line based on the interval you chose in the Period field on the header. All project work is initially put on the starting date.
You can use this matrix to budget quantities in detail, specifically at the budget entry level, that is, you can schedule quantities for resource and item lines on the calendar in steps that go from 24 hours to a year.
Each time you assign a budgeted quantity to a resource or an item in a calendar field on the page, the system will create project budget entries. These entries are the smallest elements of a project budget and the basis for planning resource capacity (see Capacity Planning).
Change Type & No#
Allows some flexibility in planning. Typically, you can change the Type and No. fields until hours have been posted to a budget line.
To move a resource from one line onto another, you can simply change the No. field on the lines themselves. However, to move a line from a resource group to a specific resource, you must run this function for technical reasons.
After hours have been posted, you need to use the Split Line action to assign part of a quantity to a new line type and number.
Reserve#
Creates a reservation on the line for tracked supplies, for example, from inventory or a purchase order. . Please note that during the creation of a project shipment, reservations are passed on to the latter. In this case, the system copies the value in the Reserved Quantity field from the budget line to the Reserved Quantity for Project Shipment field. If you try to perform another reservation in this budget line, the Reserved Quantity for Project Shipment will also be considered to prevent an excessive reservation.
Take#
Assigns stock to the project from non-reserved quantities. Stock that has been assigned previously can be identified by its filled-in Project No. field. This function can only be run from item-type lines.
Running the function opens a page on which you can see the project inventory items you specified on the line and assign new item entries. Entries you want to remove from a location entered on the line must contain a positive value and be open. Moreover, the entries cannot be reserved or assigned to a project. You can clear the project number filter should you want to move items from one project to another.
You can then specify how many items you want to remove from the warehouse. The number of items you take can, of course, not exceed the total number held onsite.
Choose OK to post the selected quantities to project inventory. A reference to the project (or, more specifically, to the budget line) is then added to each item entry that you move in this way. Afterward, you need to create a project shipment to post consumption of the item while removing it from the stock assigned to the project.
Assign Project Ledger Entries#
Typically, when you post usage for a project, the number of the budget line from where consumption originates is assigned to the related project ledger entries automatically.
Sometimes, however, a number might need to be assigned manually, for example, if you entered an item on more than one budget line created from the same WBS line.
You can then use this function to assign all project ledger entries stored on the WBS line to the budget line provided one of the following criteria is met:
- If a resource has been stored on the budget line, consumption entries must refer to the same resource.
- If a resource group has been stored on the line, consumption entries must refer to the same resource group (with the resource for whom consumption is posted being a member of that group).
- If an item has been budgeted on the line, all entries must refer to the same item number.
- If a G/L account has been budgeted on the line, selected G/L account lines must refer to the same account.
Connect
Assigns all selected entries.
Disconnect
Deletes existing assignments (as indicated in the Budget Line No. field).
Card#
Opens the line activity card.
Item Availability#
Provides multiple item availability lists designed for the same purpose and function as those used for sales documents.
Dimensions#
Shows the dimensions assigned to the line.
Reservation Entries#
Shows the items reserved for the line.
Predecessors / Successors#
Assigns predecessors or successors, or both, to work scheduled on the line.
Beginning Text / Ending Text#
Specifies line-related texts, which can be copied to sales or purchase documents.
Comments#
Stores internal comments regarding the line.
Navigate to Line Activity#
Indicates where a line activity is being used.
Line activity numbers are stored on purchase and sales documents, with project ledger and time entries, on CTC lines, and in time sheets.
Resource by Project#
Shows the budget entries created for the WBS and resource. Making another WBS the active structure will change these entries on printouts.
Choose the lookup if you want to see more details on an entry. You cannot edit the entry on that page, however.
Resource Group by Project#
Identical to Resources by Project, except that this function filters for resource groups, not individual resources.
Capacity Plan#
Shows the capacities assigned to resources. You can fill in the fields on the Options FastTab to filter for a specific resource if necessary. The page includes all capacity-related values stored on the active WBS. For more information, see Capacity planning.
Assign Skill-Specific Resource#
Copies resources with certain qualifications to the budget.
This function requires that you have assigned skills to the relevant resources. These skills can then be assigned to work packages, that is, WBS lines, or you can set them as filters manually. In addition to the actual skill, you can use skill levels and certified skills as filters when searching for a suitable resource.
Resources are indicated with their capacity values, including their overall capacity, their times of absence, and their quote and order entries.
For a quick and easy way to include resources in a budget, you can select a resource, navigate to the Values FastTab, and then choose Manage > Quick Assignment on the ribbon. Afterward, you can use the budget lines to plan a resource’s capacity in more detail, for example, by entering quantities.
You can also choose Detailed Assignment on the same ribbon to open a page where you can budget resource hours per week.
Set Service Package Qty.#
Used to adjust the quantities specified for service package resources, as those cannot be changed on the budget lines themselves. For more information, see Use on Budget Lines (Service Package).
WBS Incl. Budget View#
This function shows the active work breakdown structure of a project in combination with the budget lines set up for the project.
Information about the structure itself can be found on the header, whereas the other parts of the page show text lines, comments and, most of all, the budget lines set up for a WBS line. All entries always relate to the currently selected WBS line.
The line statistics on the right show the planned resource quantity, key values broken down by budget type, and the total cost and price of the WBS line. Budget entries are added up under Budget Line Total. You can compare these to the values found under WBS Line, which allows you to immediately spot differences in amounts between the work breakdown structure and the detailed budget.
The Usage section, on the other hand, indicates usage based on total cost and price, whereas Billings shows the amount invoiced so far and the amount that you have yet to invoice to the customer based on project progress and the billing type of the WBS line.
The actions on the WBS Incl. Budget Line page are the same as those described for the individual WBS and Project Budget pages.
Main WBS#
To track the impact of additive and deductive change orders on initial cost estimates, you can create what is called a main WBS.
This involves setting up non-active versions of a structure so that you can log negative and positive adjustments to a project. When you release those versions, their values are then merged and transferred to a WBS version that serves as the main—and active—structure for the project.
This feature can only be used to copy values changed on WBS lines; detailed schedules with budget lines must be created from the main WBS.
Note
You cannot use this function if rolling wave planning is turned on (the Forecast or Distribution feature, or both).
Set up a main WBS#
- Choose the Search icon, enter Projects Setup, and then choose the related link.
- On the Project Management FastTab, fill in the fields described in the following table.
| Field | Description |
|---|---|
| Project Budget Name (Main WBS) | Select the name of a project budget to specify an active WBS version linked to this budget as the target structure to which to copy the results of calculations and change orders. You must fill in this field before you can use the Main WBS feature. |
| Keep Invoice Qty. Separate | With the toggle turned on, invoice quantities found on lines copied to a main WBS will not be totaled but replaced with a quantity of 1. The toggle does not apply to sales amounts and unit costs. |
Main WBS#
This toggle shows whether a structure is used as a main WBS. Found on the WBS header, it turns on automatically if the budget name specified for the project is identical to the name entered in the Project Budget Name (Main WBS) field on the Projects Setup page.
Note
You can only see the toggle if you filled in the Project Budget Name (Main WBS) field in Projects Setup.
Copy Structure Only#
You can select this toggle when you run the Copy WBS function (found on the ribbon of work breakdown structures).
With the toggle turned on, the function copies the main WBS to a new structure but leaves the quantity fields blank so that you can edit WBS lines that already exist (see the following example).
Example#
You set up a new WBS, enter Default as the budget name, and perform a calculation in one or more versions. None has been released yet.
After the customer places an order, you set up another structure with a budget called Main WBS, the name entered in the Project Budget Name (Main WBS) field in Projects Setup. You release the structure and turn on the Active toggle on the header.
You then release the ordered version with the Default budget name so that its lines are copied to the main WBS. (You could have also run the calculation on the main WBS, but that would have meant no version of the base calculation would have been archived.)
The result is a released and active structure to which you can post.
Afterward, you set up a WBS for a change order, entering Additive as the budget name. You run the Copy WBS function from the main WBS and, on the dialog page, turn on the Copy Structure Only toggle to copy the WBS lines without quantities to the new version. You then specify the details of the change order:
- You enter a quantity on an existing WBS line, with a positive quantity representing an increase and a negative quantity a decrease in what is being ordered.
- You add WBS lines and calculate their values.
- You keep or delete the WBS lines that remain unchanged from the new version (lines deleted here aren’t deleted from the main version).
You release the order. The adjustments you made will be copied to the main WBS as follows:
- Quantities changed on existing lines will be adjusted.
- Lines created on the non-active WBS will be added to the main WBS.
- New descriptions will replace the old ones.
Changes to quantities and prices that you made to existing WBS lines will be copied as well. For example, if a line used to contain 100 hours at a rate of USD80, but the change order includes 20 hours at USD100, the main structure will show 120 hours at an average rate of USD83.33 following the update.
As a result, the latest changes to the project have now been incorporated into the main WBS. You can view the original estimate by opening the Standard project budget and the adjustments through the Additive budget.
The Additive budget name can also be reused later to set up another non-active version for an additive change order.
Note
When updating a main WBS, the system always includes all versions of the work breakdown structure. Therefore, none of them should be deleted. Please also note that manual changes you make to the main WBS will be discarded during the next update.
Capacity planning#
Capacity planning can help outline your company’s resource needs by setting limits on the time employees can spent on projects.
Only after you have set a total number of hours that employees are available overall and assigned part of their daily, weekly, or monthly capacity to one or more projects will you be able to draw meaningful conclusions from the data presented here.
For more information on how to specify resource availability at the resource (group) level, see View and Set Capacity. Each resource, or collectively, each resource group, has a limited supply of hours, which you can assign to lines on a WBS. These hours, the differences between resource availability and utilization, and the demand left for projects can then be shown on a capacity plan.
Assuming you have specified enough capacity for all resources working on a certain project, setting up such a plan provides a way for you to quickly implement changes to a rolling wave schedule. The feature also uses a base calendar to account for time off, such as on weekends and holidays. You can open plans from:
- Resources
- Projects (Resources > Capacity Plan on the Project Budget FastTab)
- Budget lines
Depending on where you run the function from, the Date Filter field might be filled in by default. Resources are shown on a plan by resource group, with the total capacity of a group being displayed as well. Resources with no assignment to a group will be the first on the list.
The following table describes the fields found on every capacity plan.
| Field | Description |
|---|---|
| Capacity | Shows the capacity entries available for the resource. Total lines are also created per resource group. |
| Absence | Shows a resource's non-work hours based on absence registrations. |
| Net Capacity | Specifies the net capacity of the resource. |
| Budget (Quote) Budget (Order) |
Show for which project the system has already created budget entries. All data is displayed at the resource level. A line added for each project shows how many hours the resource is expected to spend on a project. The status of the project determines in which of the fields the budget value is entered. |
| Project Time Posted | Shows how many hours spent on a project have been posted for the resource. |
| Utilization | Shows the resource’s (target) utilization. |
| Variance | Indicates available resource hours. Based on how you set up the variance filter, the lower area of the page shows one of the following: Net Capacity – Budget Shows available capacity (total capacity less absence, for example, vacation or flextime) minus all budget values. Net Capacity – Time Posted Shows the difference between net capacity and hours recorded so that you can determine whether a resource is still expected to post time to a project. Capacity – Time Posted Same as before, except that you see the difference between how high the total capacity is for the resource and the hours the resource worked on projects. Can be useful when posting certain kinds of absence, such as vacation, to a special project. Budget – Time Posted Shows the total budget value minus the work hours recorded. When you change the variance filter, you need to exit the page, choose OK, and then reopen the plan to refresh the budget values. Reopening it also resets the filter so that values are again shown as described for the first option. |
Excel Export#
To export the plan values to an Excel workbook, choose Export to Excel on the ribbon and select a date filter.
Plan resources for project#
By this functionality, you initiate the simple and direct assignment of resources as new project budget lines.
The line of resource capacity planning from which this function is initiated is decisive for filtering on the opened planning page. The current details of the resource or resource group, as well as the project, are transferred into the relevant filter fields. For the functionality of this page, both the project and resource filters are essential.
This planning function is to enable the quick and straightforward assignment of a resource or resource group with sufficient remaining capacity to a work package. The active WBS of the filtered project is displayed. For each WBS line, identification fields as well as the corresponding start and end dates are visible. The following fields are already calculated for the filtered resource, including: net capacity and utilisation percentage within the period between the start and end dates of the relevant WBS line. If at least one budget line exists for the resource, the earliest start date, the latest end date, the total planned quantity of these budget lines, the percentage share of the allocated net capacity, and the description of the first budget line are additionally displayed. For improved clarity, the total planned quantity of budget lines for other resources is also listed.
For replanning, the planning start date, planning end date, and planned quantity are entered on a WBS line. The resource or resource group filter determines which resource or group will be planned, ensuring that all key information is available and a new budget line is created automatically. Through a drilldown in the Planned Quantity field, you can delve directly into the newly created budget line and, if necessary, add further lines.
Multiple Budget Lines is not a field in the strict sense; rather, it is another way of displaying the budget lines of the filtered resources.
Work sequence#
Whereas project planning has so far been discussed only in terms of quantities and line values, the following paragraphs will focus on the scheduling feature that is part of project365. This feature uses starting and ending dates, durations, fixed dates, and task dependencies on WBS and budget lines to provide you with several options for indicating the time and sequence of project activities.
Line dependencies#
The relationships between activities are the basis for project scheduling. They can be set up at either the work package or budget line level.
To specify how one line activity is related to another based on its type and duration in days, you can use the Assign Predecessor and Assign Successor actions on the Project Budget or WBS Lines FastTab. The types are modelled after those used for task dependencies in Microsoft Project.
Duration in Days#
In addition to starting and ending dates, you can maintain a duration in days on both work package and budget lines. If you store this information, starting and ending dates are calculated automatically from the workdays available over the course of a project. For an example, see the following table, where red means changed by the user and green calculated by the system.
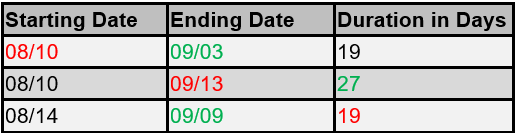
Fixed starting and ending dates#
You can also set fixed starting and ending dates on both WBS and budget lines.
Note
The values entered in these fields aren’t checked until they are included in a planning run.
Ignore in Planning#
Shown on WBS lines, this field can be selected to exclude from project planning work packages that are used solely to collect receipts, such as for travel expenses and license fees, that is, those for which capacity cannot be budgeted.
Scheduling Direction#
In this field found on project cards, you can set the scheduling direction of a project to forward or backward.
WBS Scheduling#
Actual scheduling is performed on a separate page. To view the page, open a work breakdown structure and choose WBS Scheduling on the ribbon.
A schedule shows the WBS and budget lines created for a certain project, as well as the information required for indicating the start and end of project operations. Activities are planned on both types of lines at the same time.
If a schedule already exists for a WBS, you see a message that asks if you want to overwrite current planning data. Choosing Yes will delete all entries from the page.
The values shown are used to simulate a requested planning scenario. Following a review and potential revisions to the schedule, you can choose Accept Planning on the ribbon to copy the data from the page to the related work breakdown structure.
The simulated entries are stored in the Planned Starting Date, Planned Ending Date, and Planned Duration (Days) fields on a schedule and can be edited manually. You can identify the status of each entry by its color and style. The following indicators, explained in the system by way of a legend, are available for this purpose:
-
Red and bold
Indicates that the scheduled values exceed the starting or ending date of the project (as specified on the project card). -
Red
Indicates that, according to the schedule, the line should be in progress, but the work status is still set to Open. -
Green
Indicates that the value was changed manually or during a planning run. -
Blue
Indicates that the value can be changed neither manually nor during a planning run.
Scheduling a project manually only makes sense after the first automated planning run. However, you can already prepare for manual entry on the relevant work breakdown structure by specifying the duration, fixed starting and ending dates, and line activity relationships relevant to your situation, as every automated planning run is based on these WBS or budget line fields.
To start a planning run, choose Start Planning on the ribbon. This puts each WBS line and its budget lines onto the plan based on the duration, the fixed dates, and the line dependencies set up for the line. The results of the simulation are then entered in the Planned Starting Date, Planned Ending Date, and Planned Duration (Days) fields.
Depending on what option you selected in the Scheduling Direction field, the system will begin to schedule activities from the starting date or the ending date entered for the project.
Project Gantt Planner#
The Project Gantt Planner is a user-friendly tool for graphical planning of the work breakdown structure. You can move both work packages (WBS lines) and budget lines along the timeline, with the dependencies between predecessor and successor tasks defined in the WBS being displayed. A budget line can be moved outside its original planning area, which automatically adjusts the planning area of the associated WBS line. The same applies if a WBS line extends the overall planning range of the project—unless the project has a fixed start or end date. In addition, the length of a budget line (duration) can be flexibly changed, which may have an impact on the associated WBS line.
For improved orientation, projects, WBS lines, and budget lines are displayed in different colours. When you hover the mouse over a WBS line or budget line, an FactBox appears with additional information about it.
New planning elements cannot be created in the Gantt Planner.
When starting the Gantt Planner from the WBS schedule planner, the current data (start date/end date) from the WBS is adopted. After closing the Gantt Planner, the fields Start Date and End Date in the WBS schedule planner are not changed; instead, the fields Planned Start Date and Planned End Date are adjusted. This creates a simulation capability, as any changes made in the Gantt Planner are not immediately transferred to the start/end dates of the WBS lines or budget lines, but only after executing the Apply Planning function. If this step is not performed, the adjustments made in the Gantt Planner remain a simulation and do not affect the planning data of the WBS.