General Business Functionality#
The following features expand standard Microsoft Dynamics 365 Business Central1 functions to provide additional options to those using General Business Functionality.
Other invoice addresses#
On the customer card, you can specify alternative invoice addresses for each customer via Bill-to Address in the ribbon.
If you activate the Default Address checkbox for an address, this address will automatically be entered as the invoice address in the Bill-to Code field on sales and service documents. In subsequent documents, such as an invoice, the entry for the Bill-to Code will also be carried over automatically.
Note
The Bill-to Code can be manually adjusted in the document if required. Please note that manual changes are not automatically transferred to subsequent documents and may need to be made again there.
Follow-ups#
With the Follow-Up feature, you can conveniently set up reminders for tasks in various places in the app and send each reminder to a user or a whole team.
Setup#
Teams#
To be able to send a reminder to multiple staff members (users) at once, you must assign them to a team.
- Choose the Search icon, enter Sales Teams, and then choose the related link.
- On the ribbon, choose New, and then fill in the fields on the line.
- Again, on the ribbon, choose Home > Users to add members to the team.
Note
If a user is assigned to multiple sales teams, automatic assignment only works when one of them is selected as the user’s main team.
Task templates#
To specify task templates for follow-ups:
- Choose the Search icon, enter Follow-up Tasks, and then choose the related link.
- On the ribbon, choose New.
- Fill in the fields as described in the following table.
| Field | Description |
|---|---|
| Code | Specify a code for the task. |
| Description | Specify a description for the task. |
Task groups#
Multiple follow-up tasks can also be combined into groups.
- Choose the Search icon, enter Follow-up Task Groups, and then choose the related link.
- Fill in the fields on the header as described in the following table.
| Field | Description |
|---|---|
| Code | Specify a code for the task group. |
| Description | Specify a description for the group. |
You can then add tasks to a group on the Lines FastTab. You can also specify here whether a certain team is responsible for handling them.
Workflow#
Create a follow-up#
You can create follow-ups on a variety of pages. To set up a reminder:
- Open the relevant page.
- On the ribbon, choose Create Follow-up.
- This opens the Follow-up Card on which your user ID (and, potentially, a team code) is filled in automatically. You can then enter a short description for the task in the Summary field.
- On the Follow-up Tasks FastTab, choose the relevant task codes or fill in the lines manually. Alternatively, specify a group of tasks on the header, and then choose OK.
The Description field always shows the next task that you created a reminder for.
Reassign tasks#
If a task should be assigned to a(nother) team, turn on the Team Task toggle on the General FastTab. The current user is then automatically deleted, and you can assign the task to a team. If the task should be completed later, you can adjust the follow-up date on the tab as well.
Create follow-on tasks#
A follow-on for a follow-up can be created for all or individual tasks.
- Open a Follow-up Card.
- On the header, choose Create Follow-on. Alternatively, select a single task on a line and choose the same option there.
- If only a line is selected, the task is retrieved directly and, if specified, the new team is assigned to it immediately.
The original reminder is then set to Completed, and the number of the follow-on will be shown instead.
Complete follow-ups on role center#
To open and edit reminders that you set up for your own tasks:
- Go to the role center, and then choose the Own Follow-ups tile.
- Select a follow-up.
- On the ribbon, choose Edit. Again, on the ribbon, choose Under Review.
Warnings#
In medtec365, you can store warning messages that will be shown in the marketing cockpit when you open certain contact or customer cards.
Such a message might be needed because of the presence of an infectious disease at a customer’s premises, for example. Based on how the warning has been set up, you’ll see it on the header of the card, in running text, or in a separate box.
To set up a warning:
- Choose the Search icon, enter Marketing Cockpit List, and then choose the related link.
- Open the relevant cockpit.
- On the ribbon, choose Related > Contact > Warnings.
- Assign a warning message from the list and select if you want the specified message shown in the Warning field or in running text.
Note
Warning messages can only be assigned with the appropriate permissions in place, that is, the Edit Internal Information toggle on the relevant User Setup Card needs to be turned on for this. You can find the toggle on the Cockpit View FastTab.
Quick data capture with wizard#
The Quick Contact Capture Card is a separate record that you can create base data from, including contact, customer, and vendor information.
The card is created before the actual contact is, which has the advantage that you can interrupt the process and resume it later. For this reason, quick capture is also used to set up customers and vendors, for whom contacts will be added as well.
Overall, the feature lets you set up data for each faster than any standard function. Additionally, you can use a configuration template to reduce the actual entry to the essentials.
Example
When you set up a customer from a contact based on a template, you can even add to the record fields that aren’t typically found on contact cards (such as Transaction Code).
Setup#
medtec365 Setup#
To be able to work with the feature:
- Choose the Seach icon, enter medtec365 Setup, and then choose the related link.
- On the Contact Cockpit FastTab, fill in the field as described in the following table.
| Field | Description |
|---|---|
| Contact Quick Capture Nos. | Specify a number series for quick contact capture. |
Configuration templates#
Configuration templates are used to generate meaningful base data from captured contact information. You can specify on a template any field that is relevant to your business and should be filled in during capture, such as Gen. Bus. Posting Group, so that you no longer need to enter data for it manually.
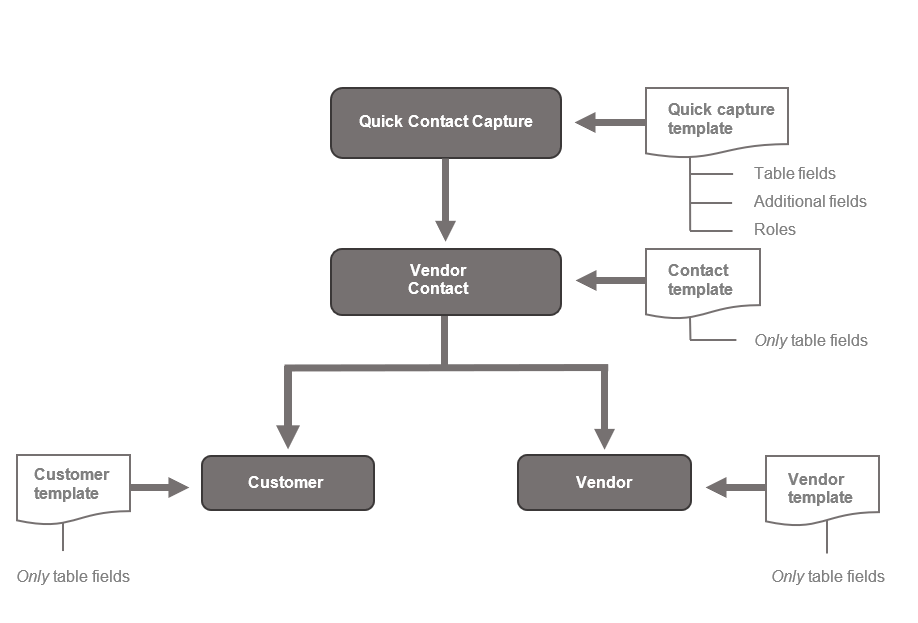
All templates are processed in the sequence that you can see in the following chart.
Template for quick contact capture
On this template, you can specify the standard and additional fields that will be filled in during contact capture. The additional fields will also be added to the new master records for contacts, and—potentially—customers and vendors later.
Additionally, you can specify here what other contact information you want to store and the template that this information should be based on. For example, turning on the Create Customer toggle will also create a customer from the entered data while filling in the Customer Templ. Code field specifies the template that will be used for setting up this new customer.
For contacts
Only fields specified on this template are filled in during quick capture, whereas the additional fields that might be assigned to the relevant contact template are ignored. The additional fields specified for quick contact capture, however, will be transferred to the new contact.
For customers
Only fields specified on this template are filled in during quick capture, whereas the additional fields that might be linked to the relevant customer template are ignored. The additional fields specified for quick contact capture, however, will be transferred to the new customer.
For vendors
Only fields specified on this template are filled in during quick capture, whereas the additional fields that might be assigned to the relevant vendor template are ignored. The additional fields specified for quick contact capture, however, will be transferred to the new vendor.
Note
Additional fields are only inherited if they’ve been set up at the required places in the app. This means that if you want one of these fields to be transferred from a certain template to quick contact capture, and to the contact and customer from there, the field must be set up for the template, contact capture, the contact, and the customer.
Setup
- Choose the Search icon, enter Configuration Templates, and then choose the related link.
- On the ribbon, choose New.
- Fill in the fields as described in the following table.
General#
| Field | Description |
|---|---|
| Code | Specify a code for the template. |
| Description | Specify a description for the template. |
| Table ID | Specify the table that needs to be filled in from the template, for example, Contact Quick Entry (table ID 71076624). |
| Table Name | Shows the name of the table entered in the Table ID field. |
| Activated | Turn on the toggle to allow the template to be used. |
Lines#
When a table has been selected, you can specify on the lines the field values that you want automatically copied from the template to the table.
Other#
On this FastTab, you can attach additional fields to the template. These are then also used in quick capture.
Note
Additional fields are only inherited if they’ve been set up at the required places in the app. This means that if you want one of these fields to be transferred from a certain template to quick contact capture, and to the contact and customer from there, the field must be set up for the template, contact capture, the contact, and the customer.
Capture data#
Quick capture can be run each time you want to set up a contact, a customer, or a vendor.
- Open the marketing cockpit list.
- On the ribbon, choose Quick Contact Capture.
- Select the template that will be used to prefill and add fields to the relevant card, and then choose OK.
- This opens the Quick Contact Capture Card, where a number will be assigned automatically. You can now fill in the other fields, such as Name and Address.
- On the ribbon, choose End Update.
Afterward, a mandatory field check is run and base data such as contact, customer, or vendor information is set up depending on what you specified on the Create Data FastTab.
When exiting the page, the new record is selected on the Quick Contact Capture List and can be opened directly from there.
Note
The field check is run for each record that you create.
Release data#
If the mandatory field check is turned on for quick contact capture, base data such as contact, customer, or vendor information can only be created if released—which depends on the status that is indicated in the Capture Update field, as described in the following table.
| Option | Description |
|---|---|
| No Field Check | The mandatory field check is not turned on for quick capture. This means that data maintenance does not need to be completed. You can also enter more information, if necessary. |
| In Progress | The mandatory field check is turned on. However, data maintenance has not yet been completed. As a result, more base data cannot be created. |
| Completed | The field check has been run and maintenance has been completed. More base data for contacts, customers, and vendors can now be added. |
You can run the End Quick Capture action to complete data maintenance and release the captured entry. If the required data wasn’t filled in, a wizard page appears so that you can make the necessary adjustments.
After maintenance of the captured entry is complete, the Quick Contact Capture Card becomes non-editable.
To be able to edit data again, choose Edit Quick Capture on the ribbon to set the card status to In Progress.
List of captured entries#
To see a list of all records that have been created through quick capture, choose the Search icon, enter Quick Contact Capture List, and then choose the related link. Here, you can also capture new contact data or edit existing entries.
Manual Capture#
Additionally, you can create a record manually via quick capture mode.
- Choose the Search icon, enter Quick Contact Capture List, and then choose the related link.
- On the ribbon, choose New.
- This opens the Quick Contact Capture Card. The card is empty, as no data from a template is copied to the entry.
- Click any field to create a record. This assigns a number from the number series stored in medtec365 Setup. All other fields can be filled in manually.
In this context, we recommend you consider the base data that you want to create from the captured entries and the templates that you want to use for them. Or you can choose Apply Template on the ribbon and specify a configuration template for filling in the information.
Item tracking#
On installation, medtec365 provides you with a variety of tracking methods that are commonly employed across the industry and can be used for all items set up in the system.
Color indicators#
Line quantities might be shown in a different color if they relate to tracked items.
This applies to quantities on open purchase and sales documents, on warehouse shipments and receipts, and on item, transfer, and inventory journals, as well as to quantities entered in manufacturing and assembly.
You can also use the lookup next to a quantity field to see the tracking code that is assigned to the associated item. The meaning of each line color is explained in the following table.
| Color | Description |
|---|---|
| Red | Lot or serial numbers are available but have yet to be assigned. |
| Blue | Lot or serial numbers are available but only some of them have been assigned. |
| Green | Lot or serial numbers are available and have all been assigned. |
Warranty dates for external lots#
You can now specify manufacturing dates based on item tracking codes.
On the Item Tracking Code Card, on the Misc. FastTab, you can also fill in a variety of new fields relating to maintenance and repair services. As an example, you can enter customer-side and vendor-side warranty periods in the Customer Warranty Until and Vendor Warranty Until fields on the tab.
Serial No. Information Card#
This card has been extended to include the fields described in the following table.
General#
| Field | Description |
|---|---|
| Description 2 | Filled in automatically with the Description 2 from the item or variant. |
| Registration No. | Specifies the number assigned by a health insurance company to the medical equipment. |
| Field Check Status | Indicates if a mandatory field check has been run. |
| Blocked By | Shows if data is blocked by the field check or a user. |
Vendor#
This FastTab is required to provide maintenance and repair services.
You need to enter a vendor on the tab if a device has been acquired via a purchase order outside the scope of existing contracts or from a competitor.
Customer#
This FastTab is required to provide maintenance and repair services.
The fields on the tab specify who provided the instructions on how to use the device.
Other#
| Field | Description |
|---|---|
| Previous Owner Previous Owner Search Descr. |
Specifies the contact or the search term for the contact who used to own the device. |
| Last Invt. Movement On | Specifies when the item was last posted to inventory. This field is updated with every movement of the item. |
| Last Invt. Mvmt. Location Last Invt. Mvmt. Bin |
Specifies where the device is stored. These fields are updated with every movement of the item. |
| Last Variant Invt. Mvmt. | Specifies the device variant. This field is updated with every inventory movement. |
| Status | Specifies the status of the device. This field needs to be filled in manually. |
| Warranty Period (Customer) | Specifies a warranty period based on a date formula. This field is filled in when the device is posted as shipped. |
| Customer Warranty Until | Filled in automatically based on the warehouse shipment date and the customer warranty period. |
| Device Class | Can be used to classify the serial number card. You can enter any code you want. |
| Startup Date | Filled in automatically when the device is shipped for the first time. |
| Vendor Warranty Until | Filled in automatically based on the warehouse receipt date and the vendor warranty period. |
| Warranty Period (Vendor) | Specifies a warranty period based on a date formula. This field is filled in when the device is posted as received. |
| Repair Warranty Until | Filled in when repairs are carried out. |
| Estimate Needed | Specifies if the customer wants a cost estimate. The field is automatically filled in with information supplied by the customer after sale. |
| Estimate Limit | Specifies the value starting from which the customer wants a cost estimate for repairs. This field is also filled in following a sale. |
| Scrapped | If selected, the device is considered scrapped. You can only select this field after the device has been removed from the item journal. With the checkbox selected, the Blocked toggle is turned on automatically as well, and the Scrapped By and Scrapped On fields will be filled in to log by whom and when the checkbox was selected or cleared. |
| Maintenance Interval (MPG Appendix 1) | Filled in with the information from the item card. |
| Additional Information | This subpage lists the fields added to the serial number card and the related item card. |
Ownership & Rent#
This FastTab specifies who owns the device.
| Field | Description |
|---|---|
| Last Transaction Code | Indicates whether the device has been loaned to someone. This field is refreshed with each movement of the item. If the field is blank, the device was sold without leaving a trace in the system. |
| Legal Owner | Specifies the owner of the device. If the field is blank, the device is owned by your company. |
| Legal Possessor | Indicates the customer who is currently in possession of the device. |
Note
If a serial number tracking item that is not known in the system is posted through the service receipts, the fields Legal Owner and Legal Possessor empty. For third-party items, the Legal Owner cannot be determined.
Provided the whereabouts of the device can be traced, the transaction code and the Location and Bin fields are filled in with the values that were specified with the most recent warehouse posting.
If a device is sold only to one customer, the fields will be blank, but the Legal Owner and Legal Possessor fields will be filled in, with the transaction code inserted in the correct way automatically.
Ribbon functions: Home#
| Field | Description |
|---|---|
| Edit Serial No. Info End Update |
Turns on the editing mode for the card or triggers the mandatory field check. |
| Inventory Overview | Shows the inventory related to the item tracking code. |
| Equipment Entries | If Equipment Tracking is used in the manufacturing area, shows the components linked to the device. Also lists all expenses and spare parts incurred as part of servicing. |
| Attributes | Shows the parameters specified for the device. |
| Item Ledger Entries | Shows the movements of the device. |
| Find entries | Shows all items, and purchase and sales documents referring to a serial number. |
Ribbon functions: Customer Service#
| Field | Description |
|---|---|
| New Case | Creates a new case for the device. |
| Open Cases | Shows all open cases for the device. |
| Completed Cases | Shows all completed cases for the device. |
Ribbon functions: Actions#
| Field | Description |
|---|---|
| Edit Serial No. Info End Update |
Turns on the editing mode for the card or triggers the mandatory field check. |
| Attribute Search | Used to search for device parameters based on the serial number. |
| Find entries | Shows all items, and purchase and sales documents referring to the serial number. |
| Assign Bar Code | Specifies a barcode to which documents have been assigned in the document management system (DMS for short). |
Ribbon functions: Related#
| Field | Description |
|---|---|
| Item Tracking Entries | Documents the movements of the device. |
| Comment | Used to enter comments about the serial number. |
| Item Tracing | Shows the serial number or component history (where included). This field is only required for manufacturing. |
| Attributes | Shows the parameters specified for the device. |
| Equipment Entries | If Equipment Tracking is used in the manufacturing area, shows the components linked to the device. Also lists all expenses and spare parts incurred as part of servicing. |
| Item Ledger Entries | Shows the movements of the device. |
Block items without variants#
Typically, when the Variant Mandatory if Exists toggle is turned on in Inventory Setup, you’re blocked from posting transactions for which an item variant isn’t specified.
This setting, however, doesn’t apply to items that don’t have variants. You can also change the requirement for individual items by choosing No in the Variant Mandatory if Exists field on an item card.
Conversely, if the setup toggle is turned off but the Variant Mandatory if Exists field is set to Yes on an item card, transactions for this item cannot be posted when variants exist but none is specified during a transaction.
To also block transactions from being posted if the item requires a variant but none has been set up for it yet in the item master, you can create a field check that uses the Variant Exists field from the item card.
Note
The Variant Exists field is hidden on the card.
Workflow#
Inventory Setup#
Ensure that the Variant Mandatory if Exists toggle is turned off on this page.
Item card#
Set the Variant Mandatory if Exists field to Yes for items that require a variant.
Field check#
Create a field check for table Item (27) that will result in an error message (as well as the cancellation of the posting process) if certain fields are filled in on an item card as described in the following.
| Operator | Field Source | Field No. | Field Caption | Condition Type | Condition Value |
|---|---|---|---|---|---|
| IF | Table | 122 | Variant Mandatory if Exists | = | Yes |
| AND | Table | 71076593 | Variant Exists | = | 0 |
Compliance (optional)#
We recommend that you also set up a compliance check to block the deletion of variants whenever the Variant Mandatory if Exists field is set to Yes for an item that has already been released.
For this purpose, you must add the following line to the compliance tables:
| Code | Table No. | Table Caption | Sorting | Description | No. of Field Filters | Status |
|---|---|---|---|---|---|---|
| VARREQ | 27 | Item | 0 | Variant Mandatory | 1 | Released |
Additionally, you need to fill in these fields on the Compliance Fields page:
| Field No. | Field Caption | Field Value |
|---|---|---|
| 122 | Variant Mandatory if Exists | 2 |
| 71076593 | Variant Exists | 1 |
Note
You need a valid license to work with the Compliance functionality. For more details, see Compliance.
Application Log#
Application logs are created for the general processing of batch runs or specific processes, such as creating warehouse shipments or requisition worksheets. They make it possible to track processing results and support error analysis. The logs can be viewed on the Application Log page.
App Log Batch Types#
The batch types are defined on the Application Log Batch Types page and can be added using the Create Batch Types function.
The following processes are currently supported:
- Get FA Items for Capitalization
- FA Item Jornal Check Line
- Carry Out Action Msg. - Req.
- Calculate Plan - Req. Wksh.
- Calculate Plan - Plan. Wksh.
- Get Warehouse Shipments
Application Log Cleanup#
The various batch runs create log entries that should be deleted after a defined period using the Delete Change Log Entries report.
Before doing so, make the following settings on the App Log FastTab in KUMAVISION medtec365 Setup:
|Field|Description| |--|--|--| |Log Nos.|Number series used to create log entry records.| |Clear App Log - Date Formula|Date formula for cleaning up application log entries. For example, ‘-2M’ deletes all entries older than two months, provided that the defined conditions are met.|
Application Log Cleanup Batch Run#
As an alternative to the Delete Change Log Entries report, you can use the Application Log Cleanup batch run and run it regularly to delete the log entries. The basic setup is performed in KUMAVISION medtec365 Setup.
Night-Run#
You can configure this as needed on the report request page that can be opened from the job queue. The default values come from KUMAVISION medtec365 Setup and can be defined there as required.
-
Microsoft, Microsoft Dynamics, and Microsoft Dynamics 365 are trademarks of the Microsoft group of companies. ↩