Warehouse Management#
The following features expand standard Microsoft Dynamics 365 Business Central1 functionality to provide additional options to those working in your organization’s logistics department.
Types of items#
In the Type field on the Item Card page, you can select what the item is used (Inventory, Non-Inventory, Service) for in your business. Also see Types of items
KUMAVISION medtec365 only supports the Inventory type. For this reason, this option is preset for each items. The corresponding field is hidden by default and cannot be edited.
Advanced logistics parameters#
Overview#
In medtec365, you can use multiple advanced logistics parameters to decide on, for example, the methods used for picking items, whether lot tracking is required for outbound goods, and what the minimum expiration date should be for products that you ship or receive.
As the choice of settings might vary depending on storage conditions or agreements with customers or vendors, the parameters are available in several places in the app. The following sections will show you where you can find them in the system and how you can customize them to your needs.
Setup#
Parameter Descriptions#
| Parameter | Description |
|---|---|
| Pick Method | Specifies the method that will be used for picking items from your warehouse. Options are: (blank) A method has not been set up yet. FIFO The items with the earliest receipt or manufacturing dates are picked first. LIFO The items that were received or manufactured last are picked first. FEFO The items with the earliest expiration dates are picked first. Note If FEFO is selected but expiration dates are not maintained, the method is replaced with the FIFO option automatically. Custom Warehouse employees decide on their own what items (in which lots or with which serial numbers) to pick for shipments. Note When you use this pick method, the system does not check if the items can be shipped at all. |
| Single-Lot Pick | With the toggle turned on, all items will be picked from the same lot. Note This parameter is only relevant to lot-tracked items. |
| Min. Expiration Date (Outbnd.) | Specifies a formula that will be used to calculate the minimum shelf life for items that you want to ship. Note If expiration dates are not maintained, this parameter is ignored. |
| Min. Expiration Date (Inbnd.) | Specifies a formula that will be used to calculate the minimum shelf life for items that you expect to receive. Note If expiration dates are not maintained, this parameter is ignored. |
Note
The parameters are only considered by the system if you’ve also turned on the Advanced Logistics toggle on the relevant master record (such as a location card).
Parameter Locations#
You can use the parameters in various places in the app for different purposes, from mirroring individual agreements with a certain customer or vendor to making general warehouse settings.
The following list shows you all configuration options in order of their retrieval.
- Item references
Here you can specify parameters for items and variants based on special agreements with certain customers or vendors, for example. - Stockkeeping units
On stockkeeping unit cards, you can set up parameters for locations that are linked to certain items, variants, or transaction codes. - Items
On an item card, you can make warehouse settings regardless of where the item is shipped to or from and who should receive or supply it. - Item categories
On the Item Category page, you can make settings for categories without having to link to a specific item, location, customer, or vendor. - Locations
Parameters you set on a location card relate to this location regardless of the items shipped from or received at the site and the vendors or customers they’re intended for. - Warehouse Setup
The Warehouse Setup page represents the lowest level in the parameter hierarchy, with the parameters being available for all locations and items tied to the warehouse functionality.
Validation#
The system looks for parameters in master records in a certain order (see Parameter Locations). This is to ensure that the sales and purchase agreements you negotiated individually with a customer or vendor take priority over general settings, such as the configuration found in Warehouse Setup.
First, the system checks whether the logistics parameters are activated at all (that is, the Advanced Logistics toggle is turned on for the record) and if the parameter—for example, Min. Expiration Date (Outbnd.)—is filled in. If the relevant field is blank, the system will look for the required value in the remaining app locations as described in the previous section.
Additionally, the system searches for all parameters independently of each other. As an example, it might retrieve lot pick settings from the item references but minimum expiration dates from an item card.
You can also store the parameters on master records that have no direct relation to an item or a tracking code. This includes item categories, locations, and Warehouse Setup, where you can choose pick method FEFO, turn on Single-Lot Pick, or fill in the Min. Expiration Date (Inbnd.) and Min. Expiration Date (Outbnd.) fields.
The settings then apply to items with lot or expiration date tracking. If you’re working with items that these options aren’t set up for, FEFO automatically changes into FIFO while the other parameters are ignored.
Fulfill backlog on receipt#
With this feature, you can fulfil sales backlog, that is, overdue deliveries or transfer shipments, automatically when a receipt is posted to your warehouse.
You can also track item movements on the Sales Backlog page and intervene if, for example, the number of items that you receive isn’t enough to satisfy demand. The page provides an easy-to-use overview of all open sales and transfer lines that you can complete by filling in items from the delivery.
Building on standard cross-document functionality, the feature offers you a way to automate order fulfillment while streamlining your logistics, as no storage space is required for items that you can ship immediately.
Depending on how backlog fulfillment has been set up, items are reserved on sales orders, warehouse shipments are created, or the shipments are already posted and printed.
Note
This feature can only be used if the relevant site is set up as a warehouse location.
Setup#
User Setup#
To specify if and how a user can automate order fulfillment:
- Choose the Search icon, enter User Setup, and then choose the related link.
- Select a line.
- In the Can Clear Backlog field, choose one of the options described in the following table.
| Option | Description |
|---|---|
| No | The user cannot open the Fulfill Backlog page. Warehouse receipts are therefore posted without the feature being turned on. |
| Reserve Only | The user cannot see the Fulfill Backlog page. The backlog is cleared by using the quantities already reserved. |
| Custom | The user can see the Fulfill Backlog page. The backlog is cleared by using the quantities already reserved and the quantities allocated by the user. |
Purchase order types#
Whether the sales backlog can be fulfilled when you post a receipt also depends on the type of order you’re working on.
- Choose the Search icon, enter Purchase Order Types, and then choose the related link.
- In the Fulfill Backlog field, select one of the options described in the following table.
| Option | Description |
|---|---|
| Reserve | The allocated quantities are reserved for the demand lines. |
| Create Outbnd. Docs. | The quantities that should be distributed across the demand lines are first reserved. Afterward, a warehouse shipment is set up for each sales order that demand should be met for, with the reserved quantities filled in on the shipments. If picking is required, the system then creates a pick document that it transfers the reservations and the bins to, if needed (unless directed pick and put-away is used). Note Warehouse shipments are only created when the Shipping Advice field is set to Partial Shipment, or when all remaining quantities can be delivered in a single shipment. The system also checks whether the credit limit will be exceeded because of the reservations. |
| Post Outbnd. Shpts. | The first steps in the process are the same as with the other two options. Afterward, the pick is registered, if necessary, and the shipments posted. If you turned on the Require Put-away toggle on the location card, the put-away that is created is also registered automatically. |
| No | No backlog is cleared. |
Based on the option that you select and the type of order you’re handling, you might see a dialog box where you can choose the type of fulfillment that will be used when you post a receipt.
The field on the page is filled in by default with the option specified for the order on the Purchase Order Type page but can be changed manually for each posting (that is, if the relevant toggles are turned on for your user ID on the User Setup page).
Workflow#
When a warehouse receipt is posted, the system first checks whether the items that are specified on the warehouse receipt lines are needed to meet demand from sales, transfer, or service lines, production order components, or purchase returns. To limit the period that demand needs to be met for:
- Choose the Search icon, enter Purchases & Payables Setup, and then choose the related link.
- On the KUMAVISION FastTab, in the Fulfill Backlog (Days) field, specify the formula that will be used to find based on today’s date demand lines within the calculated period.
If one or more demand lines are then found during receipt, you see a dialog box that you can specify in how current backlog should be fulfilled. If what you’ve received is too little to cover what’s needed according to the demand lines in the system, you’re informed that you need to allocate items to them manually. If no demand exists, you don’t see this box.
Note
Backlog isn’t cleared if you select No on the request page of the Fulfill Backlog report. If you select any of the other options, you see a page that lists all sales, purchase, transfer, service, production order, and purchase return order lines that demand must still be met for.
Based on the shipment date entered on a demand line, the system then suggests the part of the receipt that hasn’t been reserved yet in the Qty. to Allocate or Qty. to Allocate (Base) field. The line with the earliest shipment or due date has the highest priority here. You can change the value and distribute the quantity across individual demand lines, however, before confirming your choice. Afterward, the quantities that you entered in the Qty. to Allocate (Base) field will be reserved.
Replace consignment items#
The Replace Consignment action has been added to the Lines FastTab ribbon on the Warehouse Receipt page.
Running the action opens the Choose Item & Variant page, where you can change the item number or, if applicable, the variant code on a line.
Get Bin Content: reclassification journal#
You can run the Get Bin Content function from an item reclassification journal to move the content of one or more bins to another bin stored at the same location.
The function uses the transaction codes set up in medtec365 to specify who owns the items that you move with the help of the journal. When you transfer them, their tracking information is copied as well.
Note
This action is only available on the transfer journal ribbon.
To move items within your warehouse:
- Choose the Search icon, enter Item Reclassification Journals, and then choose the related link.
- Select the relevant line, and then choose Get Bin Content.
- On the request page, set filters as necessary to calculate and fill in the journal.
The Quantity Type field plays a major role in the transfers. You can select one of the following options in this field:
| Option | Description |
|---|---|
| Overall Quantity | All pick lines that have not yet been registered and all allocation entries related to the bin content are deleted. |
| Moveable Qty. | All allocation entries related to the bin content are deleted. Quantities in picking or blocked quantities are ignored. |
| Available Invt. | Only available quantities are used during transfers. Allocated, blocked, or picked quantities are ignored. |
The impact of each option is also described to you in a text box below the field. User Setup controls if you can choose between all three (Can Get Bin Content is selected for your ID) or whether you can only have available quantities calculated (the field in User Setup is deactivated).
Note
The New Location Code and New Bin Code fields aren’t filled in automatically on the transfer lines. Instead, you must manually specify the location and the bin that you want inventory to be moved to. Item tracking codes can only be shown after you’ve entered a new location.
When you’ve specified a target location and bin for the lines that you created, choose Post or Post and Print on the ribbon to transfer the items.
Post shipments as receipts: transfer orders#
You can use the Auto Post Shpt. as Receipt toggle—found on the General FastTab of a transfer order—when you have no staff member who could confirm item receipts at a certain location, for example.
To set up the feature:
- Choose the Search icon, enter Inventory Setup, and then choose the related link.
- On the Numbering FastTab, in the Direct Transfer Setup field, select the option you want to use (Microsoft Direct Transfer or KUMAVISION base Direct Transfer).
- In the Direct Transfer Posting field, select Direct Transfer for standard functionality. For the KUMAVISION base extension, select Receipt and Shipment.
However, for the function to work, you must also turn on the feature for the relevant location:
- Open a location card.
- On the General FastTab, turn on the Auto Post Transfers toggle.
The toggle is then set automatically on transfer orders that the location is assigned to.
Inventory overview#
In this overview, you can filter inventory, including its tracking information, by custom criteria.
To open the overview, use the general search function or run the Inventory Overview action from the Items page or an item card. The following fields must be filled in on the header:
- Location Code
- Item No.
- Transaction Code
When you choose Inventory > Calculate on the Lines FastTab ribbon, the inventory is then calculated and shown according to the filters that you’ve set.
To specify the FactBoxes that should be shown for a line, go to the ribbon, and then choose Show FactBox > Line Details to see information such as item availability for the current line, Total (Factors) to see total availability—limited by the filters entered on the page header—or Totals to analyze data by location, item, variant (if available), and transaction code.
Because items that are stored in a bin such as QM aren’t available for picking, they will be marked accordingly and can be viewed by drilling down on a location field.
Additionally, the Total Qty. (Base) field shows you how many items are in inventory, regardless of availability. The Qty. on Inventory (Base), on the other hand, indicates how many have been put away.
These quantities might not match, for example, when some items have been picked. Subtracting the Qty. Picked (Base) from the Qty. on Inventory (Base) will get you the Available Qty. (Base) shown in the FactBox.
Dampener periods#
In the standard app, you can add a dampener period to a purchase order to mark the time span in which supply orders aren’t rescheduled if they arrive earlier than needed (for example, to meet demand on a sales order).
Although you initially need to fill in the dampener period field in Manufacturing Setup, you can later enter another period on a specific item or stockkeeping unit card.
In medtec365, the field Dampener Period (Delay) has been added to both these cards and Manufacturing Setup so that you can now specify buffer times in both directions during lot-for-lot reordering.
Note
If you want to use this feature, you also need to set up a lot accumulation period (which is typically greater than the dampener period).
Assign permissions by location#
Overview#
One of the things you must do when you add a new company to the app is to specify who can use or post to locations on documents created in the system. The following setup is therefore required for every user to whom you haven’t assigned one or more locations on the Warehouse Employees page.
Setup#
Location permissions#
To assign a non-warehouse employee to a location (and bin):
- Choose the Search icon, enter Location Permissions, and then choose the related link.
- On the ribbon, choose New, and then fill in the fields as described in the following table.
| Field | Description |
|---|---|
| Role ID | Specify the role that permissions should be granted to. |
| User ID | Specify the ID of the user whom permissions should be granted to. |
| Location | Specify the location that permissions should be granted for. |
| Purchase Sale Pos. Adjmt. Neg. Adjmt. Transfer Output Consumption |
As for each of these checkboxes, you can decide whether to select it—and allow the user or role to run the function—or clear it to block use of the feature. Note You can also choose Yes or No in the All Functions field to select or deselect every checkbox at the same time. |
| Own Bin Only | Restricts the user to the bin that is linked to their customer number (which is determined based on their salesperson code and contact; for more information, see Own Bin Only). |
| Customer No. Bin | Limits the user’s permissions to the bin that a customer number is entered for in this field. Note The bin must be assigned to this number at the specified location. |
| Applies to All Bins | With the toggle turned on, the settings on this page apply to all bins at the location. The value in this field is only considered by the system if the Own Bin Only and Customer No. Bin fields are blank. |
| Bin Permissions Exist | Specifies if bin permissions are maintained for the selected line. |
Note
You can assign permissions either by role or user. Assigning a location to both isn’t possible. If you specify permissions for a role, the Role Permissions checkbox needs to be selected on the relevant location card.
Own bin only setup#
To limit a user’s access to their own bin, the following must be true:
Warehouse employee#
The user isn’t specified as a warehouse employee for the location.
User Setup#
On this page, the All Locations Allowed checkbox, which you can find on the General FastTab, isn’t selected. The Salespers./Purch. Code field, however, is filled in.
Note
If the user hasn’t been added as a salesperson or a purchaser yet, you must set them up as one.
Employee (Salesperson/Purchaser)#
On this card, the contact specified for the user is entered in the Contact No. field.
Note
If a contact doesn’t exist, you need to set one up before continuing.
Contact#
The contact specified for the user is assigned to a customer.
Location#
The location contains a bin that is linked to this customer.
Restrict to existing bins#
To allow a user or role to post only to an existing bin that isn’t assigned to them or a customer, choose Find Entries > Bins on the ribbon and specify the required permissions.
Note
If Own Bin Only or Applies to All Bins is selected, or the Customer No. Bin field is filled in, you can safely ignore the bin permission settings described in the following section, as you don’t need to maintain data for individual bins in this case.
Workflow#
Location lookups#
In most cases, the Location Code and New Location Code fields show only locations that the current user is allowed access to. This concerns the following records:
- Sales documents (headers and lines)
- Purchase documents (headers and lines)
- Transfer records (headers)
- Item journals
- Requisition and planning worksheets
- Inspection orders
- Production orders
Permissions check (in three stages)#
a) Post
Each time you post to inventory—whether from a document, a journal, or somewhere else—the system checks what permissions are required for posting and cancels the process if you aren’t allowed to post to the specified location.
b) Release
A check might already be run one step before (a)—if the record that you release is a purchase, sales, or production document—but only on document lines that you want to post.
Theoretically, posting the lines might then lead to more inventory postings, although these cannot be checked in advance. Consequently, the system only runs a check if at least one line leads to inventory being moved, that is, some quantity still needs to be shipped.
c) Lookup
Further upstream, the view provided by location lookups on documents and journals is limited to locations that you have permissions for given the settings made for the document or journal line (for example, during a transfer).
The feature was designed as a usability improvement, which means that all locations remain available when you type in the name of a site manually. Additionally, the view isn’t restricted when you create base data or want to set a filter on an analysis or the Possession / Ownership field.
The following records are excluded from permission checks:
- Invoices and credit memos that don’t lead to a change in inventory levels.
- Report 71076607, which is used to create fixed assets.
Roles and users#
Users can have permissions superior to those of the roles assigned to them. They can also have fewer permissions if some rights aren’t granted to them. All a user's roles are checked, one after another, for the extent of their permissions. If none of those, nor the user’s individual permissions, allow access to a certain location, the user cannot post to the location at all.
Transaction codes and movement hierarchies#
Transaction codes specify the type of possession or ownership over an item and are automatically entered when you post a warehouse shipment.
By using the associated movement hierarchy, the system then selects, depending on setup and availability and according to a predefined sequence, the fixed, current, and third-party items that need to be shipped.
You can change this configuration on the Transaction Codes page, which is available via the general search, by replacing the transaction codes and movement hierarchies filled in there by default. This way, you can ensure that, for example, used goods (=current assets) are always shipped first.
If no inventory is assigned to a transaction code, the system will search for available inventory based on the next transaction code set up in the system.
Print item labels#
You can have the system print labels for items that you post a receipt for. To set up the feature:
- Choose the Search icon, enter Items, and then choose the related link.
- Select an item or open the associated item card.
- On the ribbon, choose Related > Item > Label Information, and then fill in the fields as necessary.
You can specify in the Print on Receipt field whether the label should be printed when the item is received. In the Packaging Size field, you can specify the size of the outer packaging as a factor. As an example, entering 5 in this field would tell the system to print three labels if a receipt contained 15 of the same items.
The barcode information that will be printed on the label consists of the item number and information for tracking the item (such as a lot or a serial number). You can also enter a short text that should be shown on the label.
Verify inventory#
You can create a verification request in the system to ask customers to confirm how many items that aren’t their own are held by them at their warehouses. The basis for verification is the quantity that is posted with warehouse shipments of type Transfer.
- Choose the Search icon, enter Physical Inventory Journals, and then choose the related link.
- Select a journal.
- On the ribbon, choose Customer-Held Inventory to fill in the journal.
You can then compare the numbers entered in the journal to those provided by your customer.
Inventory: ease-of-use functions#
Besides offering year-end counts, medtec365 provides you with multiple functions for handling ongoing inventory control with ease.
For example, with the new count fields available in physical inventory journals, you can quickly identify the parts of a location or bin where you still need to take a physical inventory of your items. Additionally, you can now exclude an area from a count, if necessary.
Setup#
To be able to take stock, you must first complete all related transactions that involve some kind of inventory movement. This means that you need to:
- Take the items you want to ship from their bins and post their costs to the associated general ledger accounts.
- Make sure that transferred items aren’t still at the in-transit location.
- Adjust inventory as necessary and then post the adjustments.
Physical Inventory Location Setup#
On this page, you can specify how you want a warehouse area to be divided among the physical inventory journals you’ve set up. You can open the page by running the Phys. Invt. Location Setup action from the ribbon of a journal.
This way, you can speed up inventory calculations, especially if the number of items in inventory is comparatively large.
To assign certain rows and aisles of a location to a journal, you only need to fill in the Location, From Bin Code, and To Bin Code fields on the page.
Block inventory posting#
In medtec365 Setup, you can specify on the Inventory FastTab if you want to:
- block all locations when a physical inventory journal is filled in.
- block only the locations entered in the journal.
- don’t block posting at all.
The setting that you choose will apply to all items entered on physical inventory journals. With the first two options, posting inventory transactions (movements) will be blocked in sales and purchasing and on item journals.
Year-end counts#
Calculate inventory#
To do a year-end count:
- Choose the Search icon, enter Physical Inventory Journals, and then choose the related link.
- Use the Assist button to the right of the Batch Name field to select a journal.
- On the ribbon, choose Prepare > Calculate Inventory, and then fill in the fields as necessary.
As for the field values that you can specify on the request page, the posting date and document number you fill in are later copied to the journal lines so that you can track exactly when and what items were counted during physical inventory.
You can also filter for certain locations and bins on the page to specify the areas that the journal should cover.
Note
If the Calculate per Serial No./Lot/Expiry toggle is activated on the request page, the system creates (among other things) a line for each lot that items are in inventory for. Turning on the toggle is therefore essential to proper stocktaking.
After you run the function, the Qty. (Calculated) field on a journal line shows the total quantity that is available in inventory for the item entered on the line. If the Calculate per Serial No./Lot/Expiry toggle was turned on before you ran the Calculate Inventory function, you also see a new line for each serial number assigned to the line item, for example. Meanwhile, the Qty. (Phys. Inventory) field shows the number of items that were expected to be in inventory, as well as their tracking information.
Record count#
Afterward, you can choose Print on the ribbon to print the list you need for a physical count. On the request page, you can then specify if you want the quantity determined for each item on the list to be printed with the relevant tracking information and if the print or count date should be added as well.
Enter inventory#
When you’ve done the count, you can manually copy the quantities written in the Qty. (Phys. Inventory) column on the list to the fields with the same name in the physical inventory journal.
Note
You don’t need to fill in the field for every item but only for items where the quantity that you have on hand differs from the quantity calculated earlier.
For items that use serial numbers, tracking must be removed before you can enter a quantity in the field and then reassigned after you make the entry. For an item with a serial number, you must add a new line and tracking information manually.
Recount#
When you need to do a recount, you can set filters on the lines to restrict the journal view to certain values, such as Difference <15 or Quantity <> 0.
Ongoing inventory counts#
Calculate inventory#
For ongoing inventory control, only a limited number of bins are typically counted.
- Choose the Search icon, enter Physical Inventory Journals, and then choose the related link.
- Use the Assist button to the right of the Batch Name field to select a journal.
- On the ribbon, choose Prepare > Calculate Inventory.
- On the Filter: Item FastTab, specify a range of bins for calculation.
- In the Inventory Type field, select the type of stock that you want to count. You can choose among the following options:
a. Year-End
Calculates the entire inventory (as of the balance sheet date).
b. Excl. Ongoing Inventory
Calculates inventory quantities for all item lines where the Counted On and Count Document No. fields aren’t filled in.
c.Only Ongoing Inventory
Calculates inventory for each line a count date and document number are filled in on. - Turn on the Ongoing Phys. Invt. toggle. This activates the Block Bins and Incl. Non-Inventory Items toggles as well so that no one can post to the bins you’ve specified and that empty bins are included on the list.
- Fill in the other fields as necessary.
Record count#
For ongoing inventory counts, you again need a list for recording item quantities. For more information, see Year-End Counts > Record Count.
Enter inventory#
Ongoing counts are subsequently entered into the system in the same way as year-end counts. For more information, see Year-End Count > Enter Inventory.
However, before you post a journal line, you need to choose Actions > Functions > Include in Regular Counts on the ribbon. This opens a dialog box in which you can specify the number of the relevant count document and the count date.
This data is then copied to all calculated lines, as well as to the physical inventory entries and the bin content created for the journal.
If you later add an item to a bin where the content has been counted before and the data pertaining to that bin is entered in the box, only new items (=quantities) will be copied to the journal lines (provided you select Excl. Ongoing Inventory when using the Calculate Inventory function).
Recount#
The recount process used for ongoing inventory control is the same as for year-end counts. For more information, see "Year-End Count > Recount“.
Special features: physical inventory journal#
Specify possession and ownership#
For third-party property, you can specify in the Possession / Ownership field whether the legal possessor or owner must be recorded during counts.
Capitalize fixed assets#
Fixed assets should be posted by using CA-CAP or another transaction code.
If you’re using a separate code, your financial department and the customer need to agree whether it should be set to Valued or Not Valued. For CA-CAP, you need to run the capitalization function when you acquire the item.
When you dispose of an asset, the fixed asset number is recorded in the background so that you can check the asset schedule later.
Note
The FA transaction code should never be used to post positive adjustments to, for example, physical inventory or item journals.
Inventory valuation#
Many companies also need to manage items that aren’t their own. This includes:
- Items delivered by a customer for repair, with some also forwarded to suppliers before being returned to the customer.
- Products managed and rented to customers but provided by a third party.
- Goods sold on consignment.
- Rental equipment that counts as a fixed asset (although it will again be considered an item for the purposes of repair and refurbishment).
What all these examples have in common is that they shouldn’t increase the value of your regular inventory or show up as such inventory on your general ledger.
Additionally, the handling of these items must not have an influence on the average unit costs determined for them under normal circumstances.
In short, whatever way is used to ship or receive goods and move them through your warehouse, they must always, or in the case of consignment, at least, temporarily, be excluded from inventory valuation.
With a new feature, you can use standard logistics processes to move items without changing the value of your inventory—but still be able to arrive at the expected costs for consigned stock when ownership over it is transferred in purchasing. This concerns the following posting processes:
- You remove goods from a consignment delivery.
- Products that you’ve sold are returned to you for rental or repair purposes.
- You rent out items (which are recorded as fixed assets on your balance sheet).
- You sell rental equipment that was capitalized as a fixed asset.
- You buy back stock that was returned to you for storage or rental purposes.
- You cancel one of these transactions.
Depending on the process, you can use transaction codes to set a valuation method manually. You can specify a code for each method that you want to use. The correct method is then determined based on the type of transaction that occurs (as entered in the Valuation Method field on posted item ledger entries).
While this procedure works for posting quantities, you see an error message if the method shown on the invoice and the type specified on the associated item ledger entry don’t match.
You can unhide and fill in the Transaction Code field on all types of purchase documents, except blanket orders, quotes, and item journals. You can also set up default transaction codes for certain documents and lines on the Purchase Order Type page. For more information, see Purchasing.
Note
The valuation method is determined for each process separately and is then copied to the item ledger entry created by the relevant posting.
A valuation method is also filled in on application entries if you apply an item that the field was specified for (that is, was set to Valued, Variable, or Not Valued).
Note
Output reported is always posted with a value.
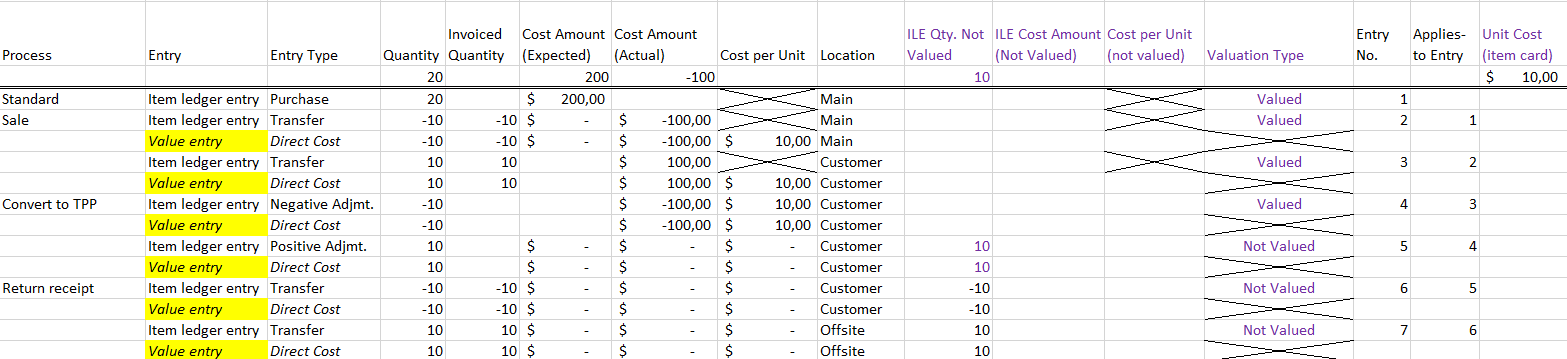
Variable valuation#
The delivery of consigned goods is typically posted as a purchase receipt in the app, with the Valuation Method field set to Variable when you post them. The value of the items is then specified in the system not as a Cost Amount (Expected) but as a Cost Amount (Not Valued) and the item quantity is copied to the ILE Qty. Not Valued field. Additionally, the valuation method on the item ledger entry created during posting is specified as Variable.
When you later post an outbound transaction, like a sale, a disposal, or consumption, the system checks if Variable is selected in the Valuation Method field on the applied ledger entry. Should the option have been selected, the system creates inbound item ledger entries and—sorted by application date—value entries for expected costs, as if standard functionality had been used. Afterward, the balancing quantity is entered as the ILE Qty. Not Valued.
The Cost Amount (Not Valued) in this scenario is calculated based on the following formula: ILE quantity not valued times cost per unit, with the expected cost amount representing the opposite value.
If you want to cancel an entry, another value entry will be used to post the reversal.
Example
You have a purchase order of 20 items with expected costs of USD200, which works out to a unit cost of USD10 on the associated item card.
You then receive consigned stock that the Variable valuation method is selected for. The delivery consists of a total of 10 items that are valued at USD110. Standard unit costs aren’t affected by the receipt, however.

Afterward, you transfer the items to another location. Posting the movement creates a value entry but has no impact on unit costs either.

As a next step, six items are consumed. This means that another value entry must be created to change their valuation and calculate expected costs.

You sell the remaining four items. As a result, the system creates yet another value entry based on the original document and again calculates the expected costs.
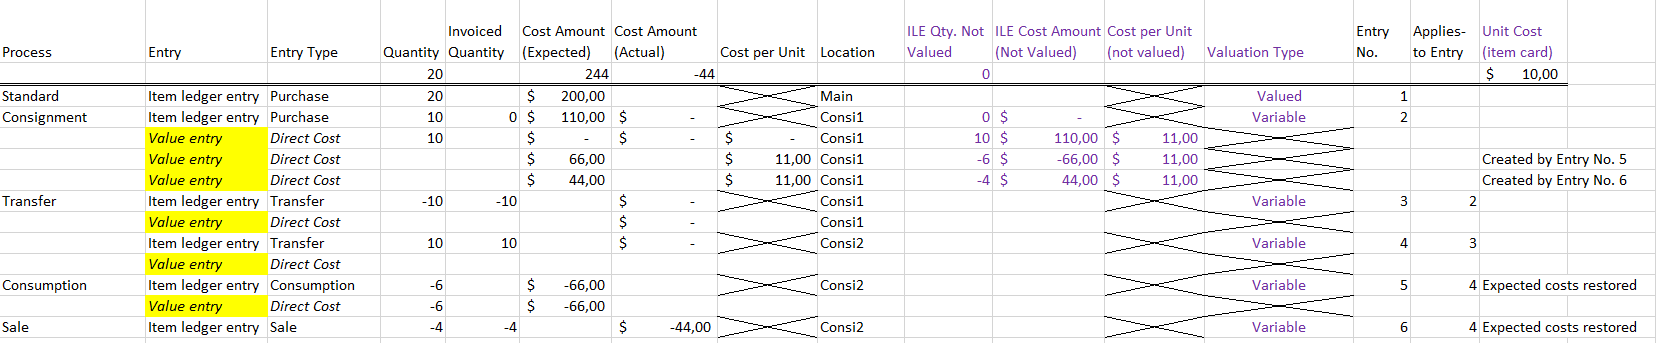
If for whatever reason you need to cancel the consumption posting made for the first six items, the system identifies them as items variable valuation was used for so that they’re returned to the non-valued status on the source document.
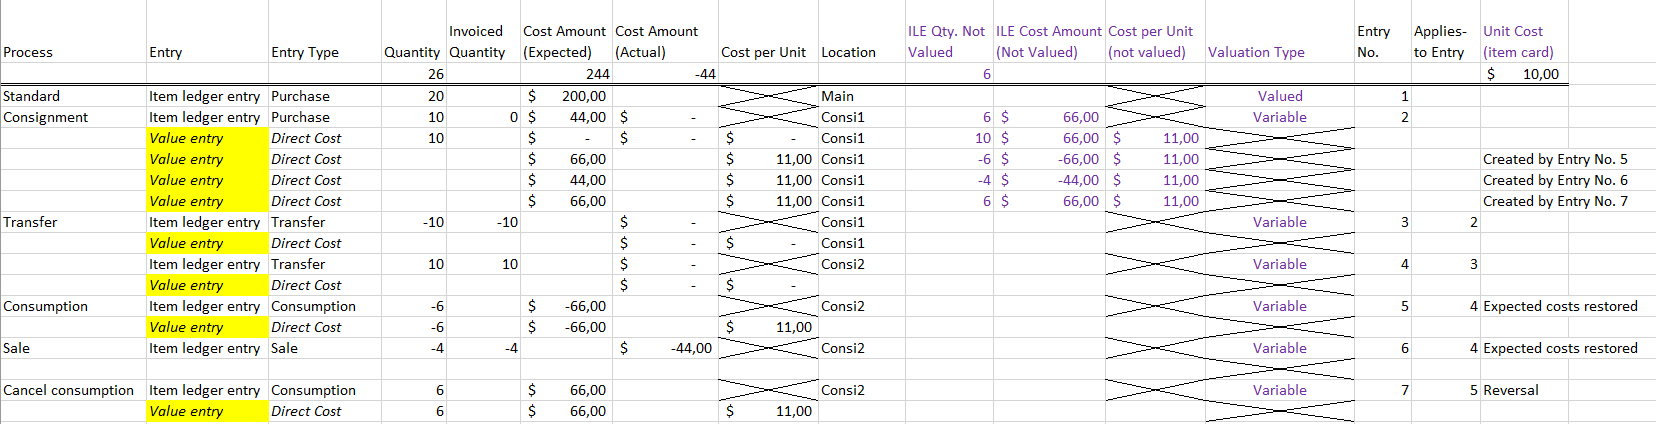
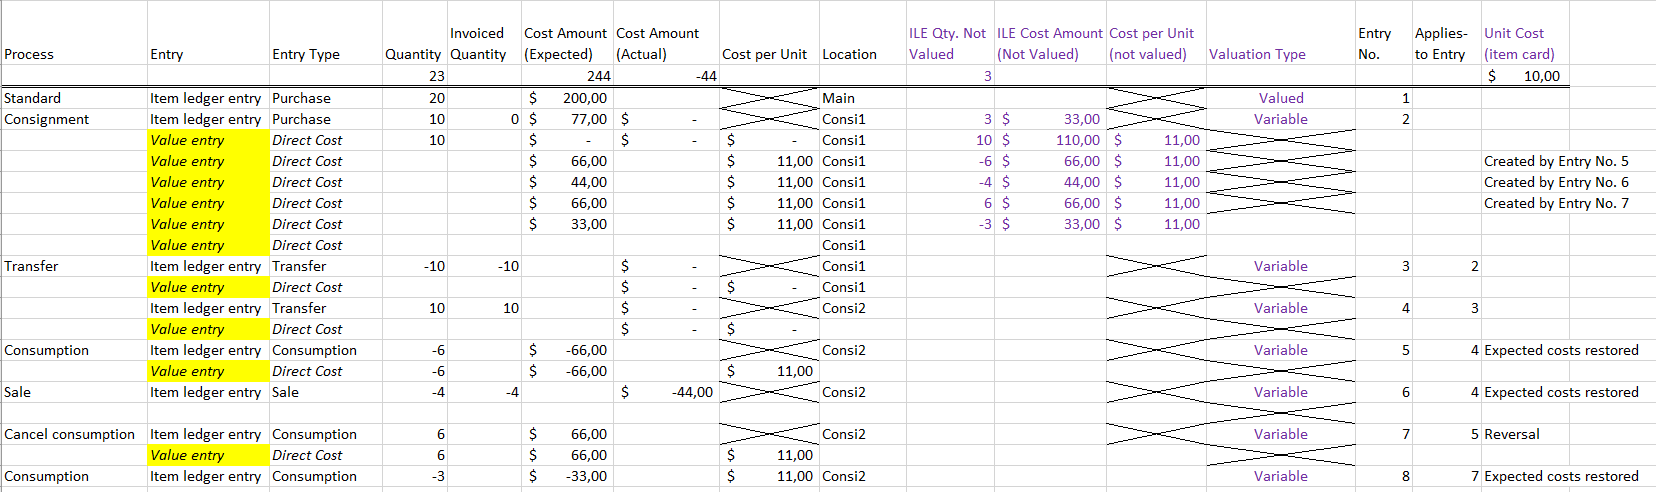
Reposting consumption for three of the items later will add values to them again, as shown in the following image.
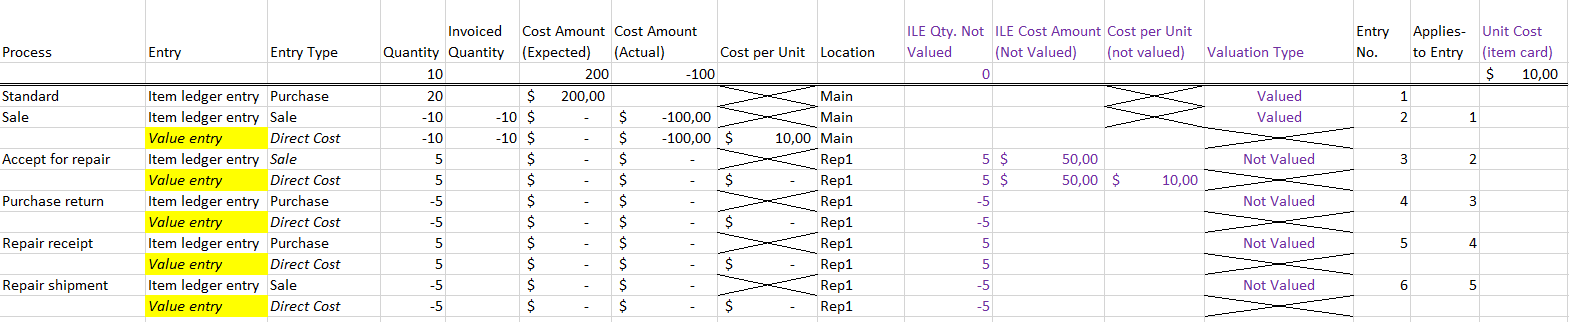
Non-valued inventory#
In the case of repairs, items are posted to the warehouse from a sales return order. As they’re owned by someone else, however, no inventory value is assigned to them, as indicated by their valuation method.
Consequently, the Unit Cost (Expected) and (Actual) fields on the item ledger entry that is created during the posting process remain blank and only the Unit Cost (Not Valued) field is filled in.
If the entry is applied (for example, through a purchase return order used for repairs made by a supplier or via a sales order when you ship the repaired items back to the customer), the valuation method is copied over to the applied entry and the number of items is entered in the ILE Qty. Not Valued field, to prevent them from influencing standard unit cost calculations.
When the supplier returns the repaired items to you, the Valuation Method must then be set to Not Valued so that the items are treated like on sales return orders.
You need to make the same settings for cancellations, with the valuation method set to Not Valued so that the ILE Qty. Not Valued field is filled in.
Example
You have a purchase order of 20 items with expected costs of USD200. Ten of those are sold at USD100, which comes out to a unit cost of USD10 on the associated item card.
You now accept five of them for repair, with the valuation method on the item ledger entry set to Not Valued during the posting process. Even if you later adjust the costs by using exact cost reversal, the Cost Amount (Expected) and Cost Amount (Actual) are then not filled in on the entry, only the Cost Amount (Not Valued) field is, and the unit cost entered on the related item card isn’t affected by the postings either.

For repairs, items must be sent to the relevant supplier by creating a purchase return order; the valuation method Not Valued is copied along when the entries are applied. The method also specifies that no changes must be made to the goods on the sales document that they were originally entered on (as would be the case with consigned stock).

After the repaired items are returned by the vendor, you put them away by creating a purchase order and mark the receipt posting as Not Valued.

As a last step, you ship the items back to the customer; the result of this transaction is shown in the following image:
Manage third-party property
The posting processes used for repairs also apply to items that are owned by a third party but are stored in your warehouse for other purposes.
Transfer ownership to third parties
In some industry solutions, ownership over items might change not by selling them directly to a customer but by creating a transfer order, for example, if the items are paid for much later.
They’re then still treated as being owned by a third party, although no function has been implemented to cover this exact scenario.
Convert to third-party property
You have a purchase order of 20 items with expected costs of USD200. Ten of those are shipped at a value of USD100 via a transfer order, which comes out to a unit cost of USD10 on the associated item card.

A third party agrees to buy the items to assume ownership over them. But because they’re still held by you in any case, as they were only transferred to another one of your locations, you need to post a negative and then a positive cost adjustment in the system.

Afterward, you post the item quantity again as non-valued third-party property:
Buy third-party property
Buying back items you sold is typical for handling return orders. However, because of their current status as third-party property, you first need to post a negative cost adjustment for them as well.
Revalue inventory#
If variable valuation is used, revaluation should only be possible for items that you decided to include in the value of your inventory.
As the standard app allows the revaluation of expected costs only to a limited extent, it is excluded in variable valuation to reduce complexity. This means that item ledger entries can only change in cost if the valuation method is set to Valued.
Locations and bins#
Receiving location and customer bins#
The name of the default receiving location is OFF (offsite).
Each bin at the location is named for a customer so that you can quickly identify who is in possession of the items stored in it. A bin is created automatically when you set the movement type on a sales order to Transfer.
To set up the feature:
- Open a location card.
- On the medtec365 FastTab, in the Receiving Location Code field, select the site that you want to use for transfers from this location.
- On the same tab, turn on the Auto Assign Customer Bin toggle.
This setup can be useful for a site that patients are supplied from, for example.
Post outbound transfers as inbound#
With the Auto Post Transfers toggle on a location card turned on, a receipt is posted automatically for a transfer order when the order is posted as shipped at the source location. This can be useful, for example, when you have no staff member who could confirm receipt at the destination.
Warehouse type: bins#
You can specify the following warehouse types on the Bin page:
- On Hand
- Receipt
- Shipment
- Production
- QM
You must assign a type to each bin when it is created. Picking is only performed for bins of type On Hand.
Shipping and picking: ease-of-use functions#
A page combining warehouse shipment and picking functions has been added to the app, showing you only the take lines for picks and keeping them aligned with the put-away lines.
Print pick list#
After you’ve pulled source document lines to a warehouse shipment document, you can choose Print/Send > Print Pick List on the document ribbon to print out a list of all the items that must be picked from the warehouse.
Delete shipment#
Sometimes, a warehouse shipment might need to be deleted because the customer who ordered the items no longer requires them (or, for example, an employee forgot to remove the pick code before posting the warehouse shipment).
Pick lines are automatically registered when you post a warehouse shipment, even if an error occurred during posting (for example, because of the code used for picking).
When lines are registered, the items specified on them are posted from their source bin to the default OUT warehouse bin and you can no longer see the lines on the Warehouse Shipment page.
Now, before you can delete a shipment, you need to reopen it by choosing Release > Reopen on the ribbon.
You then see a message that shows you the items that were picked and are asked if you want to move them back to their source bins. Choose Yes. You’re informed that transfer journal lines have been created (provided the Own Jnl. Template Name field is filled in for your user ID in User Setup) and are asked if you want to see the journal.
Choose Yes again to open the journal. Afterward, you’re told that the picked items will remain in the OUT bin, that is, the shipping area, unless transferred and are asked whether you want to delete the warehouse shipment.
Choosing Yes a third time deletes the shipment and the only thing left to do is to put the items back to where you want them.
Log batch for warehouse shipment#
When creating warehouse shipment, it can happen that not all documents can be gotten. In Microsoft Dynamics 365 Business Central1 Standard, no information is provided as to why a warehouse shipment could not be created.
To make this process more transparent, the documents that could not be gotten are documented in the Log batch in KUMAVISION medtec365. In this context, a distinction is made between errors and informational messages.
Setup#
To make use of the logging functionality, the report 5753 - Get Source Documents must be entered as an entry on the App Log Batch Types page.
Example:
| Code | Document Type | Description | Object Type | Object ID | Object Name |
|---|---|---|---|---|---|
| WA-ABRUF | 1 | WA abrufen | Report | 5753 | Get Source Documents |
Workflow#
In the Create Warehouse Shipment workflow, the system checks documents such as the sales order, purchase return, and transfer order. Documents that have not been retrieved are recorded in the App Log Batch. A distinction is made between errors and notifications:
Notes:
- Item not available
- Variant not available
- Complete delivery cannot be served
Error:
- Item Bocked
- Variant Blocked
- Customer Blocked
Note
If a customer is blocked, subsequent notifications such as availability, complete delivery checks, and other potential blocks cannot be determined. The determination of these subsequent notifications only takes place after the customer has been released.
When creating warehouse shipment through the document or using the Use Filter to get Src. Documents function; the App.-Log Get Source Documents is automatically opened for editing if an error or notification is present.
Alternatively, the App.-Log Get Source Documents can be opened and edited via the ribbon on the following pages: Sales Order, Transfer Order, and Purchase Return Order.
Track slow-moving inventory#
To see which of your items aren’t selling, use the general search function to open the Slow Movers page. The following actions are available on the ribbon:
| Function | Description |
|---|---|
| Refresh | Recalculates all lines. |
| Resolve | Opens the Take Action page for the selected line. |
| All Problem Items At-Risk Entries Problem Entries Follow Up Entries |
Filters the page view based on the specified value. |
Refresh: ribbon function#
This action is run to look for all open item ledger entries, that is, all entries for which a quantity remains in inventory.
One line is then created per open entry. Entries that already exist are updated; those that have been closed are deleted. Overall, the following line fields are filled in by the function:
| Field | Description |
|---|---|
| Entry No. | Specifies the number of the item ledger entry. |
| Item No. Variant Code Location Code Transaction Code |
These fields identify the item on the line and are used to calculate its quantity on hand and consumption. |
| Description Description 2 |
These fields show the description and additional description stored on the related item card. |
| Posting Date | Is filled in from the item ledger entry. |
| Sched. Consumption Code | Specifies how consumption of the item is calculated. |
| Qty. on Hand | Indicates how many items remain in storage. |
| Remaining Quantity | Is filled in from the item ledger entry. |
| Serial No. Lot No. Warranty Date Expiration Date Manufacturing Date External Lot No. |
The values in these fields are copied from the item ledger entry as well. |
| Sold Until | Is filled in with a value that the system extrapolates from the item quantity on hand and sales of the item per day. |
| Minimum Expiration Date | Is filled in according to setup. |
| Problem Item | Selected if the date shown in the Sold Until field is later than the minimum expiration date. |
| Problem Entries | Selected if there is at least one problem with the item. |
| Sales per Day | Shows the result of applying the consumption schedule. |
| Amount | Shows the remaining quantity multiplied by the unit cost. |
| Comment Comment (Whse.) |
Used to enter remarks about the item. |
| Customer Count | indicates how many customers have bought the item. You can see them by using the lookup in the field. |
| Modified By Modified On/At |
Shows by whom and when the record was last changed. |
| Follow-up By Follow-up On |
These fields are set on the Take Action page. |
| Shelf Life on Sale (Months) | Specifies, in months, the difference between the Sold Until and Minimum Expiration Date values. |
| Best-By (Sale) | Is filled in according to setup. |
| Entries at Risk | Selected if the date shown in the Best By (Sale) field is later than the minimum expiration date. |
| Statistics Main Group Statistics Group Statistics Subgroup |
These fields are filled in from the related item card. |
| CG Statistics Main Group CG Statistics Group CG Statistics Subgroup |
These fields are filled in from the related customer card. |
Colors
Lines where no problem has been encountered are displayed in green, at-risk entries in black, problematic entries in blue, and problem items in red.
Resolve: ribbon function#
Running the Resolve action opens the Take Action page for the current line.
At the top of the page, you can see detailed information about the item. You can then enter the solutions you’ve tried. You can also specify here if you want to follow up on this issue or all issues with the item and when you want to do so.
The Follow-Up Date field is copied to the line when you select an action on the page. After a date is set, you no longer see the record when you filter for problem items, for example.
Selecting the Exp-DATE-2M option on the page sets the date for following up on the issues with the item to two months before the item is shown to expire. With the Set-Multiple action, you can apply the setting to all ledger entries that are created for the item. Set-Single means that the formula applies only to the selected entry.
In the Action Reason field, you can describe the reasons for taking action, and in the Solution field, how to solve the issues you have. Choose Return here, for example, if the item should be returned to the vendor.
The remarks that you enter in the Comment and Comment (Whse) fields are shown on the Slow Movers page later. One such warehouse remark might be: “Please move to restricted location.”
Note
The Follow-up Date field is only used to deal with issues arising from slow-moving inventory and isn’t part of the medtec365 follow-up feature described elsewhere in these articles.
Pick from multiple orders#
You can now set filters to combine picks for multiple shipments, which will help you save time and optimize your pick paths.
Before you can work with this feature, however, you must set up multiple warehouse shipments and register picks for them in the system.
You then use the general search function to open a new pick worksheet and choose Get Multi-Order Lines on the ribbon. On the request page, you can set the maximum number of lines that a shipment can have for it to be included in multi-order picking. This ensures, for example, that a large outbound delivery isn’t split up before leaving your warehouse. Additionally, you can specify if you want to pick items not only from warehouse shipments but also from production or assembly orders.
As a next step, choose OK so that the system can copy all lines that a pick document hasn’t been printed for to the worksheet. Following retrieval, you need to select the Include in MOP checkbox on the lines that you want included in the multi-order pick process.
Note
If you exclude a certain sales line from the multi-order pick, the other lines of the sales order will be excluded from it as well.
Afterward, choose Create Multi-Order Pick on the ribbon. You can make a variety of settings on the request page of this function to customize the new pick documents to suit your needs, as described in the following table.
| Option | Function |
|---|---|
| Per Whse. Document | Creates pick documents for worksheet lines with the same warehouse source document. |
| Per Cust./Vend./Loc. | Creates pick documents for each customer, vendor, and location. |
| Per Item | Creates pick documents for each item on the pick worksheet. |
| Per From Zone | Creates pick documents for each zone. Note This function is only used for directed pick and put-away. |
| Per Bin | Creates pick documents for each bin. |
| Per Due Date | Creates pick documents for source documents that have the same due date. |
| Max. No. of Pick Lines | Creates pick documents that have no more than the specified number of lines on each document. |
| Max. No. of Pick Source Docs. | Creates pick documents that each cover no more than the specified number of source documents. |
| Assigned User ID | Creates pick documents only for worksheet lines that are assigned to the selected warehouse employee. |
| Sorting Method for Pick Lines | Specifies how the created pick documents should be sorted. |
| Print Pick Document | Prints the pick documents created by the multi-order pick. |
Note
Pick lines where the Include in MOP field has been cleared must be processed manually on the pick worksheet.
After the picks have been created and the pick documents printed, you can continue with picking, packing, and posting the shipment in the usual way.